Author Topic: mattneck - mk2 ryder  (Read 63285 times)

Offline mattneck(Beavis)

  • I live here
  • *****
  • Posts: 1,909
  • Bristol's Own (DJ) Beavis ;-)
Re: mattneck - mk2 ryder
« Reply #70 on: 06 October 2007, 22:26 »
Next thing wasto FINALLY get round to checking out my new wheels on the car, a good chance when I had a 14.4v impact gun. TSW Omegas with a polished lip and black facing, am hoping to get 4 flat silver centre caps machines to fit them to, oh and downgrade from 205/55 baloons to 195/50 tyres.  :smiley:


Sig Removed. No Longer Applicable. New Sig? Nah. Not Yet..

Quote
Sharpo says: (16:57:39)
to be honest i dont doubt that half ggti users have a shortcut on their desktop for sharpie's last posts

Offline mattneck(Beavis)

  • I live here
  • *****
  • Posts: 1,909
  • Bristol's Own (DJ) Beavis ;-)
Re: mattneck - mk2 ryder
« Reply #71 on: 06 October 2007, 22:37 »
A couple of other jobs also completed recently, a GTI front ARB fitted just to reduce the roll and make the car feel a lot safer and stable.

Bought for £10 from Ben Mew, blasted for £10, powdercoated gloss black for another £10 then rigged up with brand new eyelets, bushes, bolts and pipe clips.

It's fair to say the whole thing really does feel a lot more stable and tight. Drives like you would expect a normal car to now!


Finally also got round to swapping my cambelt and water pump. Also while everything was apart swapped the cam oil seal and tappets as they had been getitng quite tappy, even after a day of non-driving. One problem encountered, wrong design of cambelt. I had a round tooth profile belt and pump when I actually needed a square one, so had to push the car out of the lockup plot onto the road, rush to work on my bike to swap it come back and bash the lot back together. Doh!

Remembered I needed to soak the tappets upside down in oil overnight. So that got done in Quantum using TQ OE Tappets.


Also finally got round after fitting my VDOs to the car, have picked up a 4-door electric window setup. Got a console cheap off a mate and proceeded to ahve a go at grafting the spare gauge panel into the console. Firs tI cut the gap and placed it on, this show there to be a lip which was causing the switches to jam in place when pushed down.


Instead I decided to drop some more plastic out from behind the console, which meant I could mount it further forward bringing it inline with the electric winow section above.


I then proceeded to test fit 2 random switches I had lying around combined with my set of gauges. The weight and pull of the gauges currently is too much. Admitted I only used bathroom silicone seal to locate the panel, so now i can remove a bit at a time and use plastic weld paste in place, which is both black and able to take the pressure.


 :smiley:
Sig Removed. No Longer Applicable. New Sig? Nah. Not Yet..

Quote
Sharpo says: (16:57:39)
to be honest i dont doubt that half ggti users have a shortcut on their desktop for sharpie's last posts

Offline mattneck(Beavis)

  • I live here
  • *****
  • Posts: 1,909
  • Bristol's Own (DJ) Beavis ;-)
Re: mattneck - mk2 ryder
« Reply #72 on: 22 October 2007, 21:59 »
Thought Id bring this forward in the thread.. and update it with a few things and that!

Anytihng completes striked out as ive forgot dates ETC lol. although needto photo a fair few things.

Work to be Done:

Engine
-Cambelt
-Camshaft Oil Seal (added 24/5/07)
-Waterpump

-PreHeater Gasket (added 30/05/07)
-Sump Gasket
-Breather T Hose (rocker to breather assembly to replace) (added 30/05/07) (sorted august 07)
-Oil Seperator (replace) (added 30/05/07) (sorted august 07)
-Oil Seperator to Airbox pipe (Replace) (added 30/05/07) (sorted august 07)
-Clean out breather assembly if gause intact, otherwise replace! (added 30/05/07)

-Sump Pan (think the edges have deteriorated, apparently the small engines sumps used to go like hotcakes) (added 24/5/07)

Drivers Window
-Guide Felt (sorted august 07, but rocking is actually in the regulator)


Alternator
-Swap Mount to Golf Mount (swapped over thu 20th sept)
-Clean Earth Points Around Bay
-Replace regulator and Brushes.. (Possibly causing battery to drain at speed - 2/3days - output from alternator may not be all that..) (new huco one sourced for valeo alternator after bosch's stud and insulating block broke) (lights on dash and headlights now when idle is hunting, are visually flashing and dipping!?)

Sunroof
-Deflector Plate (Rub and Paint)
-Seal (added 05/06/07)

After Accident (to be done to return to previous state (added 24/5/07))
-Fit New Slam Panel

Doors
-Rip plates, aka Slimjim Plates (added 30/05/07)[/b]


This is what remains of the original list, but a few additions are going to be made..

-Powdercoating of a slam panel and rocker, (arb gone to coaters.. slam and rocker still to go)
-New exhaust manifold heat deflector, (tidyed up the bay)
-Fit the motors to headlights and fit them, (need extra adjusters for conversion still)
-Have been attempting to clean the grease from my spotlights, (washed out nicely)
-Fit VDOs in new centre console minus ashtray, (looomed up cut and fitted with m1 gauge schackles to retain the gauges and panel)
-Fit new drivers door trim without damaged seal, (cut off damaged part, and door tirm fits flush)
-Oil temp sender needs fitting (sump bolt replacement one) (fitted at last service in august)
-Oil pressure dual sender has gone in.. (all gauge parts fitted and working)
-Maybe a 5dr OEM central locking system as I've sourced one.. (sone mid august, 5dr to 5dr direct swap except the boot mech as i already have the solonoid pop)


So got through a fair bit so far.. Now for the new list with a pile of additions I've come up with.. :grin:
« Last Edit: 22 November 2007, 23:44 by mattneck(Beavis) »
Sig Removed. No Longer Applicable. New Sig? Nah. Not Yet..

Quote
Sharpo says: (16:57:39)
to be honest i dont doubt that half ggti users have a shortcut on their desktop for sharpie's last posts

Offline mattneck(Beavis)

  • I live here
  • *****
  • Posts: 1,909
  • Bristol's Own (DJ) Beavis ;-)
Re: mattneck - mk2 ryder
« Reply #73 on: 22 October 2007, 22:58 »
Work to be Done:

Engine

-Sump Gasket
-Sump Pan (think the edges have deteriorated, apparently the small engines sumps used to go like hotcakes) (added 24/5/07)

Sunroof
-Deflector Plate (Rub and Paint)
-Seal (added 05/06/07)

After Accident (to be done to return to previous state (added 24/5/07))
-Fit New Slam Panel (have to see if this is really worth it after all.. All jobs once I get my garage back!)

Random list..
-Is the front passenger side leaning down lower? Hit a large bump a while ago and have wondered ever since, spring shifted maybe? Going to have to get the tape measure out.
-Fit the motors to headlights and fit them, (need extra adjusters for conversion still)

-Fit rear inside door handles to front, cleaner less scratched
-Front door check straps may be worn, swap for rears as less used doors

-Radiator bottom hose has wear to the outside atm, bit roughed up, don't want it splitting, replace.
-Expansion tank - needs a clean so I can actually see the level through it for one, and the braided hose needs replacing as it's tatty.

-Petrol flap central locking to fit
-Carpet the back of the rear seat, to match the boot and tidy it up? Maybe follow suit across the boot and lock lip?
-A possible cross hairing of the standard headlights?
-Sunvisor with vanity light to adapt and wire in (LHD one needs adapting to RHD)
-Relocate cig lighter onto passenger side of centre console.
-Braided brake hoses?
-Get dents sorted, mainly passenger side rear door
-Get a VW1300 badge form a beetle - forgot to buy one at Bristol Volksfest till after, want to add this to my battery cover as a little bit of detailing..

-Oh almost forgot to.. Scirocco sunroof for Tilt & Slide. Needs stripping down cleaning and fully regreasing. Panel also requires stripping and repainting (currently red) and inside panel requires retrimming as it's a state and also doesn't match, doh!

-Heated seat pads to fit when arrive, combine with machine washing all seat cloth (fitted Nov 9, didn't wash the seats, everything went too well witohut stripping it right down so kept it that way!
-Fit Sunroof loom to switch and FB (all fitted oct 4)
-Fit VDO wiring back in, after finishing console adaptation. (Refitted, and now running Sunroof switch illumination on same loom. Need to high build primer and matt black the consoles panel now though to level it up and look tidy.)
-Swap rear bumper but leave wiring in for tow bar if ever needed, have a non tow bar bumper sat out back. (Done the night before Oxford Edition ready for the show!)
-Fit new sunroof cover over motor. (fitted oct 5th, a huge thanks to bomp for that, still requires some slight editing inside to sit flush but itll get there!)
-Buy a white rear pressed plate to match the car's black and white monotone theme (not to run daily though - too paranoid of £30 fine lol) (Bought one at Oxford Edition - total impulse buy in the end as I was really unsure.. But it looked top draw when it was on there!)
EDIT: Fit mint condition bonnet that has been sat in back garden for way too long now, and put old one in garage till I work out a plan of attack. It's got a few punched in dents on that arent pullable and someones splodged touch up in.. The new ones mint and cos a fiver so hey ho  :cool: (Fitted this the wednesday before Oxford Edition ready to look a bit shiny and spankers on the club 'stand'!)
-Check the under carpet lining? Maybe replace, as it holds moisture I don't want corrosion.. Replace with something more durable and less worn. (It's all good..)
-Electric/heated mirrors - install. (Finally fitted! Looming to the passenger door was a bugger such a small gap to fit through..! Good fun they are now fitted though)
-Sort drivers side mirror - check if door skin is damaged after somebody kicked underside of mirror bending it up (was actually the mirror damaged, doh)

-Create a bracket or adapt fuel vapouriser/swirl pot bracket from pierburg to fit for return line not featured on Weber (currently fitted with cable ties holding it to the fuel pump! Has improved the running and made the whole flow a lot smoother)
-GK Inlet manifold for larger/matching bore to head? (Has arrived, is being cleaned by my mate at work in the parts cleaner and will then be fitted most likely with a shaved hedgehog for improved flow..)
-Electric windows to install now they have arrived and are now all fitted
-Rear quarter windows - one is on the wrong side, and is green tint, one is a pilkington window. Have one to replace the green glass so far, will replace the seals at the same time. (Have replaced the green one, but not the pilkington, that one will wait! It doesn't look as odd!)

Alternator
-Replace regulator and Brushes.. (Possibly causing battery to drain at speed - 2/3days - output from alternator may not be all that..) (new huco one sourced for valeo alternator after bosch's stud and insulating block broke) (also now have a problem where all the lights on dash and headlights etc are flickering and dipping etc in tune with the res flying up and down when cold-ish..!?) (Rebuilt the original bosch one now, see page 9!)

-Colour code armour door plates alpine white to make them blend in a bit more, subtle touch. (tried with rattle can, really didn't work out!)
-PreHeater Gasket fitted when inlet and everything was apart
-Find a new top plate for the carb and fit it with studs so I can spin nuts onto them instead of cutting into the alloy of the carb each time, and losing the thread again. cost me £85 but I rebuilt the whole thing heheh
-Powdercoating of a rocker Looks wicked.
-Going to get the headlight frames blasted and powdered just for that extra little neat touch, then rig them up with the motors TYip thats done
-Blast and powder the air cleaner lid once again - the top of the carb had lost it's thread so it's been rubbing on the underside of the bonnet. (Turns out the bonnets sunk at the back, brackets possibly loose?)


That's it for now.. Time to stop thinking and start working!

 :grin:
« Last Edit: 18 February 2008, 17:50 by mattneck(Beavis) »
Sig Removed. No Longer Applicable. New Sig? Nah. Not Yet..

Quote
Sharpo says: (16:57:39)
to be honest i dont doubt that half ggti users have a shortcut on their desktop for sharpie's last posts

Offline mattneck(Beavis)

  • I live here
  • *****
  • Posts: 1,909
  • Bristol's Own (DJ) Beavis ;-)
Re: mattneck - mk2 ryder
« Reply #74 on: 26 October 2007, 01:05 »
So Bomp hasmade me a flush sunroof motor cover. which is much appreciated and I owe him one (now its in writing, officially.. lol)

Its require a bit of sanding out to make the farthest back microswitch fit inside, luckily te resins thick enough.. a tiny bit more rubbing out and itll be there flush.

Heres the cover, in place over the motor..


And heres the switch lit up in the centre console, the window switches arent wired in yet admittedly though so they arentilluminated. but i created the loom for this from scratch and managed to hook in illumination to my VDO gauge loom  :smiley: Excuse the shakes, it was a slow shutter!


Also completely by chance withoutt hinking about it noticed my door was out of line, drivers rear,its always been horrible to open. New handles new lock blocks, notihng has sorted it, the alignmenet never really came to mine, till i noticed the top corner to be completely off, the top of the door next to front door is small and flares out to the bottom being quite large and stepped out.. Bet have a look at the hinges asap..


« Last Edit: 26 October 2007, 11:27 by mattneck »
Sig Removed. No Longer Applicable. New Sig? Nah. Not Yet..

Quote
Sharpo says: (16:57:39)
to be honest i dont doubt that half ggti users have a shortcut on their desktop for sharpie's last posts

Offline mattneck(Beavis)

  • I live here
  • *****
  • Posts: 1,909
  • Bristol's Own (DJ) Beavis ;-)
Re: mattneck - mk2 ryder
« Reply #75 on: 01 November 2007, 21:26 »
It's been an eventful week. In a nutshell first regarding the TSW Omegas.. The fitment, and the aftermath..

Saturday: Get 195/50's fitted. Rubs in certain spots on all 4 corners. Visible dodgy Toe up front both sides, visible dodgy camber both sides, and an odd angle to the drivers rear wheel. This being the corner that previously took damage before I owned it. The drivers side tyre also sitting 10mm or so closer to the arch, turns out to be with fixed stub still the same, hinting towards rear beam bushes being done and beam replaced off key (becomes only corner to rub with 195/50s once proper camber is taken into consideration)..

Monday: 4 wheel alignment check. Rear toe on driver’s side, toe-in like crazy. Verdict - bent stub axle. Rest of the work couldn't be sorted though, they had broke 2 wobbly sockets in the past couple of days, and have lost out on the business all week.. Hopefully should have it in this week though. Source new stub axle, attempt to remove old one. One bolt remains. Go home annoyed with it. Attempt again, that evening, all comes off, all goes back together. Drum goes on, outer bearing goes o..No it doesn’t. The stubs been machined wrong. Revert back to old. Finished more annoyed.

Tuesday: get a letter saying we have to pay £40 to get my and rubjonnys combined parcel from Canada. Great. Return the stub axle, find out its been returned before. I did wonder why there were traces of grease in the end of it, to. Get a new one; try a brand new bearing on each one, fits replacement, wont fit originally given one. Our survey says Errerr. Get home Tuesday, undo everything in 10 minutes, get to bolt No. 4 on the back plate and spend 30minutes on it. Eventually get it out new one goes in, old one visibly warped on the base, and stub standing wonky. Get bolts back on, drum kind of goes on, gets stuck, bearing goes on wonky, oil seal has to be ripped out to refit drum, new oil seal now needed but bearing eventually got straightened up.

Dodgy Stub:


Wednesday: go and get another check done, this time rear is perfect. Front proves to be cambering to the positive massively, and toe all over the place. Highly recommend to anyone in Bristol or nearby Pro-Tyre in Lawrence Hill.. Top bunch of lads there, let me have my check free as still no tool sourced, but the boss said to me I know you'll be back for it, and we'll ring you to get in first when the tool arrives. Bolted on the fresh bonnet, that had no dips or anything detrimental on it. Few deep chips out of it unfortunately but very small, look like flakes of dirt lol. Neil mops/glazes car, comes back covered in res but shines showing

Report:


Thursday: Getting ready for OE show. Wash and wax car, comes up nice.. Remove blue pinstripe around grille that was colour coded to the side stripes.. Looks loads better. AutoGlym Super resin polish - polish whole car, whilst that’s going off black front bumper, grille, and tow eye cover, then buff off polish. Coat once again with hand glaze.. Horrible to buff off, very greasy and hard to work out completely but well worth it.. Farecla stuff, recommended. Shine shows nicely but condensation starts setting in so fighting a losing battle, Kiwi all side strips off car, refit once dry, and give exhaust tip a little bit of autosol polishing.. Looking sharp. Parcel arrives finally to! After waiting in all day for it! Still to go - Kiwi and replace rear OEM tow bar iron bumper with non tow, leave wring installed for possible revert. Kiwi boot grab handle. Clean up drivers seat (couple of splodged on stains) get tyres shined in black, have refitted all Ryder standard trimmings, looks a lot better for it! Clean glass and vac and she'll be ready to roll..

Nothing to really report on the parcel, some nice items though, a full heated seat setup (Pads, loom, relays, Passat switch but the guy has promised me a Mk2 on which I believe he has just found! and a LHD Mk2 Sunvisor with vanity light, a possible bodge into another visor to be thought through..


That's it for now, no exterior valet shots yet.. Not till it’s completed!  :grin:

« Last Edit: 01 November 2007, 21:28 by mattneck »
Sig Removed. No Longer Applicable. New Sig? Nah. Not Yet..

Quote
Sharpo says: (16:57:39)
to be honest i dont doubt that half ggti users have a shortcut on their desktop for sharpie's last posts

Offline mattneck(Beavis)

  • I live here
  • *****
  • Posts: 1,909
  • Bristol's Own (DJ) Beavis ;-)
Re: mattneck - mk2 ryder
« Reply #76 on: 10 November 2007, 18:46 »
Bit backwards in the order now.. But fitted the heated seats this week - was suprised by hoe easy everything worked out and went together!

This is what it all comes to visually, admittedly the wrong one and sitting proud ATM but that's due to me getitng it stuck as one of the metal locating clips on the back had bent and caused me to have to remove the dash surround to remove it!


So the fun starts!

Job 1: Fit Loom.

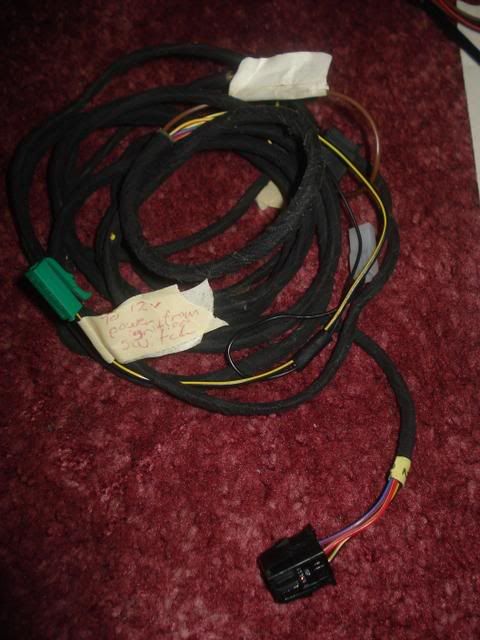
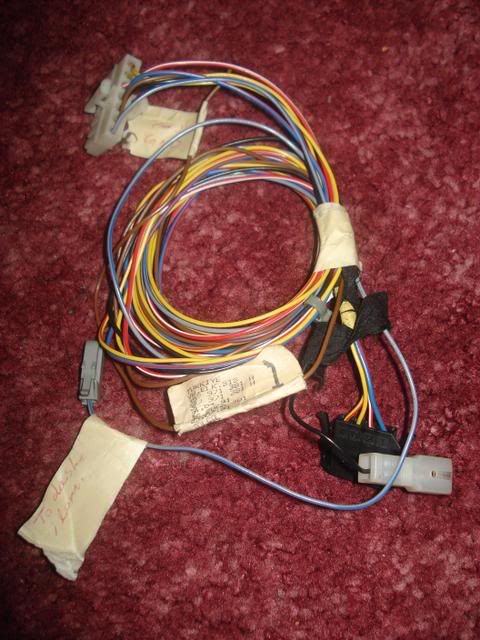
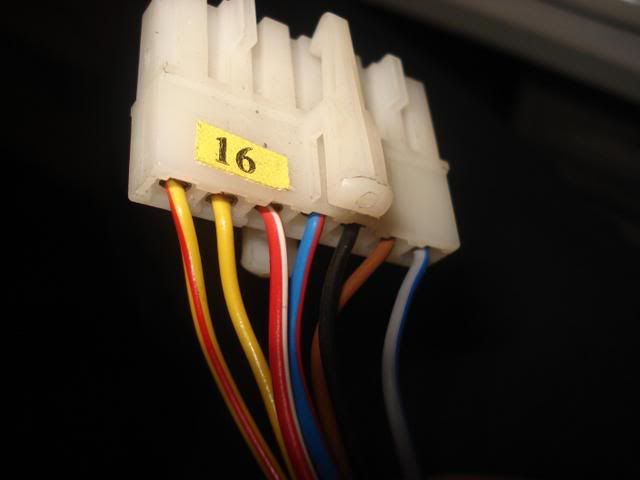
So this is the loom which needed to go in, at one end is an earth, a 4 pin plug which goes onto the switch, a single white plug with a 12v line and another 12v line (this is a loom from a Mk3 so has junction box plugs. To run this in, I took off the sill trim, lifted the carpet, removed the front seats, undid the screws for bonnet release, dropped the fusebox from its bracket, pulled back the door seal and flicked off the plastic holding the carpet up, making it possible to lay the length of the loom into place. Refitting is a reversal of removal. Along the loom then I had 2 conenction,s one to pull out below drivers seat, one below passenger, this was fed directly across, and the 2 flying leads put through the cuts in carpet and holes where the seat runner guides through.

Loom:


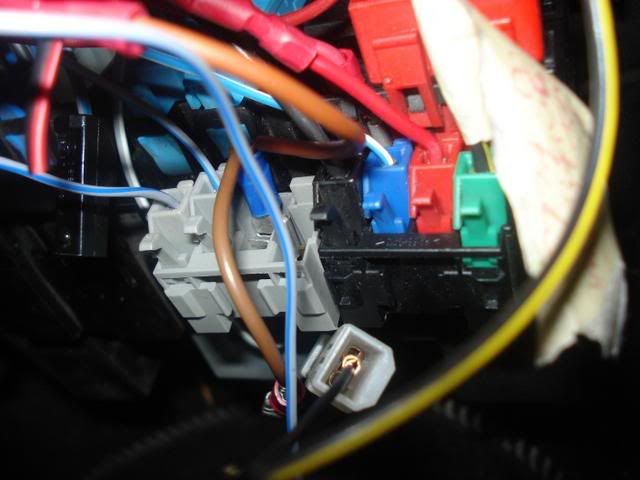
Junction Boxes fitted (made some extra little adapters so I could run my gauge feed and sunroof motor feed etc off of these, making it both tidyer and more sensible.. and OEM+  :grin:


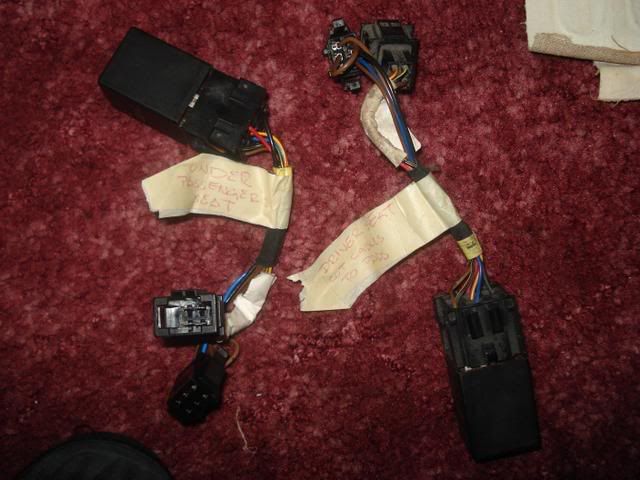
Job 2: Fit pads to seats.

So for this follow the standard procedure to strip a seat. Turn the seat upside down, undid the wire at each end, lifted the 2 tabs in the middle, pulled the ins pout, lifted the foam base and rolled the cover back. Undid the crossbar in the seat to give more flexibility and room to get my wrist through with the pad. Slid the pad into place and pulled the wire out through the back corner so it was hanging free. Refitting is a reversal of removal.
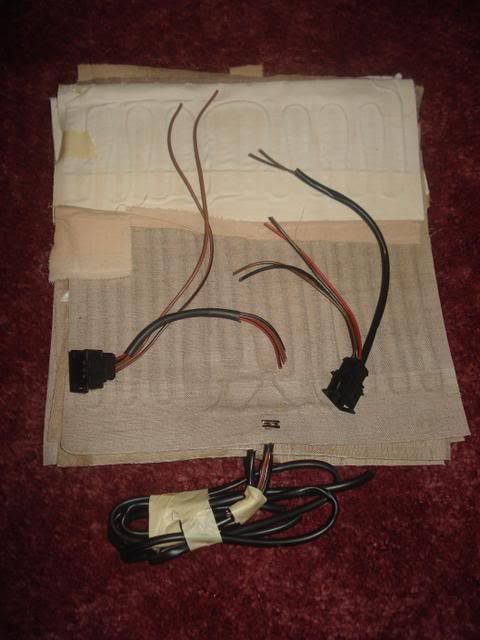
Again this follows the same trend with the backrest, lifting the 4 clips along the base, then rolling the cover up the seat, sliding the pad in, cable down below and wrapping the cover back, down around. This left the 2 bare wires hanging ready to be connected to the relay plugs. To do this I used bullet connectors between the 2 after stripping the ends, then hid the relays and loom up in the underside of the seats.

Pads and Plugs:


Job 3: Fit Relays and complete plumbing in of switch loom.

To do this I used bullet connectors between the 2 after stripping the ends, then hid the relays and loom up in the underside of the seats. the relays have a 6 pin and a 4 pin plug hanging from their bases and sue a relay number 59.

Relays:


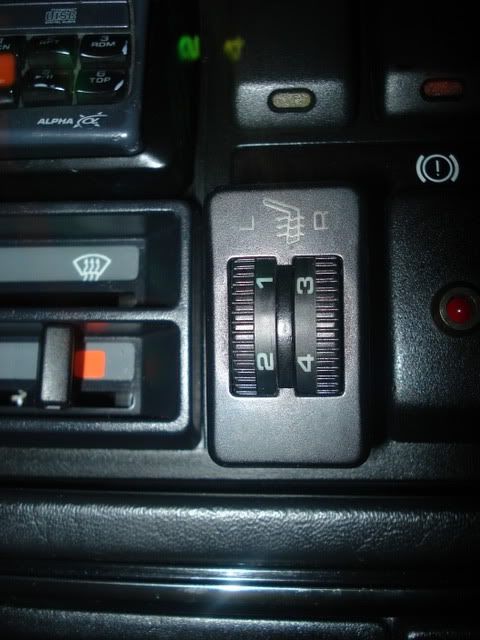
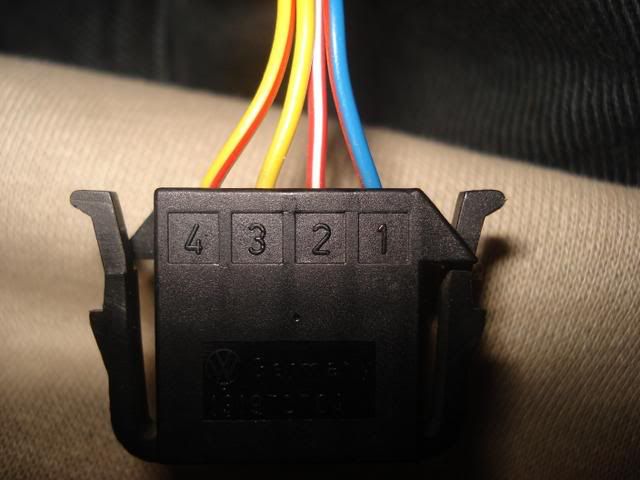
To plumb i the switch loom, I routed itbelow the dash across below the clocks to the factory dash location, currently using a passat switch which will soon be replaced with an OEM Mk2 double dial switch.

Switch Loom, with dash illumination, link to 12V line on main loom, earth, 7 pin plug to dash switch and 4 pin plug onto main loom.


One all fitted, I realised whilst driving to work I had turned on the heat for the left hand seat (apparently) Yyet I was getting nothing, than gave it a moments tohught, touched the passenger seat and realised, It's a LHD loom. So the far end plug was classed as left.. passenger, and everything was in reverse to the switch.

Graphic representation:


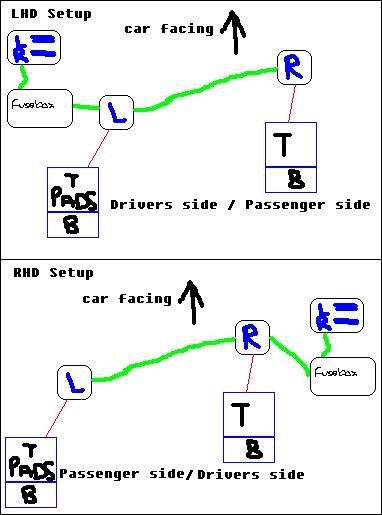
Bentley Loom diagram shows where everything is routed, proving swapping of just 4 wires will make it possible to make the dials work as if it were a RHD loom.. Which it basically is with the swap.


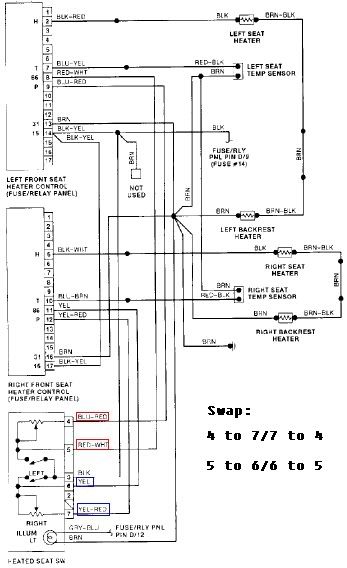
These are the wires at the plug which when swapped, will put the signals to the correct sides.
1 is Dash illumination, 2 is Earth, 3 is 12v, 4 and 5 are one side, 6 and 7 the other. These are the ones to be swapped around (4 and 7, 5 and 6) whilst remaining the same at the other end as to send the correct signal and keep the wiring continuity, changing at the switch is the best point.

Switch plug:


Joining main loom:


Until I ge tthe tool form VW for doing these plugs, I've given up, a needle and watchmakers screwdrivers have been attempted and I've not managed with both, even tohugh I have previously! Buying the tool (VAS1978-4A) will make it a 2 minute job and I can keep it for the future  :smiley:
« Last Edit: 10 November 2007, 21:41 by mattneck(Beavis) »
Sig Removed. No Longer Applicable. New Sig? Nah. Not Yet..

Quote
Sharpo says: (16:57:39)
to be honest i dont doubt that half ggti users have a shortcut on their desktop for sharpie's last posts

Offline mattneck(Beavis)

  • I live here
  • *****
  • Posts: 1,909
  • Bristol's Own (DJ) Beavis ;-)
Re: mattneck - mk2 ryder
« Reply #77 on: 18 November 2007, 23:28 »
Just a brief update to bring my photo collection up to date on here..

Have ended up with a new steering wheel lying around, from a polo..


Picked up the white palte for the rear for shows at oxford edition..


At which i also had my my genuine motorsport gearknob fitted for that extra show piece..


Artsy photos on the way home..


finally started working on the sunvisor, stripped it down, flipped the mirror so it will be on the correct side, now jsut to work on a trimming idea.. possibly using the chunkier vinyl headlining that came in some golfs.. cut a alrge enough piece to fold it all over and together?


Finally got a nice new oil breather fitted, got this done by the workshop linked with the parts place i work for, should aid the engine and reduce some crankcase pressure, stop oil pushing out all the seals it can..


Also finally got on the case of a fuel vapour seperator, so the carby has a return line back to the tank etc.

Blank return, carb doesnt have one standardly..


Fuel vapour seperator, fresh from pierburg keping it OE haha..


Also got my electric window setup through, so far have alid the loom out to check how it all goes together and that, found that some of the wiring at the fusebox end was missing and the fuse was gone to, managed to source them from an ibiza at the scrapper for £10 and have wired it all up together, ready to fit now, but just have to find the time aongst the miserable weather!


My Ml2 heated seat switch also arrived, but the bulb in it is extremely dim, maplins do one the same, a green one, which is a tiny bit larger but should still be workable as currently it looks like it doesnt even come on, although it does, extremely dim! Nothing else to report until the mirrors and windows go in.. mirrors likely to go in first though considering the looms :grin:

:smiley:
Sig Removed. No Longer Applicable. New Sig? Nah. Not Yet..

Quote
Sharpo says: (16:57:39)
to be honest i dont doubt that half ggti users have a shortcut on their desktop for sharpie's last posts

Offline mattneck(Beavis)

  • I live here
  • *****
  • Posts: 1,909
  • Bristol's Own (DJ) Beavis ;-)
Re: mattneck - mk2 ryder
« Reply #78 on: 03 December 2007, 17:54 »
Well, nothing really in the way of pictures right now but they'll be added..

So the heated seat pads went in, these turned out to be pretty easy to do, literally a case of pulling the wire at each end lifting the cover and releasing one of the crossbars, and sliding the pad in and through. Didn't take long at all, just need a way to keep relay and loom safe under seat now! Wiring loom was also pretty easy and pretty basic.. so that got plumbed in pretty fast.

Next up my Mk2 switch arrived which looks even better in my dash now  :cool:

Heated and electric mirrors have been fitted.. Still not had a chance to use the heating, one evening I'm asked if I've fited them, next morning theres frost.. sod's law i fit them that night and ever since there's been nothing. Have also devised a second loom to run the heated mirrors independent of the rear screen, so as not to waste energy running both when not needed.  :smiley: This jsut needs pieceing together still but once done should work wel. Did ahve the aim of getitng a Transporter T3 Switch form the early 90s which had the heated mirror image on, stood the right way for a mk2 dash but was a corrado style texture unfortunately. Ordered hta totld it would be here the enxt day, only to have to clal anda sk where it had disapeered and then be called back 10 minutes later to be told it's back porder. Grr. Got a volvo switch the the mirror graphic on reay to chop and graft into a mk2 one  :smiley:

Fitted the Olo steering wheel for a test run, very strange as it's slightly smaller. But does look quite sporty.

Also manage to get the electric windows in, on 3 doors so far. The drivers rear is still remaining as I ahve a replacement piece of glas for the rear quarter I'm going to fit, so no longer will I have a single piece of greeen tint glass, on the wrong side, with the etching on the outside. And I'll ahve all 4 doors electric  :smiley: Not tat I ever really have people in the back.. Piced up an OE window switch new today from work as well, so now all 4 not jsut 3 of the window switches match the sunroofs switches full illumination, looks 100x better  :smiley:

Couple more ideas being toyed with - the definate: colour code armour door plates.. the possible: paint GK inlet manifold silver before fitting and maybe fit 3 orange LEDs below my VDO gauges as if the orange behind them is dissapating downward, but also this will have use.. Lighting up my Fischer CD box so I can see what CD i'm pulling in the dark  :grin:

Time to get on with it then  :smiley:
Sig Removed. No Longer Applicable. New Sig? Nah. Not Yet..

Quote
Sharpo says: (16:57:39)
to be honest i dont doubt that half ggti users have a shortcut on their desktop for sharpie's last posts

Offline mattneck(Beavis)

  • I live here
  • *****
  • Posts: 1,909
  • Bristol's Own (DJ) Beavis ;-)
Re: mattneck - mk2 ryder
« Reply #79 on: 28 December 2007, 20:10 »
Right then, as my old alternator ahd been lying around for so long I decided to have a crack at rebuilding it.. And this is what it entailed!

So this is the alternator as it was. mounted in the car, before attempting to change the regulator due to slack charging, and even slacker power on idle.. dipping lights etc. The regulator was ruined so out it came and the other one in, cue a lot of hassle getting it back together though, and the insulating part broke so it kept earthing out. Lucky I had my old alternator here so that went on.


first out were the through screws, the condensor came off, the voltage regulator out and the fan wheel off.. I took it to the garage below my work and got the nut buzzed off with an air gun, the easiest way.


After getting the 4th screw drilled out due to it being bent after the alternator had been dropped, I split the casign and ended up being presented with this, the rotor in the drive end casing and the NDE casing split from this.


To remove the rotos, removal of the woofruff key is required first. Then the rotor can be pressed from the bearing, the thrust washer removed, then the plate holdign the bearing in removed by the 2 scres, and the bearing pushed out from the casing. As can be seen you can only access the plate screws after the rotor is removed.


At the other end the diode pack and coil can be removed by removing the 2 screws holding it into the casing, on this is where the stud had broken, I've since found some fibre washers I'll use as insulation do didn't remove the stud and replace it, also a pole to plug repair kit is available I'm looking at trying out.


Next up I removed the bearing from the end of the rotor from the NDE, and drifted a new one back on using the old bearing as a drift. the bearings have nubmers marked on around the outside denoting what they are and these seem to vary depending on size of alternator. 6201xx xx denoting a lettercode seems to be a general rule of thumb to the style they are.


I then proceeded as I could do nothing more at this point, to wire brush all the casings, the fan wheel and the edge of the coil. And paint the lot, silver alt, colourcoded fan and coil strip.


Then, put everything back together and voila. 4 new through screws are going to be ordered, as the rust ones don;t look the greatest. Oh and it's back tgoether correctly now, in the picture it's currently 90degrees out after it span on the bearing when clamping it down.


So that'll be fitted soon, when I can stop the leak from the oil gallery coming slowly through my headgasket, common on small blocks so I'm told! Just don't want this one getting too mucky though  :smiley:
Sig Removed. No Longer Applicable. New Sig? Nah. Not Yet..

Quote
Sharpo says: (16:57:39)
to be honest i dont doubt that half ggti users have a shortcut on their desktop for sharpie's last posts