Author Topic: mattneck - mk2 ryder  (Read 64111 times)

Offline mattneck(Beavis)

  • I live here
  • *****
  • Posts: 1,909
  • Bristol's Own (DJ) Beavis ;-)
Re: mattneck - mk2 ryder
« Reply #30 on: 12 December 2006, 23:23 »
So after a full morning of phoning around every small garage I could find who I thought would possibly be able to help me and rent me a ramp for an hour so I can fit the exhaust onto my car that I bought.. to no avail, so I decide to go it alone on the side of the road, only to find out alter when passing by a garage I had visited to see if he could weld the hole in my front silencer, he said to me "you didn't ring me did you" no, cause i couldn't find you in the yellow pages or anything, grr!


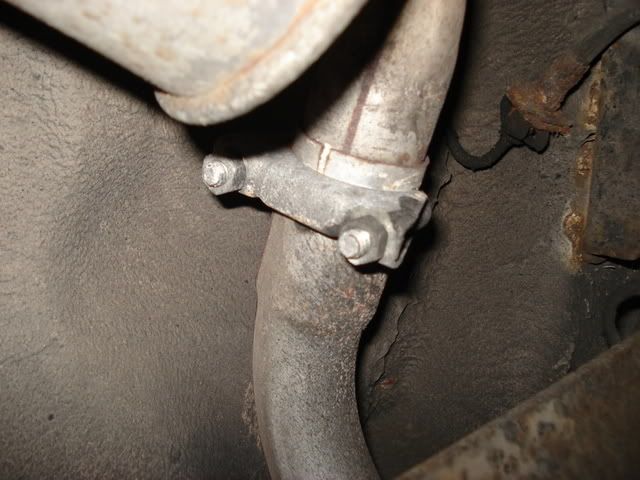
so these were the clamps sat on the pipes, they were unbelievably easy to remove, kind of loose infact, and i think it must have been leaking form everywhere, as there wasnt very much assembly paste if any in there, it literally slid off easy..


added to the dodgy rubber mounts that were on there, same as the previous one these were again originals, and didnt come away easy, i had to remove the entire metal mount and then unthread that from the rubber, refitting is a reversal of removal heh heh


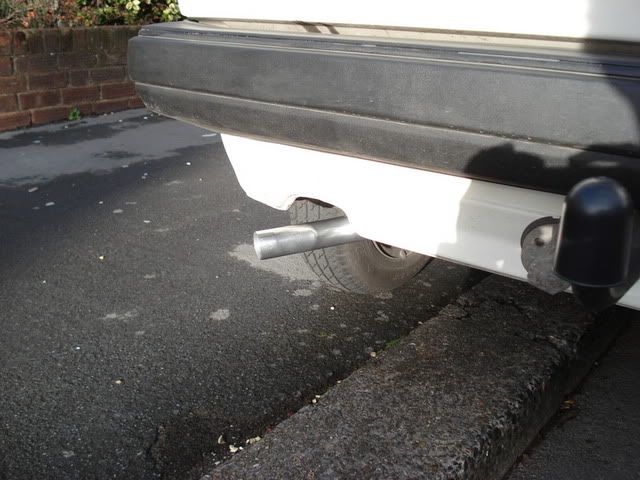
admittedly once i got into installing it, as i was on my bike under the car with about a foot of working space, the pictures just didn't happen, dirty hands and covered in paste, i didn't dare touch the camera but this was how it was looking on the day, one nicely polished tailpipe sticking out the rear..


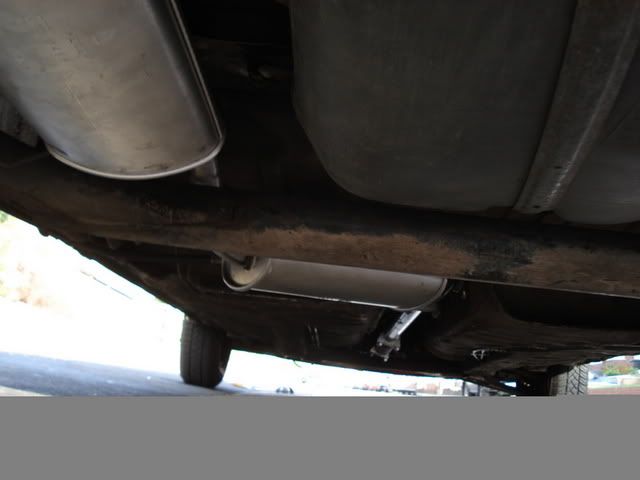
and just a quick shot taken form the rear end looking under at the new system, looks odd, brand new, compared to the rusty brown colour of the old which matched the rest of the bits!


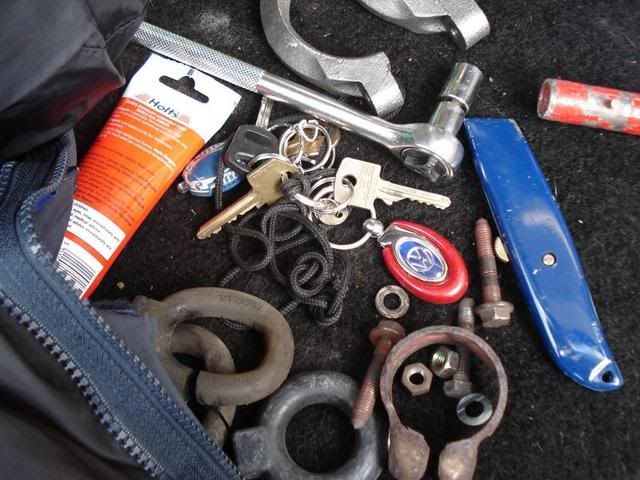
a random shot of the bits left over, i literally had to cut through the rubber mounts to remove them, last time using a saw in a pen knife, this time a stanley which was nowhere near as easy, but easier than trying to remove the bloody things at least..


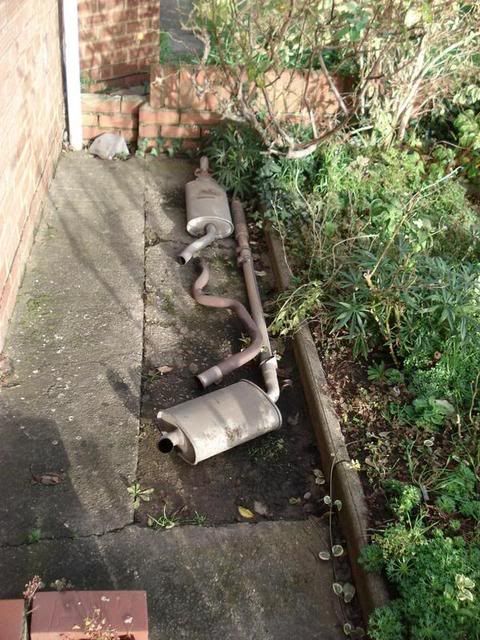
the old exhaust system, luckily easy to remove by only splitting 2 joints, at first i couldnt remove the corrugated/intermediate/box from the downpipe, so had to stick 2 feet on the box and push hard, and bang it popped out, on top of me admittedly but at least it was done..


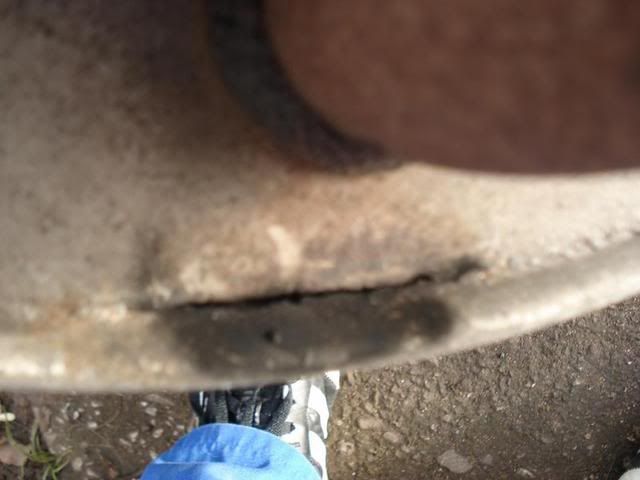
another shot of the hole in the midbox, where it was blowing form majorly, and cause hell of a noise, not in the way of an exhaust made for noise either ;)


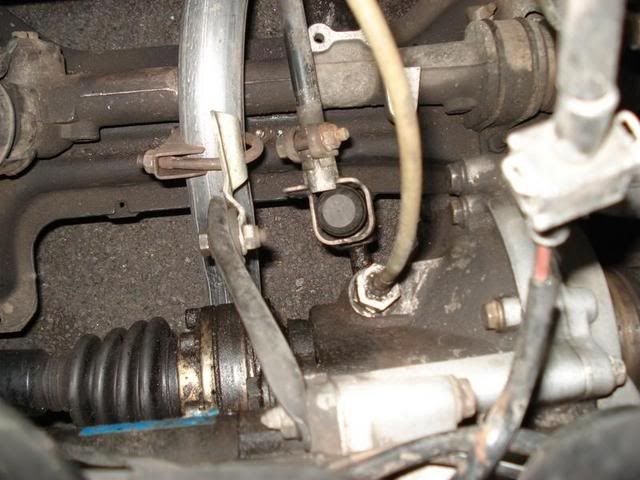
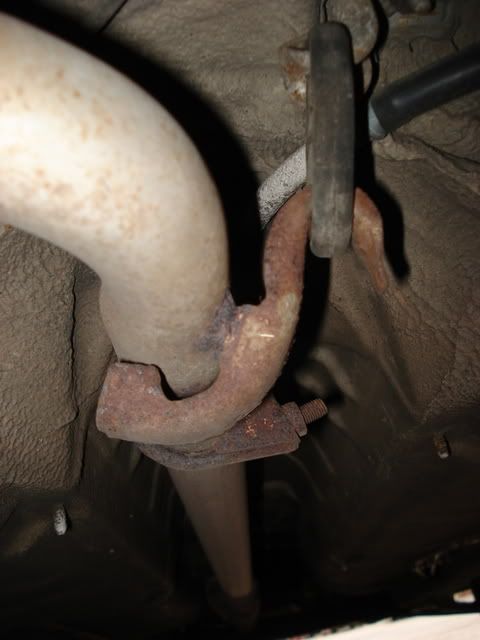
currently i'm missing, form somewhere down the line the parts for the downpipe brace, I can't remember if they were there when we changed the engine or if it was done in this way prior, but at least it works temporarily, am currently toying with the idea of using a pipe clip, putting the silverish brace through the pipe clip then the bolt through pipeclip-silverbit-pipeclip-nut.. this should hold everything up above the steering rack successfully.


and again from another angle, i'm sure it's not right at all..

also what with the winter weather and the cold and damp we are currently experiencing i thought it was best to finally swap the dizzy cap and rotor that ws left on the engine we bought from the breakers.. as this also seemed to be a common plan of attack when people buy a car.. i think it's lucky that i did considering the state that it was in..


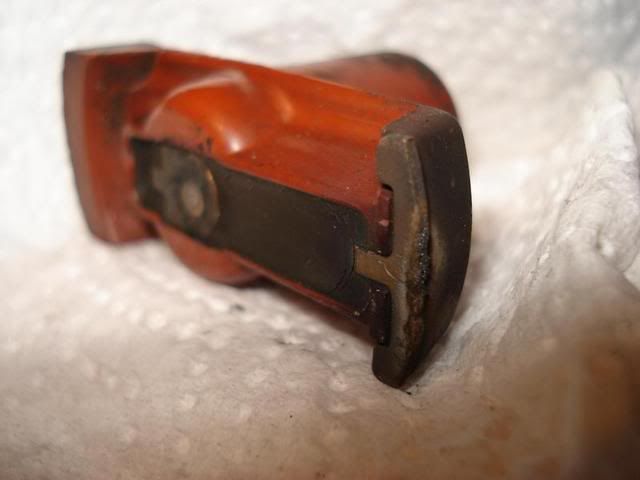
old rotor arm wear..


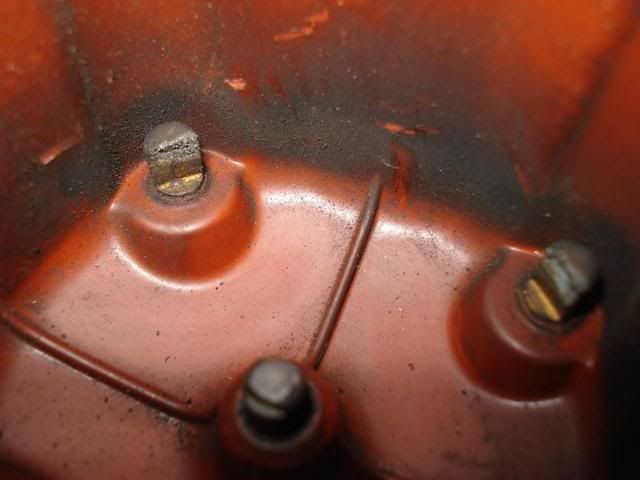
old dizzy cap wear..

runs a lot nicer now as well!
Sig Removed. No Longer Applicable. New Sig? Nah. Not Yet..

Quote
Sharpo says: (16:57:39)
to be honest i dont doubt that half ggti users have a shortcut on their desktop for sharpie's last posts

Offline mattneck(Beavis)

  • I live here
  • *****
  • Posts: 1,909
  • Bristol's Own (DJ) Beavis ;-)
Re: mattneck - mk2 ryder
« Reply #31 on: 12 December 2006, 23:23 »
next job, which has been due admittedly since me and my dad changed the servo, has been to sort out why the brake pedal has to sit so high.. the pedal had to be adjusted, and lifted, due to the fact that the pedal was otherwise pulled too far down, onto the switch and an always on brake light, and now, its tempermental in staying on at times, a slight dab of the pedal and it will stick, or a full push and it will stick, but not always, and usually a slight touch will turn it out..


Sig Removed. No Longer Applicable. New Sig? Nah. Not Yet..

Quote
Sharpo says: (16:57:39)
to be honest i dont doubt that half ggti users have a shortcut on their desktop for sharpie's last posts

Offline mattneck(Beavis)

  • I live here
  • *****
  • Posts: 1,909
  • Bristol's Own (DJ) Beavis ;-)
Re: mattneck - mk2 ryder
« Reply #32 on: 12 December 2006, 23:23 »
another job as well is to work out why I currently have so much play in my gear lever, i've been told to test for 2mm of movement pulling upwards, and it seems to not go anywhere, but when moved to other points, it will lift, so wether the ball or cup is worn or not at all i am unsure, but for £12 for the complete repair kit, i'm overwhelmingly tempted to go for it in the hope it may do something. currently the ball atop the shift finger i am thinking is where the play may be, but i am unsure as to if the ball has worn, or not, and the part number atop this is an obsolete part but the shift finger which is on etka, seems to show the entire item complete with the ball atop.. so wether this will be worth buying, i am unsure, as i don't want to waste £11 buying it on special order from vw and then finding it makes no difference! the other things currently missing from it which i have spotted on etka seem to be the bearing ring, again another possibility, yet something which is not visible in the haynes, and does not define as being for 4 or 5 speed exclusively, which the shift fingers do.


shift ball atop finger


bracket with loop around ball atop shift finger, and shift finger


the same visible from further behind showing the pipe clip holding the shift pole in place to the bracket, where according to etka there should feature a bearing, and a top down view of the same clip where there is nothing else inside
Sig Removed. No Longer Applicable. New Sig? Nah. Not Yet..

Quote
Sharpo says: (16:57:39)
to be honest i dont doubt that half ggti users have a shortcut on their desktop for sharpie's last posts

Offline mattneck(Beavis)

  • I live here
  • *****
  • Posts: 1,909
  • Bristol's Own (DJ) Beavis ;-)
Re: mattneck - mk2 ryder
« Reply #33 on: 15 December 2006, 00:52 »
Managed to remove the brake light switch today, get to the local factors to see if they ahve another one, only to be told "they do extend, you just pull it out, look.." cue the guy pulling the switch out to a good length, rather than it being pushed all the way in, must have got knocked during servo swap, grr.. at leas ti've got flat pedals now, will edit this post with some pictures..

Also found tonight, as I have been wondering as my MPG seemd to drop a fair amount.. Turned out the Vac from dizzy advance to carb had split at the end, so underneath the airbox, on the side of the carb, I had a bare open vacuume connection, I forgot to get a photo of it but it was about 2cm of the pipe just opened wide.. cut the end of and have stretched it a little to hopefully fit, will bae to be attempting at that tomorrow now.. hoping the return of the vacuume will help the fuelling/consumption out!
Sig Removed. No Longer Applicable. New Sig? Nah. Not Yet..

Quote
Sharpo says: (16:57:39)
to be honest i dont doubt that half ggti users have a shortcut on their desktop for sharpie's last posts

Offline mattneck(Beavis)

  • I live here
  • *****
  • Posts: 1,909
  • Bristol's Own (DJ) Beavis ;-)
Re: mattneck - mk2 ryder
« Reply #34 on: 18 December 2006, 13:50 »
Big thanks to rubjohnny for putting me up with tea and parts and a trip to the scrappy, Legend!  :smiley:

Managed to pick up a few good bits but the white 5dr had gone awol unfortunately  :sad: and by the time we got back from the ayrd, I started to realise the things I wanted, always the way  :laugh:

Saturday morning I finally got rid of the annoying piece of foam stuck to the rear passenger window, the only peice of non original glass on the car, and the oiginal glass was everywhere in the car, when we bought it  :rolleyes:

£2 for a scraper at the local cheapy store


and the before and after, from mess to cleanli-ness


oh and I found my old fan belt, replaced due to fer of snapping, admittedly it was only through the outer layer but still..


scrappy/johns garage haulage..


another thanks goes for doing all the ends of my vacuume pipes and stuff, and making my airbox sit lower, quality idea with putting it underneath the threads isntead, and emans it's not rubbing my bonent anymore  :laugh:

as my fullbeam switch ahd worn right out, found a stalk sat in a rado.. and stole the end from it


as my old oe was worn the new one went on..


next job, seals, hacksaw these down and get them on hopefully..


oh and a new dipstick guide, It looks like i've got more oil than I thought atm  :embarassed:
« Last Edit: 18 December 2006, 13:53 by mattneck »
Sig Removed. No Longer Applicable. New Sig? Nah. Not Yet..

Quote
Sharpo says: (16:57:39)
to be honest i dont doubt that half ggti users have a shortcut on their desktop for sharpie's last posts

Offline mattneck(Beavis)

  • I live here
  • *****
  • Posts: 1,909
  • Bristol's Own (DJ) Beavis ;-)
Re: mattneck - mk2 ryder
« Reply #35 on: 22 December 2006, 10:42 »
Nothing much but a little something I thought I would add..

As far as tidying up the engine bay goes I am extremely tempted to get some plastic tubing to put around all of my wiring to make it look that extra bit neater.. but first things first I changed the coolant overflow cover for a less faded nicer looking one..


And also finally changed the earth strap which was hanging loose when I bought the car, as a temporary fix I managed to cut through it with the bolt that held it in, but after finding a new one on Sunday, I've swapped it for the tidier one.


Also finally managed to get a shot of the brake light switch and how it was fixed, the length of the switch which can be seen was actually minimal, turns out that all that needs doing is pulling it as far out as can go, with the pedal adjusted to the right height, hen push the pedal down and release and the switch will lock into place at the correct length, voila..


Also have been introduced to the joy of relay number 99.. For those of you who drive regularly in the rain etc, and the intermittent wipers are too slow and the constant first speed too fast, this lets you set your speed by turning on, waiting till you cannot see again then turning them off and on again, to set the delay time.. thanks to rubjonny for that!


Relay 99, replace in same location as number 19..

Also had a random call form my friends in the bodyshop who said the uni 2 doors down that does scrap metal just had a golf roll in, it as being depolluted and was going to be gone within minutes as per usual.. managed to get there quick enough to grab the seals as it was a 5 door.. now, on this car the seals were long enough to fit in underneath the seal by the half window on the rear doors, yet, as soon as I put them on my car the same thing happens as they were with the originals, they aren’t long enough to fit.. is this possibly due to my car being post 90? Anyway this was the state of the old seal which I wanted to replace mainly for cosmetics..


Also got a nice little haul off the thing, such as a mint condition non faded rear vw emblem, a leather golf ball gear knob.. with a  slight bit of damage, where a hole has been picked out but its not overwhelming, and a heater control panel which on closer inspection when I arrive home, are newer than expected, hopefully meaning theyve got some good lighting left in them yet..


Not bad for a fiver!

Oh and a new ryder badge for the rear, in a better state than the almost scuffed to black on I’ve got... need a new front one at the moment though, as that’s scuffed to, could be another tin of humbrol for that one though..


« Last Edit: 31 December 2006, 17:12 by mattneck »
Sig Removed. No Longer Applicable. New Sig? Nah. Not Yet..

Quote
Sharpo says: (16:57:39)
to be honest i dont doubt that half ggti users have a shortcut on their desktop for sharpie's last posts

Offline mattneck(Beavis)

  • I live here
  • *****
  • Posts: 1,909
  • Bristol's Own (DJ) Beavis ;-)
Re: mattneck - mk2 ryder
« Reply #36 on: 30 December 2006, 18:55 »
Went to my local factor this morning, with one aim.. 2 new heater hoses to eliminate my smashed and broken vavles, and to avoid the bodge copper pipe job, and a new acceslerator cabe of the right elngth so it doesnt do a loop the size of my mainfold before it clips into place..

all 3 were 9.75+vat each, so around £30 in all, which wasn't bad at all.. and it will finally mean I get some heat.


this was the first pipe off, which i took first away from the valve, and then drained as much of the coolant off as possible to save too much loss.. altohugh I did run out in the end and had to evert to pure water until I can get some more coolant tuesday evening


removed the feed from the thermostat housing end, and then also removed from the matrix pipes at the bulkhead..


although i forgot to put the return pipe into a nother bottle, so, laws of gravity say, i'm going to spray you and soak you and lose most of your coolant.. bugger.


the valve removed with traces of the pipes left on it..


and the rather odd damage I found the other day when I flushed my matrix!


so on went the two new pipes, i decided to mess about with jubilees rather than attempt to replace the spring clips in such an awkward location


so with my bodged coolant resevoir i created, I realised the top half would make a great funnel and I proceeded to fill up the system again, a little too much oops, forgetitng there would be a huge airlock up in the matrix pipes..


cue some major boiling over, spraying everywhere and general mentality, as you can see, a fair bit went awol at this point..


took it for a good drive up the keynsham bypass doing 60ish, got it to warm up and work it's way through, had some good heat, but it did drop at times, so, gonig to go on jonnys advice as to "burp" the system and retopup, and here's hoping it will  :smiley:
« Last Edit: 31 December 2006, 14:50 by mattneck »
Sig Removed. No Longer Applicable. New Sig? Nah. Not Yet..

Quote
Sharpo says: (16:57:39)
to be honest i dont doubt that half ggti users have a shortcut on their desktop for sharpie's last posts

Offline mattneck(Beavis)

  • I live here
  • *****
  • Posts: 1,909
  • Bristol's Own (DJ) Beavis ;-)
Re: mattneck - mk2 ryder
« Reply #37 on: 31 December 2006, 13:17 »
next job, stop the bloody screenwash gonig all the way back from the tailgate, one small part form halfords, total cost, £2.29.. and it was done..


for some unknown reason I didn;t think to cut the rubber pipe where it would so obviously stretch to fit the valve, no, I cut the main plastic pipe like a pillock  :huh:

luckily my mate had brought me home some rubber vac hose the other day, which came in useful, as it had just enough spare on the end that I was planning to cut off, to cut in half and put on either end of the valve, and the plastic pipes.

this is the area you should cut, i recommend after experience now, cutting the rubber pipe between pump and the main line..


then ifd you buy the same halfords one as me, it's black side to the bottle, and now you have instant wash each time


 :cool:
Sig Removed. No Longer Applicable. New Sig? Nah. Not Yet..

Quote
Sharpo says: (16:57:39)
to be honest i dont doubt that half ggti users have a shortcut on their desktop for sharpie's last posts

Offline mattneck(Beavis)

  • I live here
  • *****
  • Posts: 1,909
  • Bristol's Own (DJ) Beavis ;-)
Re: mattneck - mk2 ryder
« Reply #38 on: 01 January 2007, 16:33 »
Accelerator cable, the next job, having heard it constantly grinding and it being very tight for a long time it had to be done..

So, in underneath the dash i unearth the accelerator cable hooked into the pedal, and attempt to extract it..


but don't do too good getting it out tidy..


now my old cable had been cable tied to my fuel line, went in a large loop then went onto the carb, probably one of the factors making it grind and horrible.. comparison of old and new..


After pulling it out, finding how to get it back through at first didnt occur to me that it was going under the scuttle tray, so after lifting it up it made threading it a lot easier


this also meant the cable could be routed a lot tidier, and after filling it with 3 in 1 to keep it smooth, it bolted in perfect, note having cut off the small bell shape that is found on the end of a carb accelerator pedal which isn't of any use to me, trimming it to the crimp which fits meant it was a lot better than my frayed old one, and frayed choke cable..


Also realised after that the hook was in the wrong side, this was due to me having to insert it after getting the weber installed, and the choke cable hanging down, catching the accelerator and pulling the cable right out..


next job get to repainting the accelerator pedal jsut to tidy it all up a bit, and put on the new brake pedal rubber, to match the new clutch rubber. Nice.
Sig Removed. No Longer Applicable. New Sig? Nah. Not Yet..

Quote
Sharpo says: (16:57:39)
to be honest i dont doubt that half ggti users have a shortcut on their desktop for sharpie's last posts

Offline mattneck(Beavis)

  • I live here
  • *****
  • Posts: 1,909
  • Bristol's Own (DJ) Beavis ;-)
Re: mattneck - mk2 ryder
« Reply #39 on: 03 January 2007, 18:53 »
Finally, I get around to checking out aobut healdight looms,. within 24 hours of researching it I had it built.. within 32 hours it was finished and mounted in the car..  :grin:

On the shopping list, 4 colours of 2mm2 17amp rated cable, here ive got 5 colours, but halfords had .75mm blue on the shelf in palce of the 17, i didnt notice till i got home that t was wrong as i didnt think and i wasnt the ne measuring  :laugh:

went fr the professional approach of 2 brand new H4 plugs.. a proper ABS box, 3relay blocks, a proper mini fusebox, and a load of connector bits.. and relays from VAG cars, jsut to keep it all close to home  :rolleyes:


first job was to chekc behind my headlamps how the wiring went..


as can be seen on both sides due to me having spots, the brown is ground, the white is live to the mainbeam/spot and the yellow is the dip.

first job, 2 connector leads to go from loomcase to battery, need 6.35mm rings iirc.


I then connected the fuseholder up swith some leads, and then into the relay blocks..


this was the positive connection gonig in on pin 30. next i added the ground to pin 85..


and bulb and blade connections to that, the blades will be hanging outside the bx to connct the original loom H4, the in from the main loom on pin 86 and out to the new h4 on pin 87


then added the H4s and the loom was complete


due to the ruts in the box for the scres to go in the relay blocks were minimally too wide for it, so i "fabricated" a board form some card and ducktape, to which I taped the relay blocks..


then proceeded to drill and mount all the connections, and yes i plan on swapping the ducktape on the fusebox for somehting a little more professional  :laugh:


and a closeup inside the box, one relay to cover mainbeams, one runnign dipleft and one dipright..


wahey, the meter reading for the original loom was around 7.87 reading with new loom, after haivng lghts on sa while and not engine, 11.73 coming out direct, wether extra brightness will actually be visible i'm not sure yet, as I haven't had chance to test, but form within a few feet, I couldn't tell   :tongue:
Sig Removed. No Longer Applicable. New Sig? Nah. Not Yet..

Quote
Sharpo says: (16:57:39)
to be honest i dont doubt that half ggti users have a shortcut on their desktop for sharpie's last posts