Author Topic: madone_si - A4 Avant 1.8T RED Quattro  (Read 141986 times)

Offline Madone_si

  • I live here
  • *****
  • Posts: 1,533
  • Seattle WA, USA and Middlesex, UK
Re: madone_si - A4 Avant 1.8T RED Quattro
« Reply #60 on: 27 June 2012, 00:38 »
Well I've had an interesting month......  :angry:

First off I had someone do a hit and run on my car, in my works car park, not F***ing happy about that. Rear bumper was damaged, so had quotes done and that was repaired, cost a little fortune!!

Damage


I then noticed my front Chipprotect film was coming off the front bumper and a small stone had gone through the hood film too [:(] and damaged paint underneath. So I got thinking...... before I go take the front bumper off as planned, this must be under warranty, to replace the front bumper chipprotect and also fix the chip on the hood and then replace hood chipprotect.

Well I was right. [:)]

I took it back to where I had it installed and they started to work on repairs, this was late last week. I got a call in the afternoon saying that the chipprotect had pulled paint off the bumper and will properly do the same for hood too, so they want to send the Audi to body repair shop to repaint bumper and hood and after paint is cured put new chipprotect on it. I said "Sure that would be great", so I got my car back and its going in for repairs tomorrow [:)][:D]

Front bumper with paint pulled off. (They stopped after this corner paint come off)


Front hood chip, hard to take picture of it, but you can see it when you look at hood.


I also got tires put on RS4 wheels and so put them on the Audi over weekend.

Before no tires


With tires


and then on the car [:D]


I will update all once the front bumper and hood is completed.

I also started on my air ride set-up, these are for up front and I am making rears (Upper & lower brackets: bags & fittings)
and have on order management system. I will update thread in few weeks once all equipment arrives.


Also moved the mk1 Cab this weekend so can get body work done for that too.
« Last Edit: 27 June 2012, 00:49 by Madone_si »
Old Skool Mk1 Golf Gli (82), Mk1 US Cab 85 and 83
SOLD - BLACK SOY 92

Offline Madone_si

  • I live here
  • *****
  • Posts: 1,533
  • Seattle WA, USA and Middlesex, UK
Re: madone_si - A4 Avant 1.8T RED Quattro
« Reply #61 on: 30 July 2012, 23:36 »
ok, so parts are arriving nicely now for the air ride, but I've had a nightmare the last month with certain company fixing my front hood and bumper paint work and then having clear chipprotect replaced. So I recieved my car back and Chipprotect with-in a few days started to bubble up [headbang] so I called up and complained and asked them to fix it. Short story, I had them pull all of the chip protect off and this is what happenned to the front bumper paint


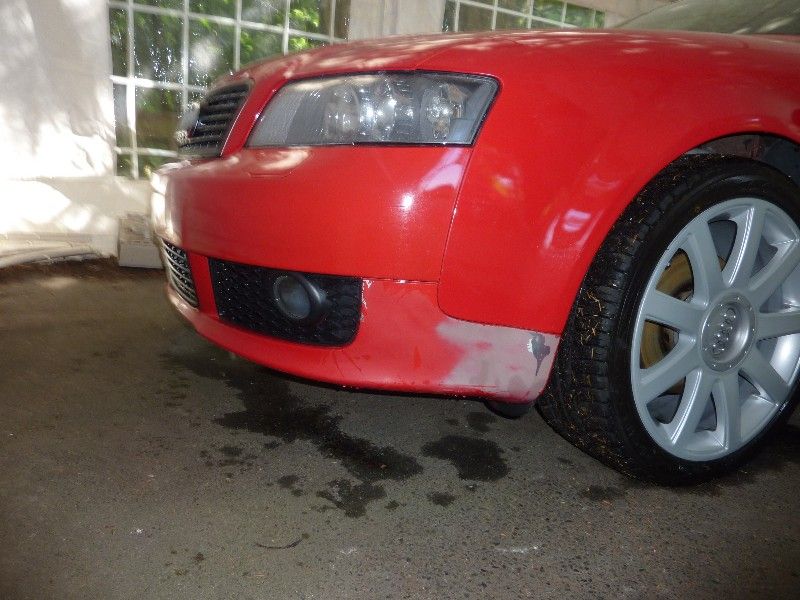
Lucky the rest of the bonnet/hood and wings/fenders are ok.

Now at this point I said, I am getting my painter to fix the bumper, so the car is with painters now and should be all fixed by next Weekend, bumper coming off and being done properly, I am also getting the new chipprotect installed after the paint has cured for week.

So while I had the car back (Few days) I started on measuring up the rear spare wheel area as this is where I am going to install the Air ride. I only have Air tanks left to order, so I needed to confirm what I needed, so here goes!

I did a load of research and most of the tanks sizes I found and was adviced on was either 3 or 5 Gallon tanks and due to I needed to put tanks into the spare wheel area, I am going to go with 3 gallon tanks, most of these come in these sizes;

3 Gallon tanks
17 x 6.5
17 x 7
18 x 7
19 x 8
20 x 7

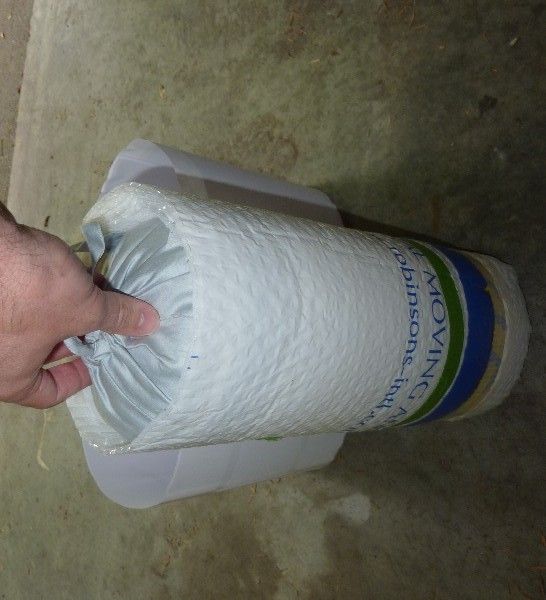
So I now needed to confirm size I needed, so I made up temp tank, by using a round pillow, bubble wrap and paper :) [wrench]

First take round pillow, hopefully the other half won't see this update! [:D] and wrap bubble wrap around it until you get the required height, I started with 7'', then taping paper together, you then wrap the paper around the bubble wrap, I did two of these, so I can adjust the paper inwards or outwards, to get to the required length I wanted.

Pillow with bubble wrap


Paper that slips over pillow and bubble wrap
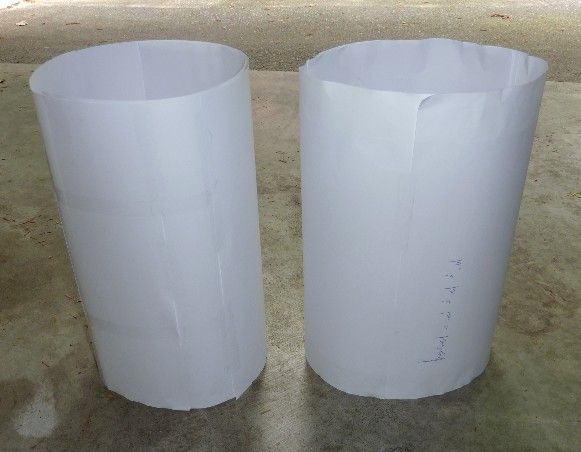

I put all together


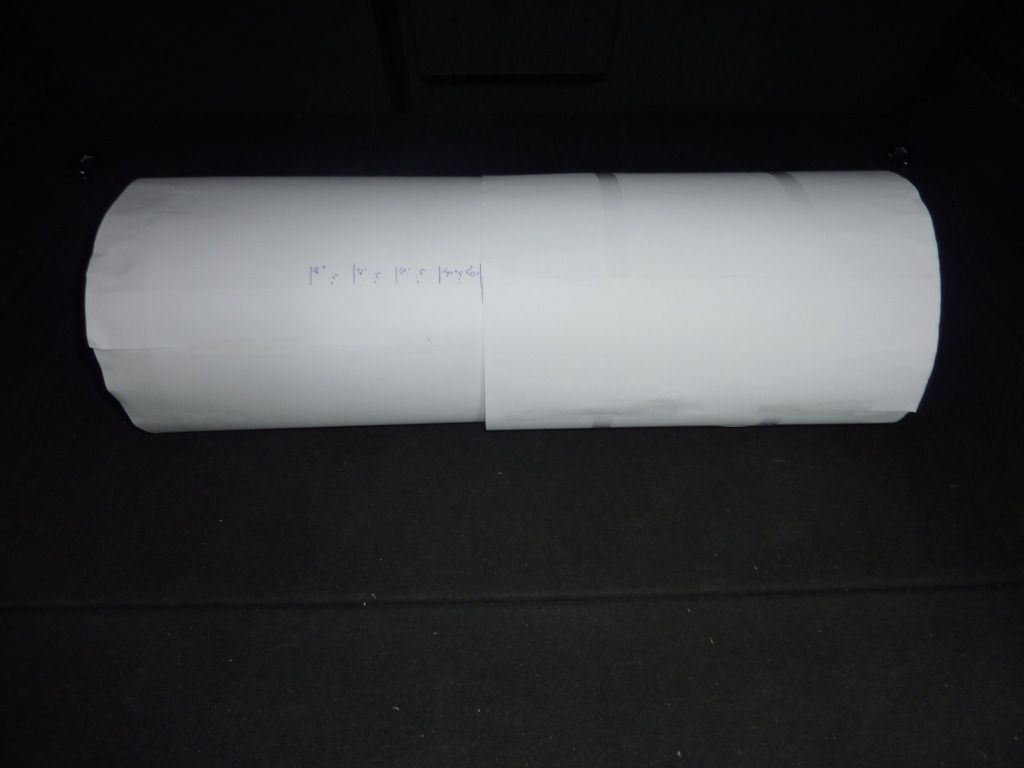
I then measured from 16'' to 20'' marks on paper, so I know the measurement length


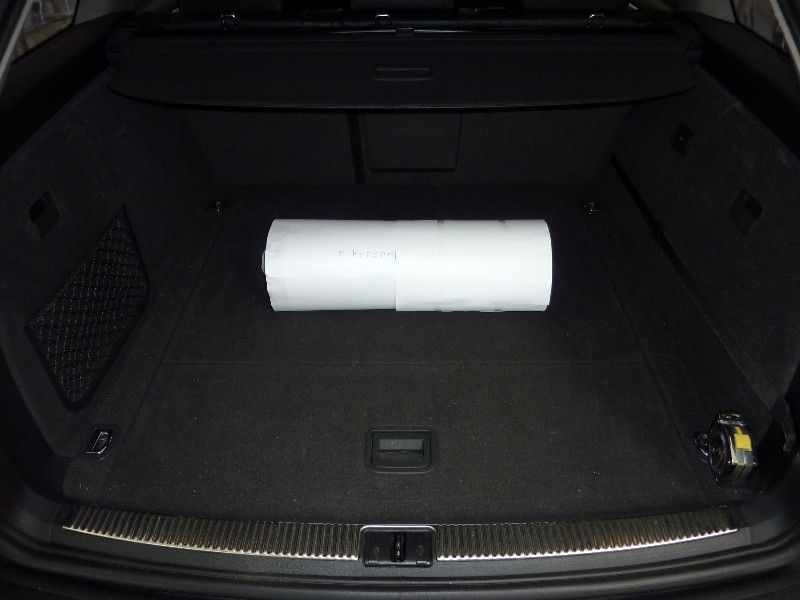
Now onto testing out in the car, this is at 20'', looks very small...


I pulled back the cover and there is a nice gap between the top cover and the spare wheel cover


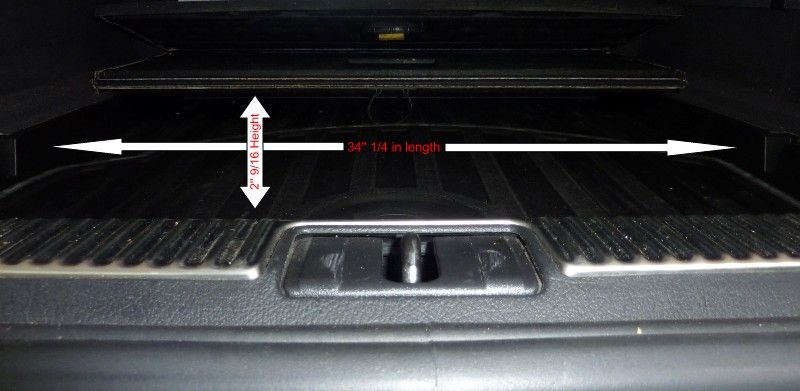
Then removed the spare wheel cover and here is wht you see, I then measured three locations, give me rough idea


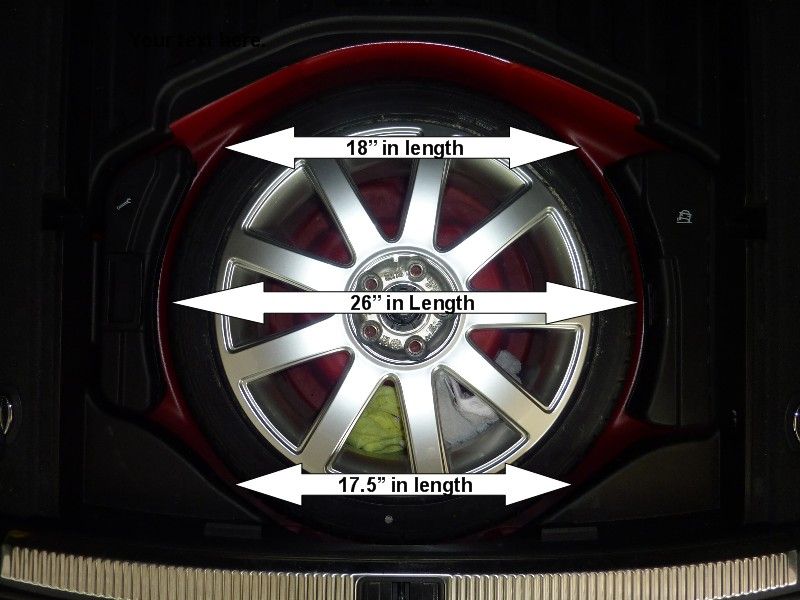
Now with wheel out, I placed the temp Air tank in two locations that I wanted to confirm measurement, to confirm the size I require to order;


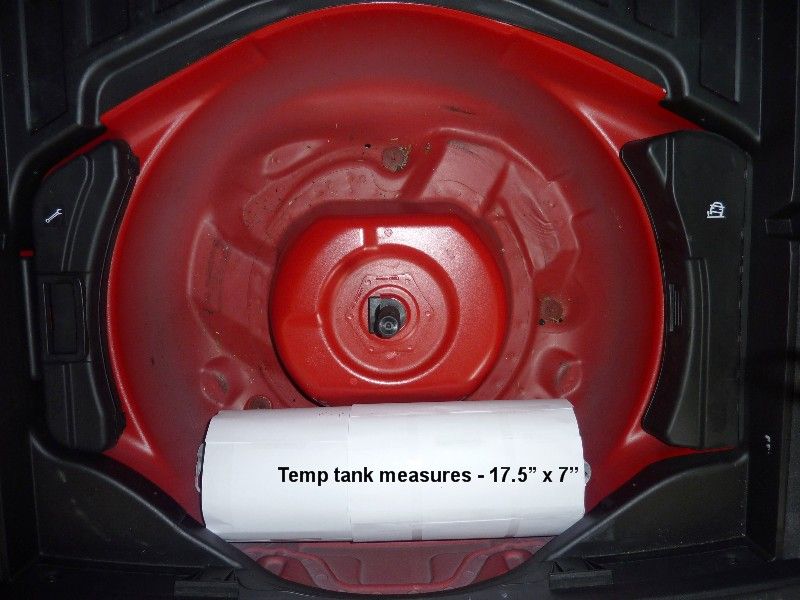
I also measure the depth from bottom to the top as well as the tank.


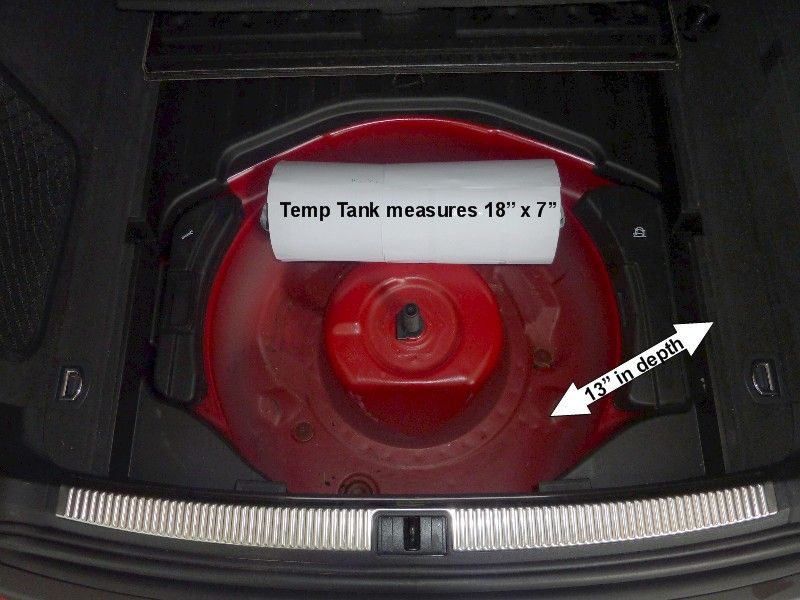
So I now know I will need 17.5 to 18'' L  x 7'' H tanks and I have 13'' in depth, so I can easily place the compressors as well, which are AZ OB2 :)

Once I get the Audi back, I will update on front and rear bumper work that was done and then fully onto the Air ride installation.
« Last Edit: 30 July 2012, 23:41 by Madone_si »
Old Skool Mk1 Golf Gli (82), Mk1 US Cab 85 and 83
SOLD - BLACK SOY 92

Offline Madone_si

  • I live here
  • *****
  • Posts: 1,533
  • Seattle WA, USA and Middlesex, UK
Re: madone_si - A4 Avant 1.8T RED Quattro
« Reply #62 on: 31 July 2012, 19:22 »
So here is my Rear Slam Technologies RE-5 with brackets. The brackets are going off to get powder coated in Red to match the car :), also will be fitting new fitments and paint the ends of the RE-5 so everything is protected.


« Last Edit: 31 July 2012, 19:24 by Madone_si »
Old Skool Mk1 Golf Gli (82), Mk1 US Cab 85 and 83
SOLD - BLACK SOY 92

Offline Madone_si

  • I live here
  • *****
  • Posts: 1,533
  • Seattle WA, USA and Middlesex, UK
Re: madone_si - A4 Avant 1.8T RED Quattro
« Reply #63 on: 04 August 2012, 04:07 »
Compressors turned up


and one of the two Air Zenith OB2 Compressors. OMG they are heavy, but quality of build is high and the noise is so low, love it [wrench]


and 3/8 DOT approved Airline, only problem is I order black not blue, this will be going back and hopefully black airlines arrive next week..... one step forward and one back [headbang]
Old Skool Mk1 Golf Gli (82), Mk1 US Cab 85 and 83
SOLD - BLACK SOY 92

Offline Madone_si

  • I live here
  • *****
  • Posts: 1,533
  • Seattle WA, USA and Middlesex, UK
Re: madone_si - A4 Avant 1.8T RED Quattro
« Reply #64 on: 08 August 2012, 18:28 »
Happy Simon  :cool:

I got my Audi back on Monday and I will be dropping it off again to Chip Protect company next Wednesday 8/15 to put chipprotect film back on the whole front of the Avant, to protect my fresh paint work [:d]
      
Regarding the paint work I had done, front bumper and hood, I can tell you this, the quality of the paint work is A1, see pictures below (from mobile) will do high quality pictures this evening.


Rear bumper repainted month ago


my plan is to now focus on Air ride installation and then get new rims and then it will be going back for more work on arches so I can get the low look I want.
Old Skool Mk1 Golf Gli (82), Mk1 US Cab 85 and 83
SOLD - BLACK SOY 92

Offline Madone_si

  • I live here
  • *****
  • Posts: 1,533
  • Seattle WA, USA and Middlesex, UK
Re: madone_si - A4 Avant 1.8T RED Quattro
« Reply #65 on: 09 August 2012, 04:21 »
Forgot the underneath front bumper picture, need to clean underneath of front bumper, already got it dirty after driving it.


and my custom air tanks arrived :) 2 x 3 Gallon tanks


Tank 1


Tank 2


Looking forward to this weekend, can really get started on building out spare wheel area.
Old Skool Mk1 Golf Gli (82), Mk1 US Cab 85 and 83
SOLD - BLACK SOY 92

Offline Madone_si

  • I live here
  • *****
  • Posts: 1,533
  • Seattle WA, USA and Middlesex, UK
Re: madone_si - A4 Avant 1.8T RED Quattro
« Reply #66 on: 10 August 2012, 22:16 »
Well yesterday I wanted to check my K&N Filter to see how much crap maybe got sucked into the box from the painters and I found a few friends.

FYI: If you want to do K&N Filter installation, this has been written up many times, but I found when I did research that this write was useful (Thanks to A4mods.com)

K&N Filter installation into Audi A4

So opened up the Air filter box, all looking good and clean


then I removed the air filter, which was not dirty at all, but........ I found this, two little mouse.


So I pulled out the mouse's and buried them in the garden and cleaned out the air filter box, I did manage to get that last bit of crap that is showing in the picture as well.


So reinstalled K&N Filter and then bolted all up again. I am so glad I check my filter every few months.

Here is picture I took months ago when I installed my K&N Filter, to show comparison of OEM to K&N Filter


Well onto Air ride set-up today and the weekend :)
Old Skool Mk1 Golf Gli (82), Mk1 US Cab 85 and 83
SOLD - BLACK SOY 92

Offline Madone_si

  • I live here
  • *****
  • Posts: 1,533
  • Seattle WA, USA and Middlesex, UK
Re: madone_si - A4 Avant 1.8T RED Quattro
« Reply #67 on: 25 August 2012, 05:30 »
Well now I have all the parts I need - Black DOT Airline 3/8 turned up this week :) I am working on design and installation of the AccuAir Mgmt, Compressors and Air tanks. I will upload pictures of how I went about this in few weeks, so to make the write up useful for everyone.

This weekend, I will be cutting and installing the wood to hold everything in place, so I can then send away my 2 x Air tanks to get painted up.....

Here is the AccuAir Management and E-level kit with remote, with additional Air DOT Lines, Parker Water Traps 250PSI, so can handle the OB2's :) and of course Mead dump mufflers.

Big thank you to BagRiders.com & AccurAir.com, this quality of this kit is amazing.


and the remote which will be used alot in the near future!!!
Old Skool Mk1 Golf Gli (82), Mk1 US Cab 85 and 83
SOLD - BLACK SOY 92

Offline Madone_si

  • I live here
  • *****
  • Posts: 1,533
  • Seattle WA, USA and Middlesex, UK
Re: madone_si - A4 Avant 1.8T RED Quattro
« Reply #68 on: 09 September 2012, 02:36 »
Air Ride prep work in Trunk of Audi Avant

So here is what I did to prep and understand the measurements and template to cut out of wood to make up my trunk set-up for air ride.

Materials: Cardboard box, scissors, tape, bubble wrap, kitchen towel and small pieces of wood (3 x 1) and of course air tanks and compressors
Time spent: 120 minutes (2 Hours)

I used cardboard first and used measurements used before to cut out rough shape to fit into the trunk spare wheel area. I spent a good 30 minutes cut and cut until I got the base piece to the size I required.

Measurements


Cardboard cut to shape for base, note the 4 spots, which will be were the airline will go underneath the car to the 4 wheels


I then focused on cutting out cardboard for second base piece that goes on top in the middle. This will hold the AccurAir Management & E-Level.


I then took the 2 air tanks and placed into the trunk area


Using some small wood, whole kitchen towel (good for adjusting height) and bubble wrap (love bubble wrap!!!!) pop pop lol, adjust the air tanks until they both are in the right position. This is key part so take you time and get the position right as you don't want the tanks touching anything. I placed cardboard at front and back of tanks to give me gap between air tanks and other edges (roughly 4-5mm)


Now we have the tanks in position, time to measure the tanks positions as in height, so can I then make up brackets at right height to hold air tanks in position.
First measure the tank nearest to the rear of the Audi trunk, measures 8.5'' in height to top of tank.


Then second tank at front of the Audi trunk, measures 11.5'' in height to the top of tank


I then measures the center height from base until to the center until, which measures 6'' in Height


Now I have these measures and base templates, I can now using wood, cut out required shapes and make up the trunk platform that will hold everything in place.

I dropped in the Compressors to see how much space I had, a little tight, but everything fits in. Once I get the platform together in wood, I will then measure up compressors positions properly, as they will need to be raised 1/2'' (Half inch).


Next update will show cutting, putting together and finished trunk platform.

Now while we are on the subject of creating platform in the trunk to hold all the air ride in place, I thought I would add these links to give you idea of all the different air ride setups people have done, I found it very useful.

http://forums.vwvortex.com/showthread.php?4171339-what-are-Hardlines
http://forums.vwvortex.com/showthread.php?4527666-Official-Air-Ride-Show-Off-Thread
http://www.stanceworks.com/forums/showthread.php?t=15600
Old Skool Mk1 Golf Gli (82), Mk1 US Cab 85 and 83
SOLD - BLACK SOY 92

Offline Madone_si

  • I live here
  • *****
  • Posts: 1,533
  • Seattle WA, USA and Middlesex, UK
Re: madone_si - A4 Avant 1.8T RED Quattro
« Reply #69 on: 14 September 2012, 01:36 »
Building Trunk Platform for Air Ride - cutting, putting together and finished

So with my last update, I now have template to work off to create air ride platform

Materials: MDF, screws, bolts, nuts, washers, blue tape, 1/8'' inch steel metal, small and large brackets, all brought at Home-depo
Timeframe: over a day

So with MDF on flat secure place, I outlined using the cardboard templates, the required base and middle platform shapes. Then using power drill tool, make sure you wear eye protection for safely, drill hole so can use jigsaw to cut out required shapes.


Tools to be used


let the fun start!


Due to making the base fit perfect in the trunk area, sanded down the edge at angle as seen below, due to shape of spare wheel area.


Test fit and it’s perfectly straight too


So now onto the center top platform that will hold the Manifold and E-Level AccurAir
Using cardboard template onto of MDF, outlined the shape and then cut it using jigsaw.


Now onto making temp legs to hold the base and center platforms together. Using wood, measured, cut three pieces of wood at 6’’ inch in length and then checked everything in trunk area.


Now using some small brackets, screwed these onto the ends of the wood, so can then adjust to make sure the legs fit perfectly. These are temporary legs, so I can use these as template to make the legs in the next steps out of 1/8’’ metal.


Installed temporary legs onto base unit


And tested to make sure all level, after a few adjustments I now have everything straight.


 So now onto making the legs out of 1/8’’ metal. Measured up metal and then shaped metal to required positions.


Old Skool Mk1 Golf Gli (82), Mk1 US Cab 85 and 83
SOLD - BLACK SOY 92