Author Topic: Matt's Accuair GTI - Now A MK5 R32!  (Read 69447 times)

Offline matttrance28

  • GTI forum regular
  • ***
  • Posts: 142
Re: Matt's Accuaired GTI
« Reply #50 on: 06 January 2013, 04:18 »
Work then started with a friend dismantling the interior..


20121223_184439 by Matty_Dub, on Flickr


20121223_144921 by Matty_Dub, on Flickr

Offline matttrance28

  • GTI forum regular
  • ***
  • Posts: 142
Re: Matt's Accuaired GTI
« Reply #51 on: 06 January 2013, 04:19 »
This is what was happening when water was fed into the grommet.. straight onto the pedals (how it missed all my fuses etc and didn't blow anything is a massive life saver, and i'm seriously lucky.)


20121223_191031 by Matty_Dub, on Flickr


Then when all the trim was out we took the carpets out:


20121223_192825 by Matty_Dub, on Flickr


20121223_192810 by Matty_Dub, on Flickr


20121223_192832 by Matty_Dub, on Flickr

Offline matttrance28

  • GTI forum regular
  • ***
  • Posts: 142
Re: Matt's Accuaired GTI
« Reply #52 on: 06 January 2013, 04:19 »
A video on how much water there was under all the carpets and lining, baring in mind the carpets and lining were all soaked and weighed a ton where they absorbed most of the water they could carry..


[youtube]http://www.youtube.com/watch?v=-WmGZAb4d7Q[/youtube]

Offline matttrance28

  • GTI forum regular
  • ***
  • Posts: 142
Re: Matt's Accuaired GTI
« Reply #53 on: 06 January 2013, 04:19 »
Removed the Switch speed controller cable and found...


20121224_112947 by Matty_Dub, on Flickr

Yes that's correct they've even managed to bend the mini usb cable, it still works, just looks nasty


And then following the cable back..


20121224_113000 by Matty_Dub, on Flickr


This was because of instead of running the wire around the seats, they decided to wire straight underneath, so of course with people getting in and out of the car it will create a flat spot... (when i fitted it all back in, i've run all the cabling around the edge of the car with the main loom (cable tied together) it's just little things like that have sent me over the edge.


They cable tied the rest of the cable (its one long cable) together under the seat near the harnesses out of the way, I've now rerun it down the side of the seat, and then along the front, so nothing will affect it.


Offline matttrance28

  • GTI forum regular
  • ***
  • Posts: 142
Re: Matt's Accuaired GTI
« Reply #54 on: 06 January 2013, 04:20 »
Took out the bulkhead and rewired the main power feed through a new grommet


20121230_150749 by Matty_Dub, on Flickr


And just to make sure it sealed i used JB weld lol, its stuck in there a treat now


And the bonnet release cable is left untouched, however I've put a small amount of sealant around the outside of it just in case, as i didn't want to redo the whole process


And whilst creating the hole for the grommet i managed to drill through my finger, so yet again SCREW YOU FAB  :cry:


(Please do not look if you don't like blood ) lol


20121230_133445 by Matty_Dub, on Flickr


Offline matttrance28

  • GTI forum regular
  • ***
  • Posts: 142
Re: Matt's Accuaired GTI
« Reply #55 on: 06 January 2013, 04:20 »
Now to their awesome i mean AWESOME earthing skills, i take my hat off to them.


20121223_141311 by Matty_Dub, on Flickr


needless to say none of the air ride worked correctly.


I've now redone it with the help of my dad and a welder lol


20121224_132434 by Matty_Dub, on Flickr

Welded an arm onto it, so i can still remove it when needed too:


20121231_120027 by Matty_Dub, on Flickr


Sealed behind it, so nothing can get through, just need to seal inside the boot now, and then tidy it up a bit as i plan to change the whole design anyway


Offline matttrance28

  • GTI forum regular
  • ***
  • Posts: 142
Re: Matt's Accuaired GTI
« Reply #56 on: 06 January 2013, 04:20 »
I've ordered some more air line, and some 3/8 bulkhead unions like these:


I've ordered some like these because where they've entered the car from the outside they've literally just drilled a hole, pulled the airlines through, put the grommets in the hole, realized the hole they made was too big and filled it with silicone.

The silicone is now coming away, so you can freely move the airline in and out of the car causing a gap, for which potential moisture will get in.


So with these bolt head unions i can securely bolt it to the car and have push connectors each end to allow easy access

Offline matttrance28

  • GTI forum regular
  • ***
  • Posts: 142
Re: Matt's Accuaired GTI
« Reply #57 on: 06 January 2013, 04:21 »
Well my anger rose today.. after testing it various amounts of time with the hose it was left outside in the rain all night and all day, i went out about 4pm to tidy up yesterdays mess in the garage, got in the car to start it and bam i saw this...


20121231_155831 by Matty_Dub, on Flickr


At this point i was so fuming i dried up the water in the foot well, luckily it hasn't gone through to the rear, it's just the front, after it was partially dry i put it in the garage, walked in the house looking majorly angry.


to which my dad saw i was fuming, so he went outside and had a look as he knew i've had enough for now and i'm just going to celebrate new years without thinking of the worry


Even though the scuttle panel is broken, and is fixed until the new one arrives, he noticed this..

a tiny crack that i didn't notice as yet again I DID NOT TOUCH

Admittedly i did brake the scuttle panel myself, but never did anything to the cover


20121231_172552 by Matty_Dub, on Flickr


It's the panel filter cover


20121231_172557 by Matty_Dub, on Flickr


Put a screwdriver in to show how much it was cracked


20121231_172611 by Matty_Dub, on Flickr


20121231_172618 by Matty_Dub, on Flickr


Offline matttrance28

  • GTI forum regular
  • ***
  • Posts: 142
Re: Matt's Accuaired GTI
« Reply #58 on: 06 January 2013, 04:21 »
Well leak is sorted, a breaker is messing me about, he said £15 delivered for the scuttle panel, and hasn't got back to me since, so will chase him up

Managed to dry out the leak pretty easily, luckily it hadn't soaked all through the underlay, so removed the trims around the front and lifted the carpet up, stuck newspaper in between like a sandwich, and kept replacing until no more water was absorbed, worked a treat, no more water left


Also had the help of this to dry out, it's not what it's meant to be used for but gets bloody hot


423209_10152376073665398_999163935_n by Matty_Dub, on Flickr


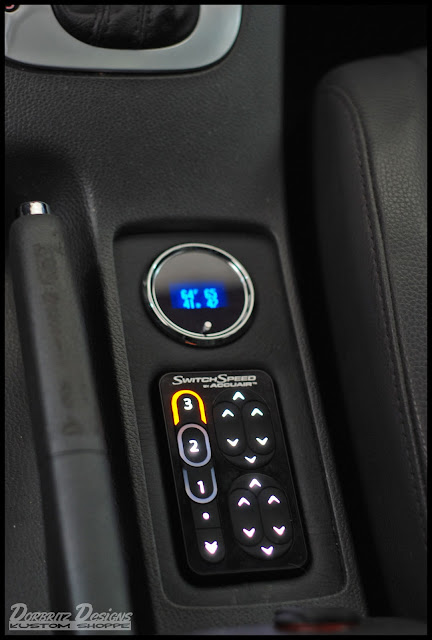
Also the next step has arrived for the install [:)]


397694_10152381650030398_1365447292_n by Matty_Dub, on Flickr


The airline i ordered extra for when the bulkhead unions come, messaged the company today asking when i would be receiving them, as i ordered on the 28th, and he said they're being shipped from america, and will be arriving Monday, for then them to ship straight to me, so will be able to do that stage next week [:)]


But for the time being i can sort out mounting the armrest and creating an install for that, i'm aiming for this (obviously in my armrest instead):


And I'll be getting the Dakota Gauge at one point soon  Just it's £330... I've told the girlfriend it's life or death of the air ride, and i need it, luckily she's on holiday with her mum in Egypt, as i took them up to Luton airport today, So there's nobody stopping me from buying it

Offline matttrance28

  • GTI forum regular
  • ***
  • Posts: 142
Re: Matt's Accuaired GTI
« Reply #59 on: 06 January 2013, 04:22 »
Well i started on moving the controller this evening.


First i started to build a base


20130103_195453 by Matty_Dub, on Flickr

 Started to sand it down to fit


20130103_202316 by Matty_Dub, on Flickr


Getting there..


20130103_202321 by Matty_Dub, on Flickr


Roughly how i wanted it to look when i get the gauge, used electrical tape as a guide


20130103_210521 by Matty_Dub, on Flickr

Positioning where i should cut


20130103_212206 by Matty_Dub, on Flickr


Did this one faulty and accidentally broke it, was using a bolt and sandpaper to get fully in the corners


20130103_215038 by Matty_Dub, on Flickr


so started again.... 4am came round...


20130103_222404 by Matty_Dub, on Flickr

This was the broken one i could see if i could revamp, but it looked crap


20130104_011935 by Matty_Dub, on Flickr


And this is the current new one at the moment [:)]


20130104_033026 by Matty_Dub, on Flickr


Compared to it literally just bolted nastily to the console before...