Author Topic: leavingeasy - track 20vt  (Read 23158 times)

Offline leavingeasy

  • Not said much yet
  • **
  • Posts: 76
Re: leavingeasy - track 20vt
« Reply #10 on: 11 February 2008, 23:07 »
Eventually the engine was finished and ready for gearbox fitting


I make that sound easy. Actually there is a shed load of stuff that needs changing to go from a K03 to K04. The oil lines are different, water pipes need adapting and all the air hoses are entirely different. I didnt realise most of that at the time and just blindly carried on!


The down pipe was wrapped as it proximity to the bulkhead was causing me some concern!

Having cleaned the surface newly lightened flywheel


the gearbox was fitted


Subframe was painted


And engine bay tidied up


My car has no heater so some ali sheet was made up to fill the holes in the bulkhead


A manual rack was fitted (and polybushed)


Finally the engine and subframe were reunited


And slowly the whole lot was put back in the car


By now my workmate had had enough of the plane crash and wanted me out. So I begged Gareth to let me bring the car back to his workshop and rent a bay in his building.

Yet again the Golf was back in his yard!


coming to some armco near you soon.....

Offline leavingeasy

  • Not said much yet
  • **
  • Posts: 76
Re: leavingeasy - track 20vt
« Reply #11 on: 11 February 2008, 23:22 »
By now it was Spring and with the bay made available to me, progress speeded up!!! :smiley:

First job was to join up the 16v Magnex exhaust system with the QPEng turbo downpipe.

This was done by cutting out the centre box and welding in a 2.5" stainless section


I fitted the correct clutch slave cylinder and routed the hydraulic pipe


then out came the engine again- I was getting good at this by now and could have it in and out in minutes


My biggest concern was the intercooler pipework. The K04 was not compatible with the K03 set up. Luckily I had a bit of a result when a broken APY engine arrived in the yard. Manifold and pipework were promptly commandeered and modded to suit the big valve AGU head.


A throttle cable bracket was welded onto the new manifold


The water bottle and header tank were removed from the n/s turret and the header welded onto the o/s


Heaps of heat protection was added to the bulkhead


but still something was missing


so in it when for the last time (i hoped :tongue:)


I made up a new top hose to accomodate the mk3 TDi rad


And changed the recirc valve for a forge one as the orig was buggered


coming to some armco near you soon.....

Offline leavingeasy

  • Not said much yet
  • **
  • Posts: 76
Re: leavingeasy - track 20vt
« Reply #12 on: 11 February 2008, 23:31 »
Next I started work on the inside.

That bloody evil sealant was stripped out :sick:


A centre dash was mocked up


and the dashboard wiring was routed (another horrible horrible job)


the battery box was fitted behind the passenger seat


and a through panel installed to feed the starter


holes were made for the gearbox cables


and slowly the wiring took shape


we cut out the towing eye to give anough room to fit the Mercedes Sprinter intercooler


with the TDi rad fitting neatly behind it


Finally some oil cooler brackets were made (yes I know its upside down but it was the only way it would fit!)


coming to some armco near you soon.....

Offline leavingeasy

  • Not said much yet
  • **
  • Posts: 76
Re: leavingeasy - track 20vt
« Reply #13 on: 11 February 2008, 23:41 »
I bought some new wheels from a mate c/w new 888's


Wiring was still an issue


But finally the engine was in and fitted. The cooler pipes were bodged together until something more long term could be produced.


The digidash was wired in and we were ready to go


First impressions of the car up and down the private road outside the workshops were mixed.

It sounded fab, looks of wooshing and hissing but didnt seem very fast. A quick check of the boost pipes revealed one had popped off!

Few more jubilee clips and another attempt and it was incredible. There was a huge rush of boost upto 1.5 bar, the wheels span, it torque steered all over the place, it wooooooooooshed, hissed and was uncontrollable on the damp concrete.

Both Gareth and I parked up and looked at each other.

We had made a monster!!!!

With a few more tweaks over the following few days it was ready to take home.

I managed to go four miles..............


and so began the next engine rebuild.

Pity me yet?


coming to some armco near you soon.....

Offline leavingeasy

  • Not said much yet
  • **
  • Posts: 76
Re: leavingeasy - track 20vt
« Reply #14 on: 12 February 2008, 21:28 »
Gareth was on hoilday, so it all happened on my driveway. Which was nice.

It all fitted so nicely under there:


But sadly it had to be stripped down. First thing was to remove the Mercedes Sprinter intercooler- marvel at the way Gareth and I had spent ages building brackets so it all fitted really neatly under the grill.


With that gone next came the Golf3 TDi radiator. Brand new  :cry:


Unfortunately on removing the rad, I found the exploding bottom end had punctured it :(  so new one needed:


Luckily the fans were undamaged  :)


Next job was to remove the oil cooler, disconnect the loom, the gearbox cables, various plugs and connectors, the fuel lines and the vacuum pipe. All done and it all looks a huge mess again


Ran out of time after that and had to head off to work, so the old girl was tidied up. Clearly it felt very embarrassed and tried to hide under a bush


Next job- pick up the new BAM engine from somewhere oooop north!
coming to some armco near you soon.....

Offline leavingeasy

  • Not said much yet
  • **
  • Posts: 76
Re: leavingeasy - track 20vt
« Reply #15 on: 12 February 2008, 21:35 »
So, a stooooopidly early start and 215 miles  ugh!


Just why are all these people on the motorway at this time? Turned out it was because somebody in a yellow NSX had some how spun their car and was facing the oncoming traffic.


The north and south border was unmanned but I still knew when I had arrived.


The engine was checked and loaded into my car by quite the most cheerful breakers I have ever met.


Mission today was to get the engine out and that means disconnecting the drive shafts again. Oh joy!!

So after two nurishing bowls of coco pops I hit the ground running, spanners in hands and attacked the dreaded driveshafts.

I dont like doing the driveshafts as it makes my arms ache undoing all those bolts, and lying on your back with the car two inches from your nose really doesnt help.

Lying on your back with the car two inches from your nose in the 25 degree mid day sun with your three year old sun saying "whats that?" every twenty seconds helps even less.


However after about fifteen minutes the engine was lifted out. Its been in and out about thirty times this year already.

This is the last time!


Sam immediately dived straight in the bay and had a bloody good look around (mainly enjoying picking up the 50p sized chunks of engine block that were liberally scatterted aroud)


Lifting the engine allowed me to look in the hole- this is my finger (entering from the rear :o ) and pushing the conrod forward. That knarled bit is the end, but not the small end, its actually snapped about one third of the way down!


Next job was to try and get the new engine out of the Volvo. Tempting as it was to just bolt it in and make the Swedish wardrobe mover a 400bhp racer, it would leave no room for the dog.


Unfortunately whilst I was having a throughly lovely time enjoying myself with my oily tools, number one son, Oliver, decided to go head over heels on his scooter. Ouch!!


The next three hours were spent fixing the pipework on the engine where it had been removed in a rather non caring manner from the donor car and fitting the parts I need for the conversion. I started at the back of the engine and sadly it looks like not much has happened- so I'll tell you:


On there you can see a K04 turbo with new gasket, the water rail fitted with new washers, the exhaust primary fitted with new gasket, the rear engine mount from a Corrado fitted after re routing the oil return line. Also done was the re-circ valve, and throttle body (changed from fly-by wire to cable operation) and a few other hoses.

So that just left me time to close the garage on it all at 6.30pm


« Last Edit: 12 February 2008, 21:45 by leavingeasy »
coming to some armco near you soon.....

Offline leavingeasy

  • Not said much yet
  • **
  • Posts: 76
Re: leavingeasy - track 20vt
« Reply #16 on: 12 February 2008, 21:54 »

First problem of the day is that the AGU and BAM engines use different coil packs. I thought I could have my loom altered to reflect this but unfortunately its not that simple:


Fortunately Ben at QPEng came up with an obvious solution- use the rocker cover from the AGU on the BAM engine. The AGU coil packs are more reliable anyways.

So with that in mind I set about stripping the old block. Trouble is removing the flywheel is always bloody impossible without a windy gun as the engine turns over everytime you apply pressure to the bolts.


Unless somebody has made a convenient hole in the block to jam up the crankshaft!!


After removing the sump, the oil pump fell out- dont think I will be using it again!!


Conrod didnt look much better.


Or the piston


Will be adding them to my trophy cabinet!!

Finally the block was stripped


Which allowed me to see the amazing damage I managed to do- I record even by my standards I think!!


Finished the day by fitting new water pump and cambelt, as well as alternator and various pipes.


In the meantime I am worried I might have become addicted to working on this. I decided I would take a day off and spend time with my kids. Which I did. :)


Then as soon as they went to bed I went into the garage. The BAM 225 engine uses different (and less reliable) coils to the AGU 150 engine. Unfortunately my engine loom wouldnt accomodate the BAM ones and so rather than buy a new loom, it was decided to replace the rocker cover from the AGU and keep the better compatible coils.

This is the BAM rocker


When I removed the rocker cover I was horrified. Seems something has gotten inside (I imagine whilst its been in storage) and so I had to clean out all the journals and cams, which was a horrid job.


However once finished it was just a quick swap aound of these two


Put the AGU coils in.


Et voila, job jobbed.


My trophy cabinet is growing....... :(


Will my hands ever be clean again?

I took ten mins just to paint the bulk head in order to stop reflections. This is not the finished product, lots of wiring to do and having a dash pod made hopefully. The interior is a nightmare, I had no idea what to do!!


coming to some armco near you soon.....

Offline leavingeasy

  • Not said much yet
  • **
  • Posts: 76
Re: leavingeasy - track 20vt
« Reply #17 on: 12 February 2008, 22:03 »
Today I thought I'd take the engine out for a little drive, after all it had been sat in the garage all weekend and I thought it might like to see the countryside.


I drove down to my mate Jason's Triumph dealership, which also has a handy Renualt dealership alongside, and asked the guys nicely if they would mind removing the dual mass flywheel (horrid heavy lump of iron) and replacing it with my sexy skimmed outrageously light one. Then fit the clutch as I didnt have an alignment tool.


30 mins later job was done. Sorted, thanks fellas!

That left me just enough time for a coffee and a natter with Mel at Triumph before fitting the gearbox and getting ready for work.


Following Saturday Jason popped around to help with something and pinched the Golf's key. His cunning plan was to watch me suffer, having finished the car I would run around frustrated not being able to find the key.

What actually happened was my poor three year old son got shouted at- alot! Poor little fella, he has a habit of pinching my keys, but he was innocent all the time, and to think I'd sent him to the naughty step too!

Still revenge was mine when I popped around to his place the following day and nicked the keys back. Oh didnt I mention I had them Jas? Was fun watching him run around trying to find them!!

Anyway so back to progress:

popped the engine back in and started connecting those bloody driveshafts. God I hate that job! Once in I needed to reattach the electrics and hydraulic clutch. This is a picture of a hydraulic gearbox for all those who dont have one!

Having finished that a few problems raised their head- the cam cover was far too close to the brake m/c. Grrrrr turns out I had fitted the engine slightly twisted (god knows hows how) so I had to undo everything and fit it all again!! :angry:


So once it was all in I had the pleasure of priming the engine. This is a truly horrible, hateful, hideous task, which I think Gareth makes me do for his own sadistic pleasure.

Basically you remove the spark plugs and insert a long socket on the crankbolt, then turn the engine over by hand.

Keep turning until oil comes out here, or you bleed, or you get bored, which ever occurs first.


That took twenty minutes- why couldnt i just let the starter crank it over, surely its the same thing??

Gareth?

Next task was to fit the AGU loom to the coils

And then fit the fans to the nice shiny new radiator


reassemble
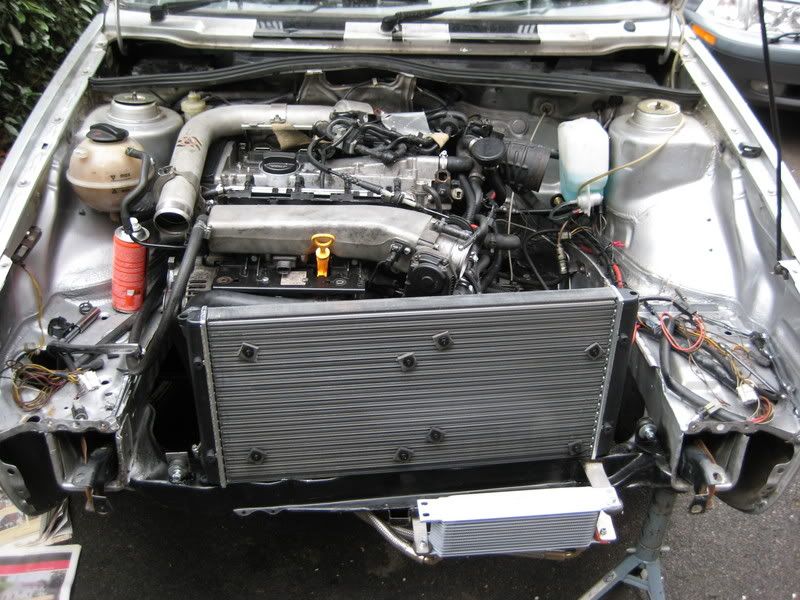

add oil, water, cable ties and bolt the front back on


so did it start??

did it hell.......


coming to some armco near you soon.....

Offline leavingeasy

  • Not said much yet
  • **
  • Posts: 76
Re: leavingeasy - track 20vt
« Reply #18 on: 12 February 2008, 22:11 »
I primed the fuel pump three times to pressurise the lines et voila


Yes I know it sounds like a sewing machine- that's the injectors. Its not the sexiest sounding engine in the world!!

Rather foolishly decided to add up how much this small episode has cost me:

Engine £1200
engine collection £40 diesel
broken hose £14
radiator £55
fan fixing kit £10
oil, filter, coolant and ancillaries £65

total £1384

and the to do list is still endless:

Fit hi-pressure fuel pump
Bleed clutch
Fit seats and harnesses
Fit bumpers
Fit wing mouldings
Fabricate and fit dash
Clean contaminated brake discs (after oil exploded over them)
Fit indicators
Bolt in quick release bumper irons
WIRING 
Fabricate an airbox
Fit AFR meter
MOT

But things were looking up

The first drive (no seat!!)


Beaten into submission


Hooking up with Jason


Thought seats might be a good idea- binned the Monacos and fitted these


coming to some armco near you soon.....

Offline leavingeasy

  • Not said much yet
  • **
  • Posts: 76
Re: leavingeasy - track 20vt
« Reply #19 on: 12 February 2008, 22:20 »
I KNEW IT WAS GOING TO BLOODY WELL  :embarassed: :angry:

I am now reaching for matches and petrol. I HATE THIS CAR :angry:

Seems when the engine was being manhandled by the breakers they cracked the sump. I never thought to look (school boy error) I will in future.


That little seep is a crack that merrily drips all my cars life blood all over the floor.

Luckily I had to go to work now- it was my birthday trip and I was going to St Lucia, it was sunny, silly and boozy. Perfect restbite!

Gareth shouted at me. This is by now normal.

Whilst I crawled around in the pouring rain on my back I noticed it might be possible to remove the sump with the engine in situ. Gareth agreed to give it a go.

10 mins later and voila:


sump removed!


a closer inspection revealed the sump had got gravel in it, so if I had done a tempo patch I would have actually fooked up my engine when the oil pick up got blocked eventually.


Grrrr! As usual Gareth was right!!

Interestingly the colour of the conrods was the normal silver- unlike the other engine where they were baked golden. I have high hopes for this motor!! Crosses fingers, legs, eyes etc!

So the final scores on the doors now:

1988 Mk2 Golf, stripped of everything I could sell, c 950kgs
SPAX RST coilovers lowered 40mm (30 at the rear)
28mm rear ARB
G60 280mm brakes with DS2500s, braided hoses and all that jazz
15" wheels with either 888's or T1Rs
Audi TT BAM engine with 1bar boost- c.250bhp
Golf3 TDi radiator with twin 10" fans
Mercedes Sprinter Intercooler
13 row 235mm Oil cooler with 82 degree thermostat
Corrado VR6 gearbox with hydraulic clutch conversion
Helix paddle clutch and lightened flywheel
Custom made 2.5" exhaust downpipe, connected to Magnex s.s system
Perspex rear three windows
Big bumper conversion
Lots of stickers
A blind hope that this one holds together.


coming to some armco near you soon.....