Author Topic: Darnpistonbroke - Golf G60  (Read 49043 times)

Offline DarnPB

  • I live here
  • *****
  • Posts: 1,959
  • Formerly Darnpistonbroke
Re: Darnpistonbroke - Golf G60
« Reply #10 on: 07 February 2008, 22:26 »
Well, a bit more has been done today. I started stripping the exterior of the car to prepare it for paint. The bumpers are off as are all the plastic trims including wheel arches. I also fitted the new second hand slam panel as the existing one is quite badly damaged.


These are close ups of the damage I found on the old slam panel.


And this is the new one prior to cleaning and transfer of bits.


The car looks a little naked now and resembles a MK1 GL. The trim came off easily and did not hide much damage. But it did show that the car has had a little unhappy history. The front left wheel arch was butcher fitted and I had to resort to a mild form of butchery to remove it. I also found out that the right hand front wing is from a non G60, and has had to be modified so that the arches could be fitted. G60 have cut outs in them and square holes round the radius to allow the arches to be mounted properly. Or at least that is how it seems on mine.


A little damage here hidden by the rear left plastic arch cover. Nothing serious and the panel is not bent.


The following are the 'shiny bitz' that I have recently acquired.
Hand brake and gearstick gaitors...

Before...plastic stuff that is a little past it


And after...nice smelling leather


Cam shaft and tappets. Camshaft is split duration 268/276


And lastly for today, rear panel and side strip badges.


These last items have really thrown me into a dilema. I was going to go for smoked indicators and rear clusters, but now I have these lovely badges, I think that crystal may suit the car better. Please feel free to comment on this.

Anyway, tomorrow I will continue to strip the car, ie aerial, mirrors etc. Then off to paint next week.
I may update again tomorrow, it depends on how much I do. Thanks for looking.


THE FORUMS NUMBER ONE ANTI-FOOTBALL FAN!!!

Offline DarnPB

  • I live here
  • *****
  • Posts: 1,959
  • Formerly Darnpistonbroke
Re: Darnpistonbroke - Golf G60
« Reply #11 on: 14 February 2008, 21:13 »
OK. A few more bits and pieces have been done to progress the beast. The seat bolster on the drivers side, that is the left seat to me here, and also to all ORIGINAL G60's, was way past it. There was foam crumbs all over the carpet when I first bought the car, and when I removed the seat and stripped it down, I found this:


I had an hour or two trying to repair it like I did with my old Audi Coupe a couple of years ago, but the foams are slightly different, so I lost interest. Now the foam bases are the same for the both front seats, so I set about finding a decent passenger side one, and came up with this.


This is also the result of washing it and waiting for over a week, yes, a whole bloody week, for the damn thing to dry out. But the end result was this.


Before putting the seat back together, I puy tape over the sides of the bolsters in an attempt to give it some protection against the constant rubbing from the fabric covering when ever the seat is occupied, (spelling check please!!). The result is a very comfortable and firm seat. I then cleaned it with foam upholstery cleaner. Now I have to check the passenger side and then clean all the seats.

I set about today finally preparing the car for the paint shop. I removed the windows successfully, ie, didn't break one. But found the only bit of rust on the car. Two tiny scabs where the rear quarter windows fit into metal clips. Well the clips were rusted away and it had started into the window aperture.


These last photos are rubbish. I think the camera was trying to focus on the things in the background.

It's not bad at all and I am certaily not worried about it. Now the car resembles a ghost car with no windows except the windscreen, which is the original from the factory, and is bonded in. It's amazing how the G60 differs from its 8 and 16v cousins. I didn't even attepmt to remove it as the glass would have gone in a big way as it is already cracked. I have spoken to the body shop and they said that they will remove it. I intend to replace it with a top tint windscreen and have it fitted with a conventional rubber.


The shaded areas that you can see high-light the parts of the car that I want re-profiling and repair work. There are also a couple of holes that I want smoothing over, one of which is the VW badge recess in the rear panel.

I came to the UK on work business for a couple of days and took the opportunity to do a bit of shopping. I went to GSF and bought an eyebrow spoiler for the front, a set of exhaust mounting rubbers and pair of new door handles. I also visited Stomper in Reading and bought his steering wheel, which I am delighted with.


The silver ring in the middle is actually black, the camera flash caused the silver effect.

The car was meant to go to the body shop tomorrow, but it has now been postponed till Tuesday, so it is sat outside under a silver car cover which has a habit of blowing away. I just hope no-one takes too much interest in the car as it is really open to the elements, not even sporting door handles. Fingers crossed.
More pictures next week as I watch get transported away.
I am not sure if I will be able to get pictures of the body work repairs, preparations and final painting as I will be back in the cars' home country, Germany, whilst it is being fettled. But as the painter is a neighbor and a BBQ pal, I will ask him to also take my camera.
Thats all for now. Thanks for taking the interest.
« Last Edit: 14 February 2008, 21:21 by Darnpistonbroke »


THE FORUMS NUMBER ONE ANTI-FOOTBALL FAN!!!

Offline DarnPB

  • I live here
  • *****
  • Posts: 1,959
  • Formerly Darnpistonbroke
Re: Darnpistonbroke - Golf G60
« Reply #12 on: 19 February 2008, 15:36 »
Ladies and Gentlemen, the car has left the building.... And is now in the body shop!
I took some photos of the loading and of it nestled in the body shop amongst other cars such as Mercedes, Jaguar etc. My old bug brought the neighborhood down a peg or two, but soon it will be up there with the best, where it should be.
I had to buy a new wing yesterday. Did I say new?? A new one for the G60 is 154 €uros + VAT. G60 wings are a little different from normal Golfs. Anyway, the reason being is that when the shoddy repairwork had been done previously, a pattern wing was used and modified. But the panel gaps with this wing on were 'orrible. So of to the scrappies again and I wrenched off a minter, in the same colour. I also bought a rear windscreen as mine had a deeeeep scratch, almost a crack, and the demist heating element is a little past its best. Total spent, 40 €uros. I spent this morning modifying the wing to G60 spec and placed it in the car for the paint shop.
I have photos, but I gave the camera to my mate the sprayer so that he can take stage photos during the prep and paint process.
I get the car back in a couple of weeks. Meanwhile, tomorrow I return to the cars' home country Germany for two weeks. I have a feeling these two weeks are going to drag...


THE FORUMS NUMBER ONE ANTI-FOOTBALL FAN!!!

Offline DarnPB

  • I live here
  • *****
  • Posts: 1,959
  • Formerly Darnpistonbroke
Re: Darnpistonbroke - Golf G60
« Reply #13 on: 08 March 2008, 23:16 »
Well the two weeks dragged. 14 days of 12 hour day shift without fixing a single plane. Yawn.
But anyway, back to the more interesting stuff.
As I said before, I bought a replacement wing which I had to convert to G60 spec. The wing as bought:


The wing after mofification by me.


Then came the time when the old girl was loaded up to be taken to the body shop.


And this was taken showing the old girl in her new home for the next couple of weeks.


It was at this point that I left the camera with my friend the painter, and he did me proud. Continued on the next reply.


THE FORUMS NUMBER ONE ANTI-FOOTBALL FAN!!!

Offline DarnPB

  • I live here
  • *****
  • Posts: 1,959
  • Formerly Darnpistonbroke
Re: Darnpistonbroke - Golf G60
« Reply #14 on: 08 March 2008, 23:36 »
Well two weeks went by with me in Germany, but when I returned, the following was the result. There are rather a lot of photos, so I hope thay won't be too boring.

The work started with reprofiling the passenger door. (Remember I live in Spain and anyway, original G60 Golfs are left hand drive.)


Then the bonnet came off for masking and better access to the passenger side front corner.


The dent was removed from the rear panel and reprofiled.


And the 'crap repair' from a previous accident was also reprofiled.


Filler primer going on.


The rear apperture where the VW ensigner was, now filled.


Masking up for priming.


Primer on.


Masking up again for final paint.


In the spray booth/oven.


Final masking.


End result. The picture are quite poor. There was dust or paint on the lense.


New top tint window going in. G60's and Rallyes have the windscreen bonded in as it adds to car rigidity. It also adds to the cost! :cry:
The chap pictured is Javier, and did all the work including the paint. He is a good friend of mine and lives just round the corner from me. He was just giving the glasier a lift with the glass.


Beginning the journey home.


More to come over the next few days. There will be a couple of before and aftershots as well as the rebuilding of the beast. Stay tooned.


« Last Edit: 08 March 2008, 23:45 by Darnpistonbroke »


THE FORUMS NUMBER ONE ANTI-FOOTBALL FAN!!!

Offline DarnPB

  • I live here
  • *****
  • Posts: 1,959
  • Formerly Darnpistonbroke
Re: Darnpistonbroke - Golf G60
« Reply #15 on: 12 March 2008, 22:30 »
Well work has progressed with the rebuild, but first a couple of before and after shots.

The dent in the left hand rear wheel arch.


The same wheel arch now.


You can probably make out where the VW badge goes, or should I say, went.


Same panel now.


There used to be an antenae hole here that had a rubber grommet blanking it.


This panel behind the drivers door, (LHD) had a big dent in it. Not any more!!


Colour coded armour door plates.


I have spent most of the last couple of days fitting the interior and trying to remember where everything went. I also cleaned up and fitted the door and body plastic trims. I bought two new door handles from GSF and quickley wished I hadn't. Where the passenger side works to effect, the action is nothing short of disgusting, and the drivers side just jams. These items are very poor quality and I would suggest to anyone to buy OE. I will be keeping the passenger side one, but I need to go to VW soon to get a real one for the drivers side.
Anyway, I got most of the interior in, including the rear seat, although ideally this needs replacing as the condition of the interior of the seat is poor. But it look OK from the outside. I replaced the backing of the seat upright as the original was 'orrible. Anyway, a couple more photos of the interior.

Before.


After.


The carpets I cleaned thoroughly before I fitted them. Took a few hours. The photos are just fitted and after I had my grubby, (well, a little dusty) feet all over them. So a little more vacuuming is needed.

Finally, I fitted my new leather gear stick gaitor and new gear knob.


Now, about this gear knob. When I bought it, I thought it was the same as I always buy for my Golf. However, when I removed it from the package, little neon lights started flashing and beeping on the top of it. HOW CHAV IS THAT??? Well, the batteries came straight out!! Needless to say.
I will be continuing with the rebuild over the next few days. Tomorrow, I hope to have the interior fitted, all bar the radio and sub. Then it will be to the brakes and wheel arches.
I have new slotted discs and green stuff pads to fit. These took a LOOOOOOOOOOOONGGGGGG time to arrive from the UK, but at least now I have them.
Hoping to get the bumpers on by the weekend.


THE FORUMS NUMBER ONE ANTI-FOOTBALL FAN!!!

Offline DarnPB

  • I live here
  • *****
  • Posts: 1,959
  • Formerly Darnpistonbroke
Re: Darnpistonbroke - Golf G60
« Reply #16 on: 17 March 2008, 21:24 »
Well alot got done this week. The plastic work got fitted as did the bumpers. The bumpers, I had to put together first as, if you buy them from VW, they are able to sell just the covers, and you fit them yourself to your existing bumper frames. Cuts down on the cost of buying a complete bumper.
I also fitted the disc's and green stuff pads. The exterior of the car is now nearly finished as you will see from the pictures.

This is with the new arches on and the wheels, which were refurbished a while ago, with new centre caps. The rear bumper is also fitted in this shot.


Close up of the front wheel with the new slotted disc behind it. You may be able to just make out the green brake pads.


Bumper fitted and replacement smoked light clusters which were bought from ebay. Also a brand new number plate.


The next couple of shots are of the colour coded mirrors. I fitted these earlier today.


Another view of the mirrors. Also today, I fitted the new window window rubbers. That was a job that takes time to get right...with the aid of a plastic hammer!!


The front bumper I put on yesterday after cutting out the holes for the fog lamps. It fitted perfectly with no adjustments needed.


Front view.


This is a shot of new tail gate struts. They are a bit bling for my taste but thet are stronger than normal ones and will support the weight of the stealth shelf when I get round to fitting it.


This is as far as I have got so far.


Off to Germany again on Thursday. When I return in two weeks, the engine will be seen to with a new cam fitted, overhauled supercharger and remapped ECU. I will then fit the grille and finish off the rest of the interior, and hopefully, give the old girl a blast for the first time. Hoping to take it to Le-Mans this year, but we'll see.


THE FORUMS NUMBER ONE ANTI-FOOTBALL FAN!!!

Offline DarnPB

  • I live here
  • *****
  • Posts: 1,959
  • Formerly Darnpistonbroke
Re: Darnpistonbroke - Golf G60
« Reply #17 on: 16 April 2008, 09:47 »
Well, I have been back from the fatherland for nearly a week now and have done some more to the velocopede. The weather here in Spain is warming up, so time for a little ICE. (I'll get my coat.)

As you have seen from the precious posts, I have been gradually accumalating various bits 'n' bobs including audio equipment. I have not got round to connecting up the amp or sub yet, but this will hopefully be done later this week. But anyway, to start with is the stealth shelf.

The top.


The underneath.


Stealth shelf split. The speakers are actually fitted to the smaller board, then the board is fixed to the main shelf.


I neglected to take a piccie of the holes cut in, but these are the speakers fitted.


Because of the height of the tweater mounts, I have had to add a small frame around the circumfrence of the board so that the said tweaters to not foul the main shelf once mounted. You should be able to see the frame in the last shot. This also meant I had to find some longer screws.
The shelf is not yet finished as I need to buy some metal mesh to go over the speakers so that anything placed on the shelf, will not damage the speakers. I will then cover the lot with parcel shelf covering. I will cover the remainder of this part at a later date.

The head unit fitted. This unit is also blue tooth. So I can make phone calls legally. (Ish).


The next shot is of a rear window demist switch. I will not need the sub woofer working 100% of the time, but as the power amp is switched on when the radio is, I incorporated this switch into the power amp switching circuit, so that I can turn the sub off when I don't need it.


The next photo is of the switch installed. I painted out the picture of the demist sign, but the paint was still wet when I took the picture, hence the reason why it looks shiny. It is actually painted satin black.
I am sure you will agree that this will look better than a chrome toggle switch mounted onto one of the blanks.


The next shots are of the inner door membrane. I was not entirely happy with my repai effort of a few weeks ago. Here is a reminder shot. Looks pretty cack I am sure you will agree.


So I bought from ebay what I thought was a door membrane kit from Cheshire salvage.  What I got and paid a fortune for was nothin short of two sheets of clear plastic that is available for pence practically anywhere. I was not impressed and I urge people to stay clear of these rip off merchants. But as I am in Spain, it is pointless to do anything about it, and make the best of what I had.
So I cut to shape these sheets and fitted them with industrial strength double sided tape. (Being I was supposed to have bought a kit, all I got was the plastic and nothing else! :angry:)
Anyway, the end result is this.


Then the door card, along with chrome door handles, polished aluminium mirror adjusters and lock pins. (Very sad)


Lastly for this post, I fitted the G60 logos to the rear of the car and the door trims. I like these alot.


That is all for now.
Today I will be fitting a new suspension and lowering kit. I have also seen on the post tracking that my compressor and ECU should be delivered today. I was going to send these to Germany as I said a few months ago, but I had a change of heart and sent them to Jabbasport. Talk to Brian there. He is very knowledgeable and helpfull. I have had the compressor overhauled to a stage 2 with a 68mm pulley. I considered a stage 4, but decided against it as I want to preserve the life of both the compressor and the engine. As it is, with a ECU re-map, a 68mm pulley and my special cam shaft, I should be pushing in excess of 190bhp. And later when I replace the exhaust and manifold for a tubular one, and fit the larger intercooler that I won off ebay, I could be reaching an optmistic 200bhp. Well, we will see! I am a realist, not a dreamer.


THE FORUMS NUMBER ONE ANTI-FOOTBALL FAN!!!

Offline DarnPB

  • I live here
  • *****
  • Posts: 1,959
  • Formerly Darnpistonbroke
Re: Darnpistonbroke - Golf G60
« Reply #18 on: 16 April 2008, 12:53 »
Breif update. The post has just come with my compressor, ECU and new tension spring. Oh yes, I'm a happy bunny. Was going to fit the suspension today, but now I'm going to get the old girl running.
STAY TOONED!!! :laugh: :laugh:


THE FORUMS NUMBER ONE ANTI-FOOTBALL FAN!!!

Offline DarnPB

  • I live here
  • *****
  • Posts: 1,959
  • Formerly Darnpistonbroke
Re: Darnpistonbroke - Golf G60
« Reply #19 on: 22 April 2008, 09:07 »
Well, this is a long overdue update, purely because I was concentrating on working on the car. Anyway, progress has been made.
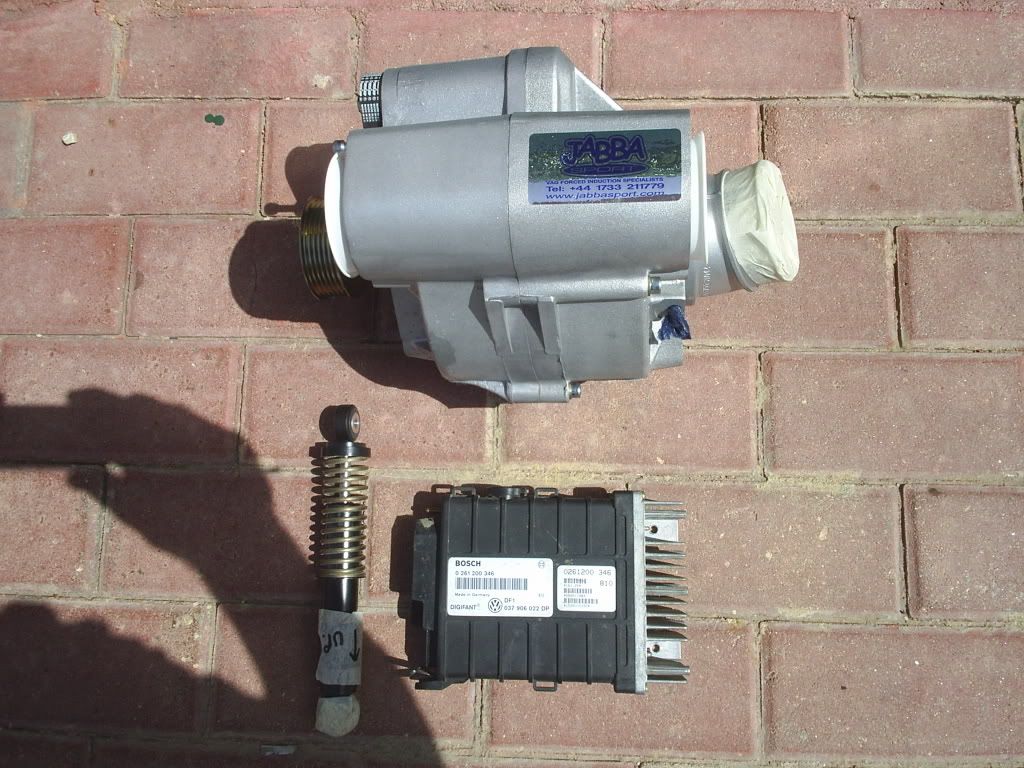
As in my last update, these arrived in the morning.


So I dropped the idea if replacing the suspension, and started the engine work.
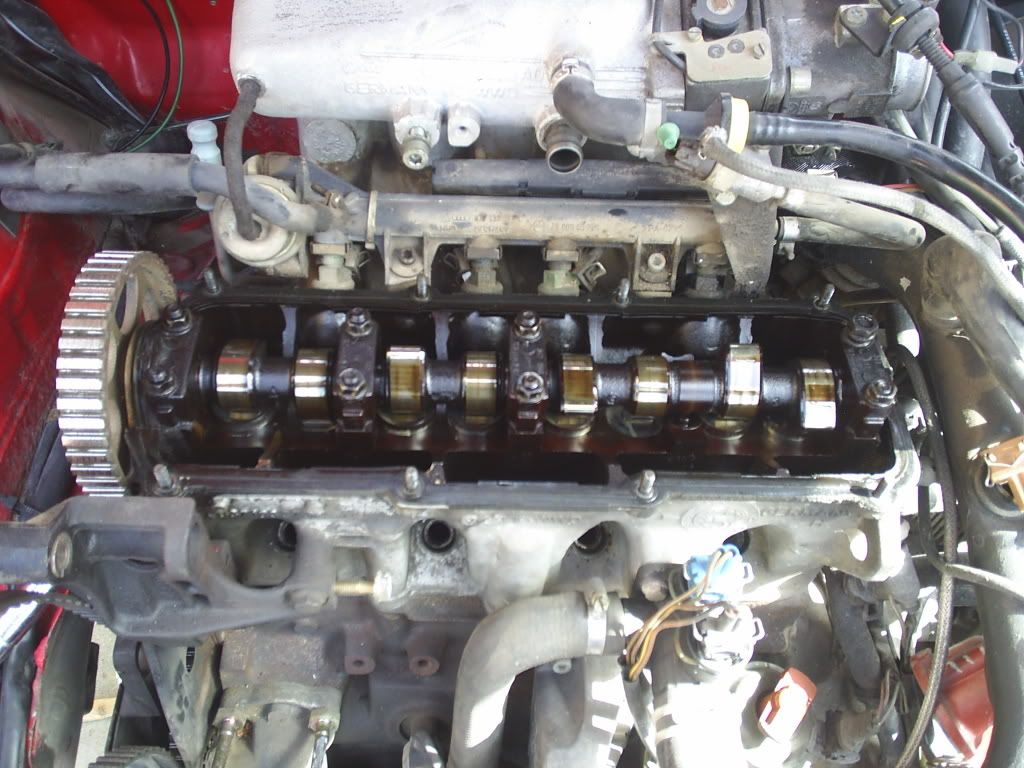
First was to fit the cam shaft. This is the old one still in place.


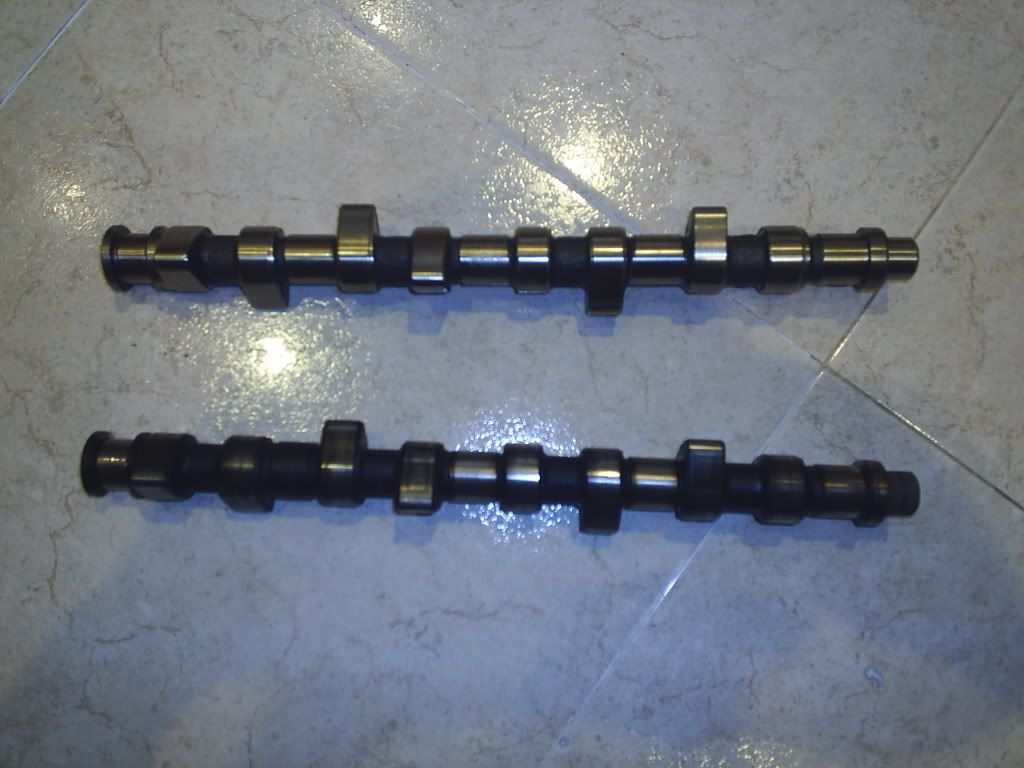
Then both side by side. Spot the difference.


I went about fitting this, but as I don't have a manual for the G60 engine, I had to rely on experience to get it right. Alas, I do not have any further pictures of the engine work as, to be honest, I got so engrossed into it, I forgot!! My bad!
Anyway, I got the cam changed with no problems at all, along with all the drive belts, including the serpentine belt that runs the compressor , the water pump and the alternator.
The tensioner pulley for the cam belt was absolutely knackered. I would have given it not even one hundred more miles before it would have caused some serious damage to the engine. It was as dry as a bone, half the bearings were missing where they had broken up and if you got all the bearings to one side, the pulley would cock over to one side. Far from satisfactory.
Word of warning to those who do their own maintenance, or even to those who get it done at the garage, always replace or insist on having replaced, the cam belt tensioner with the cambelt, whatever the condition. Its false economy not too! I always do, and this is the first time I have seen one in this state.

Next I fitted the compressor. Once it was in, I had to try to remember the routing of the serpentine belt as it had been a while since I took it apart. I finally got there and fitted the new tensioner spring. This thing is similar in appearence to a shock absorber from the suspension and I suppose, does exactly the same job. I bought a new one from Jabbasport, who also modified for me to make it a tad longer. Remember, I am using a 68mm pulley.
Whilst all this was going on, I had the oil draining away for a oil change and filter change. I used fully sinthetic competition oil suitable for turbo charged applications. We will see how it goes.
I have no pictures of under the bonnet, as quite frankley, I am too embarrassed. :embarassed:
I have done no detailing of the engine bay at all and it does not look very good. The reason being is that I want to prove the engine first before cleaning it up. If it goes bang, then the engine would need to come out anyway to be repaired. I aim to remove said lump later during the year to do detailing work, and I only want to do it once. That is my excuse, (and I think its a bloody good one) and I am sticking to it. :smiley:

Anyway, back to the car.
I got the engine started after a while, as I had not put the distributor shaft back in the position it was in originally. The last person to do this got it wrong and adjusted the timing accordingly, which is common practice, and to be honest, a bit gash. So I fitted the cam belt with the distributor drive shaft in the correct position, which of course threw the timing out. So after fiddling with the distributor, I finally got the engine fired up, but it ran horribly. When I come to the UK next week, alas without the car, I will be buying a Corrado G60 Haynes manual so that I can check my own work against the book of words, and also set up the engine properly. But, it is drivable and you can tell, even though it is not running right, that the power from the cam (Schrick 268/276 split duration), the 68mm pulley on a stage 2 compressor, and the re-chipped ECU is wanting to unleash itself. Can't wait to get it running right and get the compressor run in.

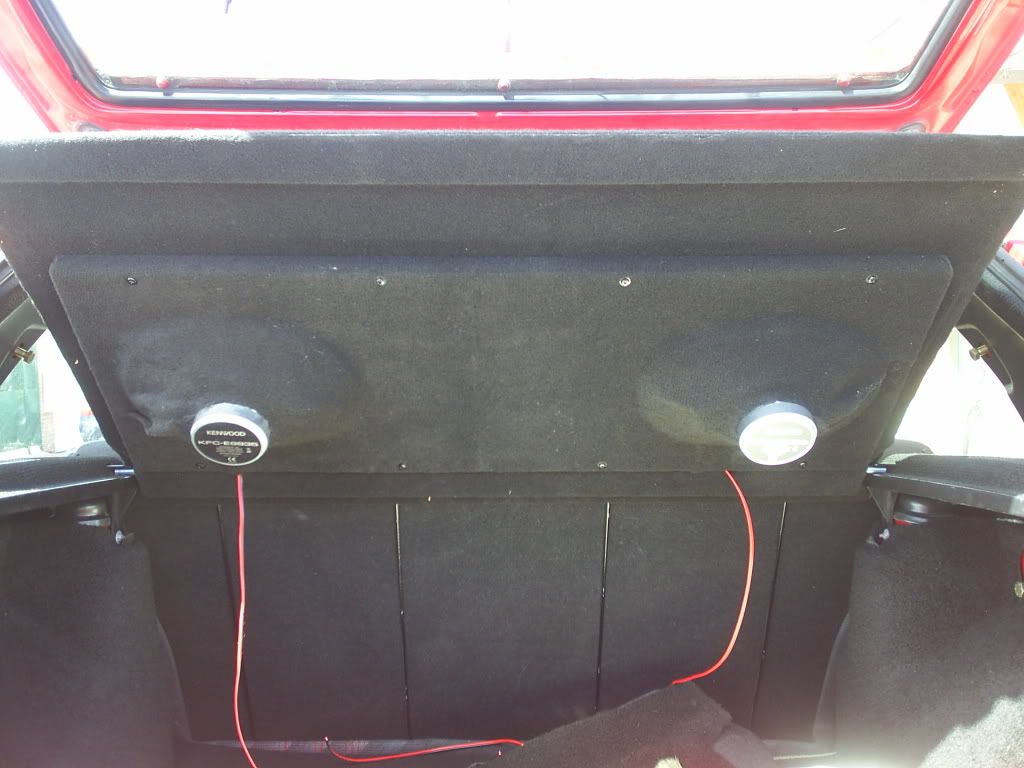
Back to the interior. In my last post, you saw me starting to build up my stealth shelf. Well, yesterday I finished it. I added a little more material to the shelf in order to support the wire grille to cover and protect the speakers.


Then I added the grille.


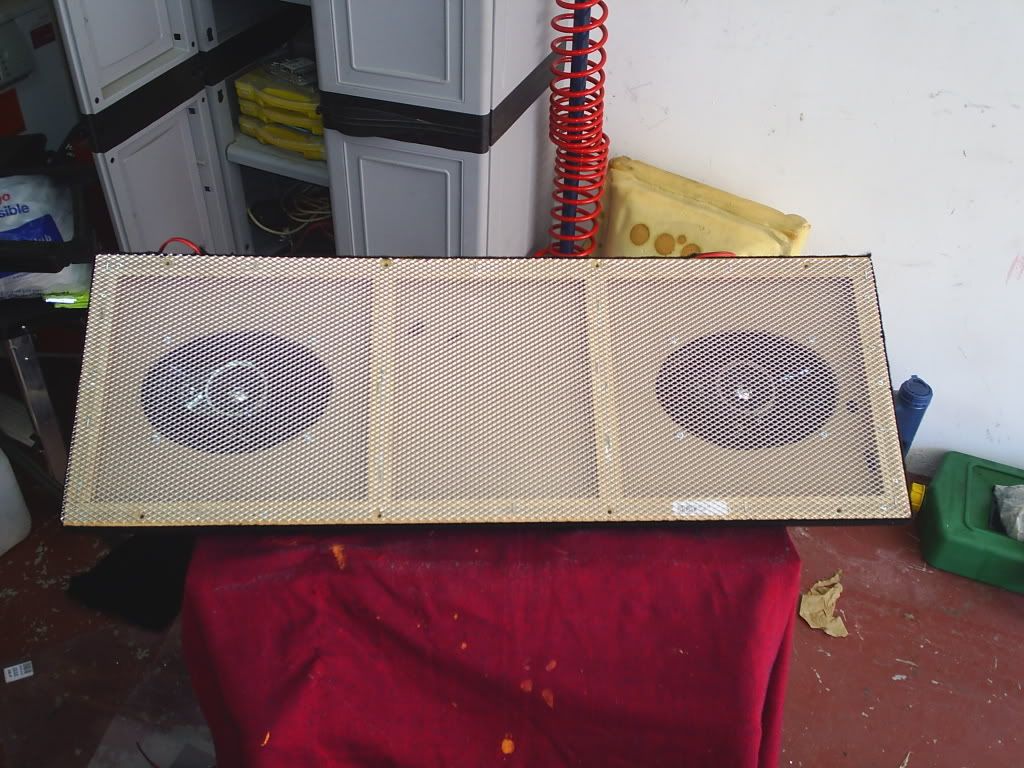
I then covered the whole lot in parcel shelf material and fitted it to the car. It still needs a little tidying and I will do that at a later date.


I then set to finish the rest of the interior. Pictures of this will appear later today once I have given it a good clean.
But yesterday, I did clean the exterior and threw some polish at it, so here is a taste of what is to follow later when I take her for a little photo shoot. :smiley:


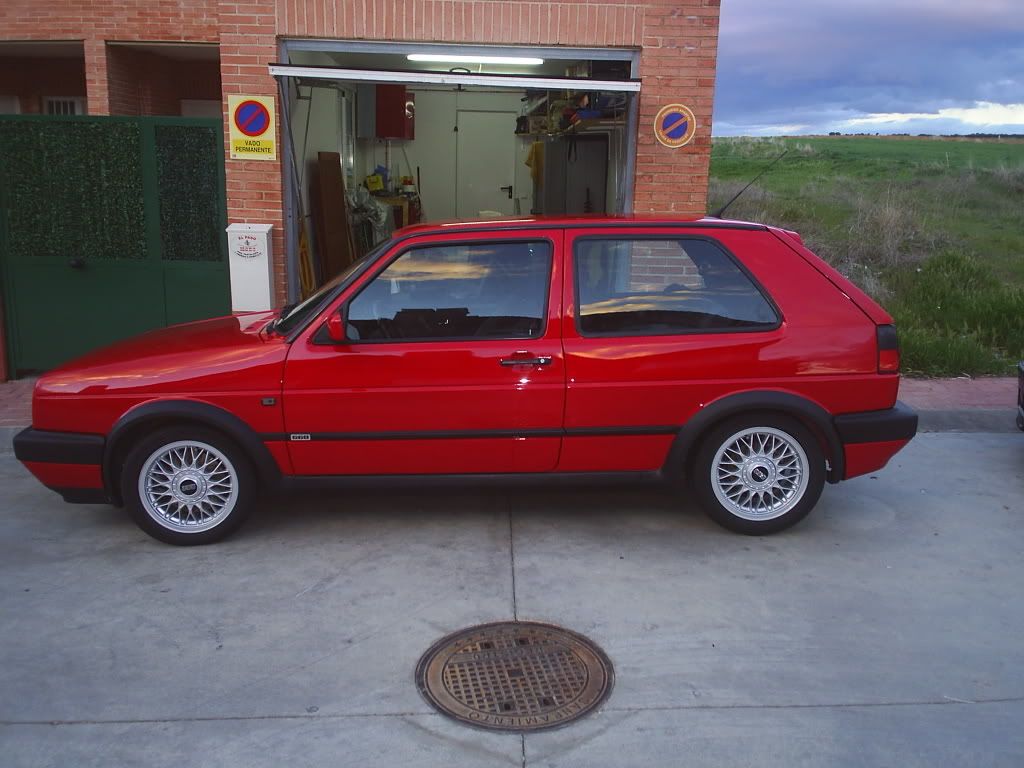
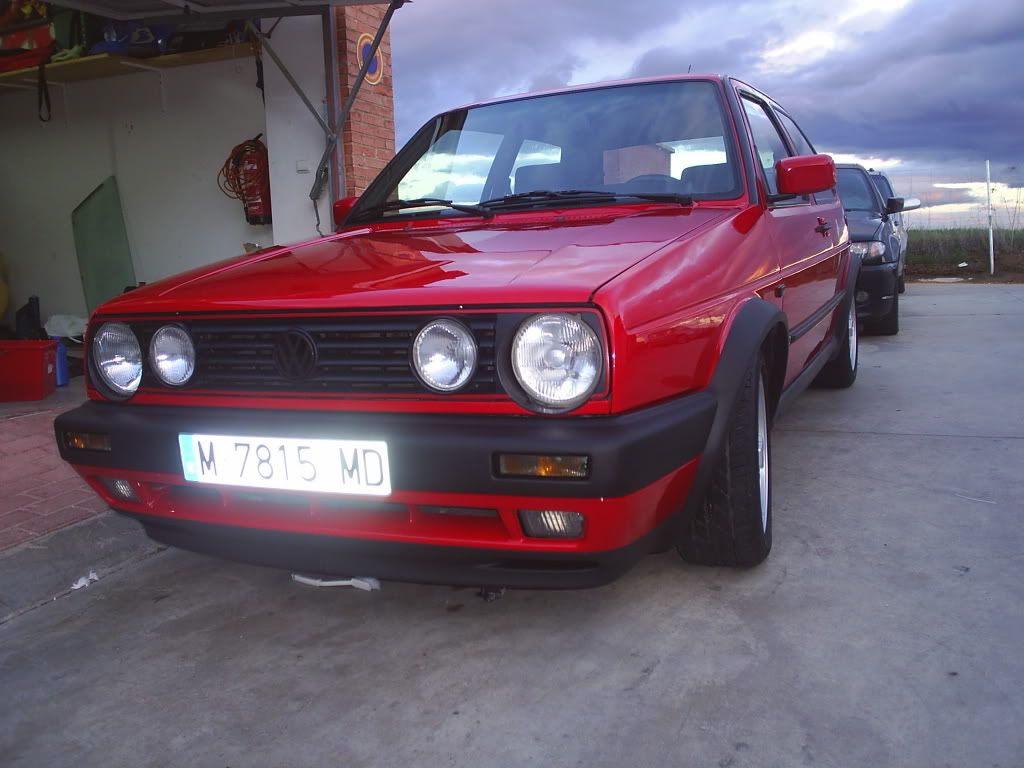
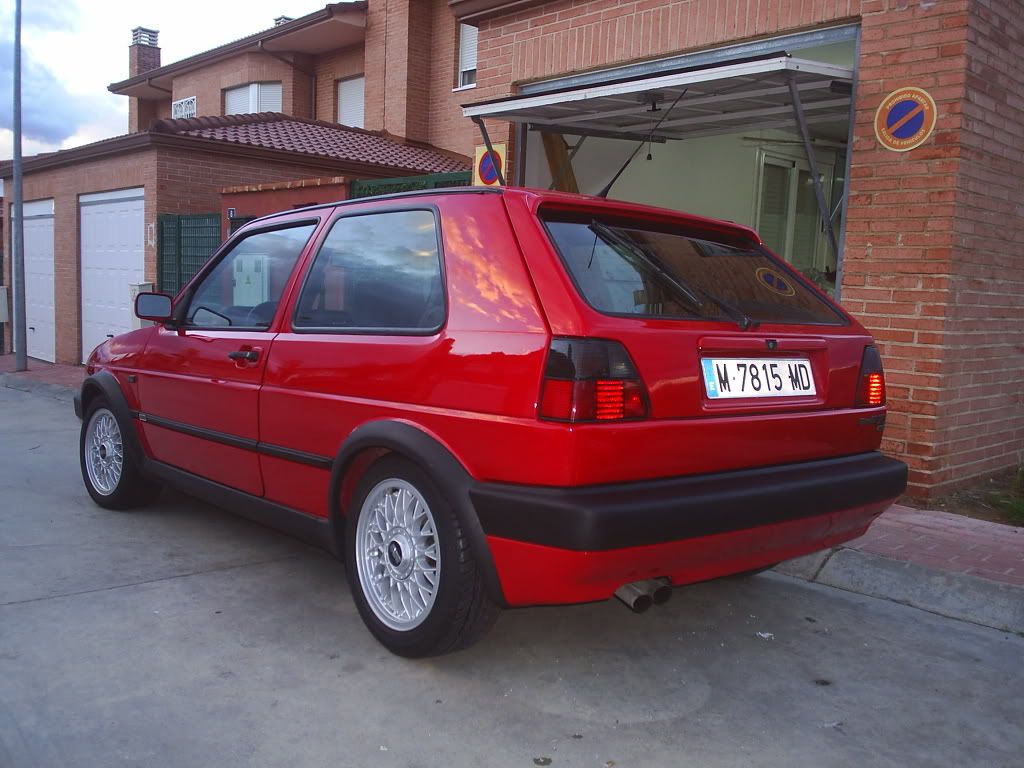
I am more than happy with the final results. She will never be a show car, that was not my intension. But she will not let herself down if I ever attended one.
Now take a moment to look at the photos of her when I first bought her and compare.
More piccies to follow, hopefully later today.
Thanks for looking. :smiley:


THE FORUMS NUMBER ONE ANTI-FOOTBALL FAN!!!