Author Topic: hurdy - Edition 30  (Read 45668 times)

Offline jv

  • Administrator
  • Serious forum addict
  • *****
  • Posts: 7,220
hurdy - Edition 30
« on: 11 February 2008, 19:05 »
:)
« Last Edit: 13 February 2008, 10:12 by jv »
Buy site stuff!
GolfGTI.co.uk - merchandise

Support the forum charity!
Forum Charity

Offline Hurdy

  • Serious forum addict
  • *
  • Posts: 8,466
Re: hurdy - edition 30
« Reply #1 on: 12 February 2008, 10:51 »
Cheers JV. Looks like I'd better get a move on now then.

Welcome all to my ED30 project thread and here's hoping some of you lucky MKV owners who have the bug for modding (RR - are you listening? :wink:) get a thread going in this section too.

Where to start?

Well my car is a 5dr MKV Edition 30 in Reflex silver and was"born" at the end of March 2007. It started off with a few optional extras listed below:-

DSG - an awesome piece of kit, which makes driving less strenuous around town and more exciting in the open countryside.

IPOD fitted in the centre console, with centre armrest - The centre armrest is great although the IPOD prep turned out to be a disappointment.

Factory fit tinted glass from the B pillar back - Keeps prying eyes at bay and looks quite cool.

Lux pack 1 - This adds the folding mirrors and reverse dipping, which are used regularly.

Cruise control - I had this fitted as a dealer option as it was around £120 cheaper, but is exactly the same as the factory fit.

That was the last of the options as I was always going to add on stuff after, which made speccing up the car too far a bit pointless.

The other two services I had added were GAP insurance and the full servicing, maintenance and tyres package.

Well that is the introduction over and done with, so I guess I'd better start looking for a few pics :grin:
Seat Leon Cupra Black 290 DSG

Offline Hurdy

  • Serious forum addict
  • *
  • Posts: 8,466
Re: hurdy - Edition 30
« Reply #2 on: 13 February 2008, 14:08 »
Here we are, a few pics of my car:-


My personal favourite below


Seat Leon Cupra Black 290 DSG

Offline Hurdy

  • Serious forum addict
  • *
  • Posts: 8,466
Re: hurdy - Edition 30
« Reply #3 on: 13 February 2008, 14:37 »
Right then,

The sound system.

I didn't spec up the original CD system as I always knew I was going to buy an aftermarket set up at some stage and so I simply had the RCD300 with IPOD prep.

The IPOD prep was complete pants and such a letdown it prompted me to change the system almost straight away.

After some hunting about on the Internet I settled on a Kenwood DNX 7200. This head unit along with some add ons gave me the following benefits:-

i) The SAT NAV is hard drive based and can be updated by simply downloading new maps onto it through the SD card slot in the front.
ii) As the SAT NAV is hard drive based you can still use the DVD slot whenever you want. The DVD drive also plays Audio MP3 files on DVD, so you can have 4.7gb on just one disc = 1000 songs
iii) Decided to have a video IPOD connection into the glovebox. This set up is fantastic as the touchscreen menu for IPOD control is really simple, really fast and shows all the details you would ever need.
iv) I had the Kenwood Bluetooth handsfree add-on too and this is also easy to use. It mutes the music when you make a call or accept incoming ones and so isn't a pain like some stand alone units.
v) I had a reverse park camera fitted in as well. This is an awesome function that automatically changes the head unit screen to a camera when reverse is selected. It also turns black and white automatically to give a clearer picture in low light conditions.

The only issue I had was security as it is a double din unit without a face-off section. The unit is well screwed in, but in the end I decided that a bit of stealth was in order and I ended up buying a cheap RCD300 off fleabay and hacking it to bits. This gave me the following result:-


Once this was in I found that the clarity of the speakers worse than before I had the head unit fitted. This was due to the fact that VW headunits use DSP (digital sound processing) to control the volume of the speakers at certain frequencies as the standard speakers are very poor at sound handling.

The only way past this was to rip out all the standard speakers and fit a decent aftermarket set up.

I ended up going for 3 way Hertz "hi-energy" components in the front, Hertz "hi-energy" coax's in the rear and Hertz "hi-energy" 10" sub in the rear. The sub and front components were then hooked up through a 4 way amp. The doors and boot were thoroughly dynamatted for good measure.

The sound of this system is truly marvellous. The separation and clarity throughout the whole range of frequencies and volume is magical. Far better in my opinion than just about any standard set-up that a mainstream manufacturer would put in (yes, better than a Bose system).

All I need to do now is finish off the boot install and get rid of the sub box!
« Last Edit: 21 March 2008, 16:39 by Hurdy »
Seat Leon Cupra Black 290 DSG

Offline Hurdy

  • Serious forum addict
  • *
  • Posts: 8,466
Re: hurdy - Edition 30
« Reply #4 on: 13 February 2008, 16:46 »
POWER!!!!

After running the newborn in and weaning her on a strict diet of Ultimate and now V-Power, she was finally getting a real spring in her step. I took her to a couple of shows which featured 1/4 mile strip action and so thought I'd let her loose.

At the GTI Spring Festival I managed a good standing quarter in 14.32 seconds with a terminal speed of 98.27 mph. :cool:

Later the same year I went to GTI International and had a few goes down the 1/4 mile again and ended up getting the runners up trophy with a standing quarter of 14.476 seconds and a great 0-60 mph time of 5.66 seconds. :cool:


Both these were done with the car as standard execpt at the GTI Inters one I had a big sub box and amp in the back! :shocked:

After this I decided that some extra bhp was in order and I scanned the internet yet again to see which tuners were giving out the best results and scouring other reports of ED30 owners who were happy or dissatisfied with their remaps. Eventually I decided on an APR remap at Awesome GTI in Irlam, Manchester.
The APR map costed out at 499+VAT for the remap plus £99+VAT for the switchable remap TOTAL = £702.65

My reasons for choosing the APR were:-
1. Reasonable increase in performance
2. Progressive rather than aggressive remap making a smooth power and torque cureve, rather than a peaky one.
3. Switchable, so that the dealer can fiddle with the stock map without affecting the performance map.
4. Switchable through the cruise control and so is very user friendly, unlike other switchable maps which require you to plug in a unit when you want to change.
5. Easily updateable and upgradeable when other maps become available
6. Customisable/optimisable by the dealer for when other parts are fitted eg. fuel pump, intercooler, full exhaust etc.


At the same time I ordered a Carbonio intake and an ED30 Forge DV.

The APR remap and Carbonio were fitted on the same day along with having before and after rolling roads to see what improvements had been made. I had been told on forums that the ED30 engine was making more than the quoted 227bhp and so it came as no suprise that mine was putting out 242bhp before the remap. After the remap the car made 285bhp and 290lbft of torque. This was slightly down on APR's claims of 295bhp+, but I was told by Awesome that the car will "learn" how to use the new power remap and will most likely be more within a couple of weeks of the remap.


The Forge DV that Awesome thought fitted my ED30 turned out to be a standard GTI DV and so I'm now awaiting my next visit to Awesome.

At the next visit I will have the ED30 Forge DV, a full Turbo back Milltek exhaust and cat plus the Neuspeed torque arm insert all fitted :cool:

I will also have before and after rolling roads done again.

I'll let you all know when they are on :smiley:
« Last Edit: 02 April 2008, 11:21 by Hurdy »
Seat Leon Cupra Black 290 DSG

Offline Hurdy

  • Serious forum addict
  • *
  • Posts: 8,466
Re: hurdy - Edition 30
« Reply #5 on: 21 March 2008, 15:25 »
Exhausting work!

Well, I visited Awesome again and had some more parts added to the car.

A full Milltek turbo back exhaust including the 200 cell free flow cat - http://www.millteksport.com/exhaust.products.cfm?variantid=275

Forge diverter valve - http://www.forgemotorsport.co.uk/content.asp?inc=product&cat=1703DV&product=FMFSITVR

I was supposed to be having some TAROX 10 pots fitted at the same time, but unfortunately they have to go back to TAROX for refurbing first :sad:

Anyway, the exhaust and DV work really well in conjunction with the Carbonio and remap. The throttle response is crisper and there is definitely more oomph at the middle and top end of the rev range :smiley:

Here's a pic of the exhaust tips - the "exclusive" tips look really good and finish the back end beautifully


Sounds good too, not overtly so, but just that little bit more "fruity"


Posting again very soon for the headlight change.

Thanks for reading. :smiley:
« Last Edit: 21 March 2008, 16:38 by Hurdy »
Seat Leon Cupra Black 290 DSG

Offline Hurdy

  • Serious forum addict
  • *
  • Posts: 8,466
Re: hurdy - Edition 30
« Reply #6 on: 21 March 2008, 15:37 »
Let there be light!

I visited the Ultimate Dubs show and ended up bringing back a new set of headlights :cool:

There had been talk on the forum around Audi style DRL's and so when I saw a set of headlights with LED's incorporated in them I just couldn't resist. :evil:

The lights were fitted by Awesome and the main lightbulbs and indicator bulbs were changed by me.

The pic below shows the lights with the "egg yolk" bulbs


and with the "silvered" indicator bulbs fitted


Here are some pics of the lights on.


Quite an effective mod

Next up will be the Carbon fibre parts :cool:
Seat Leon Cupra Black 290 DSG

Offline Hurdy

  • Serious forum addict
  • *
  • Posts: 8,466
Re: hurdy - Edition 30
« Reply #7 on: 21 March 2008, 16:37 »
A spot of Carbon Fibre

Astounded!! That's the only word I can say that describes how I felt when I looked on OSIR's website and found out that they did carbon fibre parts in silver :cool:

http://www.osirdesign.com/

It took a while coming as I ordered it at the start of February and only managed to get it fitted (by the TT shop) on the 19th March. http://www.thettshop.co.uk/

Originally I ordered the rear lower DTM spoiler, but Justin at the TTshop said that this wouldn't fit as the Edition 30 is different than the standard GTI rear. :sad:

I had thought about having the outer sections of the bonnet painted originally, but after seeing it actually on the car I decided against it. The quality of the OSIR carbon fibre products has to be seen in the flesh to be appreciated. The weave is bang straight, with no visible joins or blemishes. Even the edges are perfectly finished and the underside of the double-skinned bonnet is absolutely spot on qualitywise as well :drool:

The TT shop did a good job at fitting the parts and only a small adjustment was needed to the bonnet to align it correctly when I got it home. A PDF of how to adjust the bonnet is linked below

http://volkswagen.msk.ru/body/g5/g5_55-01.pdf

Finally, here are some pics of the bonnet and wing mirrors. Enjoy


Next up will be the brake upgrade :cool:
Seat Leon Cupra Black 290 DSG

Offline Hurdy

  • Serious forum addict
  • *
  • Posts: 8,466
Re: hurdy - Edition 30
« Reply #8 on: 24 March 2008, 00:54 »
Boot Build Part 1

Right then, I thought that it was time to change the horrible Sub box that I had stuck in the boot as it was taking up soooo much room I couldn't even get a suitcase in :sad:


I'd had a quick scan around other forums and took the bits which I wanted from each and decided upon a wheel arch build, made from fibre-glass and MDF

STEP 1 - Stuff you need

Fibreglass kits - this contains everything you need to create a mould. You will need at least 4 packs if you use the same stuff I did (bought from Halfords)
Plenty of gloves - I bought a pack of 100 although this may be overkill, you get through a lot!
Masking tape - I bought 3 rolls at 50mm wide
Cheapo brushes - I bought 2 assorted sized packs of 5 (2" ones seemed to suit best for coverage)
Bin liners - to cover the car
A cheap glass container - to mix the resin and hardener in.


Step 2 - Removing the strap

There is a strap which needs removing.It is attached with just one scew. This is removed using a T-25 star screwdriver fitting.


Step 3 - Masking up

So as not to damage the original carpeting in the arch you will need to mask off the area you want to mould with fibre-glass. It is advised that you start masking off in horizontal strips, starting at the bottom and working your way to the top. This is to stop the resin seeping through the tape under gravity. I found that a good overlap of half the width of the tape was about right.


Part 2 coming soon.............. :smiley:
Seat Leon Cupra Black 290 DSG

Offline Hurdy

  • Serious forum addict
  • *
  • Posts: 8,466
Re: hurdy - Edition 30
« Reply #9 on: 24 March 2008, 01:41 »
Boot Build Part 2

Step 4 - Fibre-glassing

For anyone who hasn't used fibreglass before, I'll start with a spot of safety. My advice is to:-

1. Wear eye protection to avoid splinters of fibreglass getting into your eyes.
2. Wear the gloves - the packs come with gloves. but they are poor and I advise using latex gloves and changing them regularly. Even if you wear them you can still get small slivers of fibre-glass sticking in your fingers
3. The resin stinks and the odour is quite strong, so if you are attempting it in a garage open a window or the garage door.

Before starting this part, cover the boot floor and hatch opening load lip with the bin liners that I mentioned. this will avoid marking up the boot with resin spillage and fibre-glass shards. It also protects the hatch load lip as you WILL be spending time getting in and out of the boot.

So, once you are kitted up, you need to cut the fibreglass. A sharp pair of normal scissors will do the trick. It is up to personal preference as to how large you make the strips, but I was fairly flexible in that you can use 10 x 30 cm strips most of the time and then smaller pieces for tricky edges and corners and larger pieces for the larger flat areas.
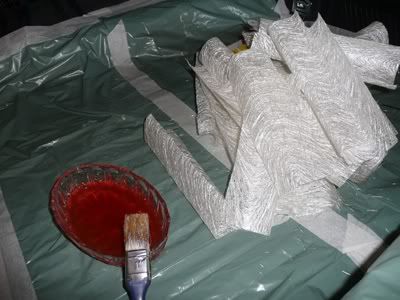

The kit gives instructions on how to mix the resin. All I can add is that the resin takes a lot longer to set when cold or if you don't put enough hardener in. Be careful though. because if you add too much hardener it can literally set in the mixing dish before you have used it all.

Once the resin is mixed, start from the bottom and piece-by-piece work your way to the top. You should cover approximately 100 mm of the boot floor and so you need to allow for this in the masking up process. Make sure you overlap each piece by at least 25mm to give the individual sheets chance to bond together with the resin. I found it best to brush a thin coat of resin directly onto the masking tape first so that the fibre-glass sheets would stick better. Stipple in the resin into the fibre-glass patches until each one loses its white colour. Also be careful to avoid bubbles of air, which weaken the mould. Once the first layer is done, stand back and admire your handywork and get some fresh air!
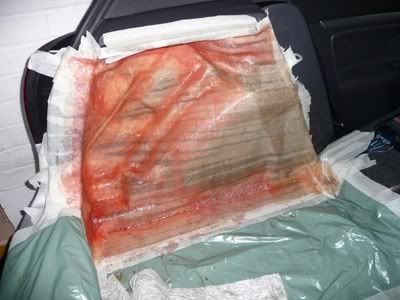

Repeat this procedure for at least two more layers, so that you end up with a solid mould. With each layer you build up ensure that you do not get any air between the layers.
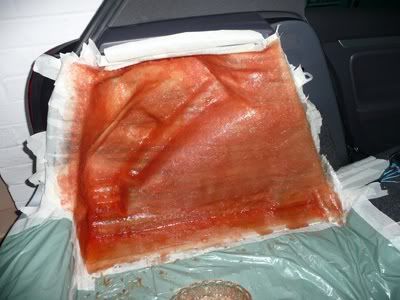

Once the mould has had chance to set, prise the mould from the arch. It will come out, but the masking tape has a good hold and so it will need a good tug. I found that pulling from the bottom was easier to remove it.
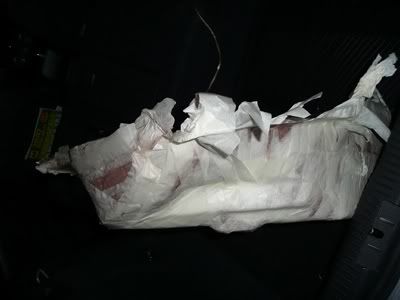

Step 5 - trimming the mould

First, remove all the masking tape from the back of the mould.

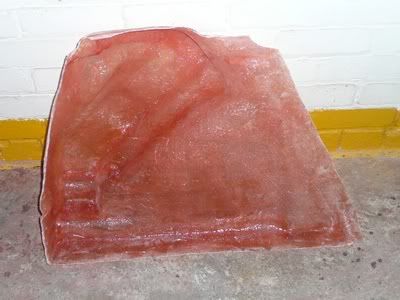
Using a jigsaw, trim down the jagged egdes of the mould. Try to follow the outline of the hatch opening, the bottom of the parcel shelf, the back seat and the boot floor. When cutting allow for about 75mm width of the mould on the boot floor.
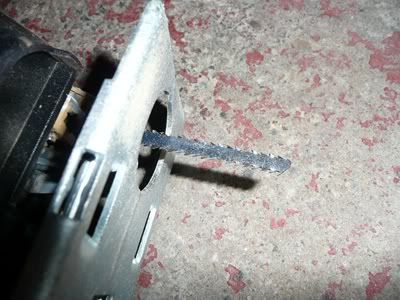
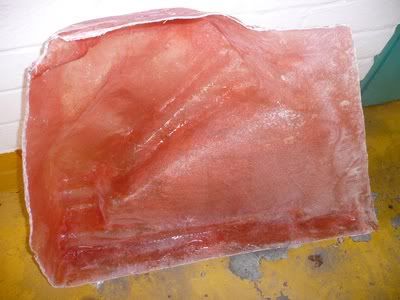

Once cut, refit the mould into the wheel arch and check that it fits okay.
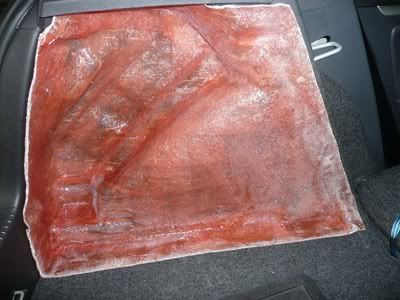

In my case I also checked that the parcel shelf cleared the mould and had to cut out an extra piece.
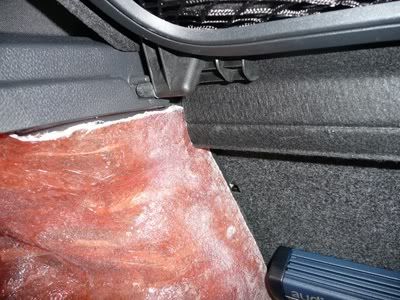

The next photo shows the mould with the piece cut out to allow for the parcel shelf

Part 3 coming soon............ :smiley:


« Last Edit: 24 March 2008, 01:46 by Hurdy »
Seat Leon Cupra Black 290 DSG