Author Topic: MikeMaher205 - '91 Golf GTI  (Read 20969 times)

Offline th3_f15t

  • I live here
  • *****
  • Posts: 1,060
Re: MikeMaher205 - '91 Golf GTI
« Reply #10 on: 25 November 2009, 16:17 »
Today, I finally had enough and decided to cut through the downpipe to get the cylinder head out the car. Seeing as the whole system will be thrown away in favour of a stainless steel manifold and cat-back system I wasn’t bothered about destroying things.

Anyway, I got the whole setup away from the car and now have the common problem of the exhaust manifold bolts rounding off being so old and rusted. Also, the hex key bolts that hold the inlet manifold on are also rounding out so there’s a total of 5 bolts I cannot get off the setup right now. I’m calling upon the power and knowledge of my uncle to help with this.

Here are some more pictures just for the hell of it.


Sadly, I have to re-think my project now as it looks very unlikely I will have this put back together by Sunday. The head was supposed to go away and be skimmed today or tomorrow but as you can see, it’s far from ready. Still a slim chance but in all honestly, looks like this could be delayed until February 2010.

Moving over to Flickr, sorry for the broken picture links!

Offline th3_f15t

  • I live here
  • *****
  • Posts: 1,060
Re: MikeMaher205 - '91 Golf GTI
« Reply #11 on: 26 November 2009, 18:57 »
A small update and no pictures available I'm afraid. My uncle came over tonight and used his mass of experience and helped me get the last of the stubborn bolts out the manifolds. Now the cylinder head is stripped of everything except the internal parts of the cylinder head.

Tomorrow will involve getting it finished and boxed up ready for cleaning along with the rocker cover and inlet manifold. I won't be able to put this all back together until February unless I get some extra time off work.

Future work will also involve new engine mounts; gear linkage and a damn good clean up of the bay, maybe even some painting too but haven't decided yet.

Moving over to Flickr, sorry for the broken picture links!

Offline th3_f15t

  • I live here
  • *****
  • Posts: 1,060
Re: MikeMaher205 - '91 Golf GTI
« Reply #12 on: 27 November 2009, 17:04 »
Today has been quite pleasant, everything went according to plan and smoothly which makes a bloody change. So here is the cylinder head, camshaft and injectors out the car and stripped apart.


Next job was to take the cylinder head apart and put all the parts into storage. Sorry about the really bad quality of the photo, my phone isn’t very good.


In the box in the background are the valves and springs; in the tin next to them are the collets and the tappets and camshaft bits are stored in a bath of clean oil in a cupboard out of harms way.

So now the final bit of work is to get the valve guides and valve stem oil seals out the head. This will be sorted over the next week hopefully, even though I won’t be here.

Below are some pictures for you to look at. These show the state of the rocker cover and inlet manifold. The cylinder head is also filthy and the bottom end is coated in rust. I think I’ll be stripping the bay more at some point and jet washing it clean.


A picture of what the throttle body looks like. This is pretty much the story for all the internal parts of my engine. Would be surprised, in this state, if my car was reaching 100 BHP!


Unfortunately, there will be no more update until February unless I can sneak back up to Essex to get working on the car.

Moving over to Flickr, sorry for the broken picture links!

Offline th3_f15t

  • I live here
  • *****
  • Posts: 1,060
Re: MikeMaher205 - '91 Golf GTI
« Reply #13 on: 08 December 2009, 14:25 »
I have managed to get another week back home, and possibly a few days next week as well. The plan is to try and sort out some jobs while I’m back, although the initial plan of re-building the cylinder head has changed, which I will explain why.

So I had my uncle take my rocker cover, inlet manifold and cylinder head into his work to get shot blasted clean and they turned out really nice.


However, he phoned me while I was in Cornwall to inform me that the water ways weren’t good. In fact, there was a fair bit of corrosion which was heading towards the cylinder itself.


The choice was simple enough. Buy a recon head or get someone to do some tig welding which should solve the problem. I was told, by my uncle, that him and five others stood around and discussed the matter. What a work force!

Spoke to my mechanic who said that there’s no need for a recon head as a proper job of tig welding will be more than enough. So I’m going off later today to get that done properly, by someone who I’ve never met.

Also, the valve guides have had it, which mean new guides, valves, springs and seats need to be bought and fitted. Along with these, the injection rail and injectors look like they need replacing too. I also need to get some new studs as a few of the rocker cover ones knackered out when I took them out. Also, replacing all the crap water hose clips with jubilee clips and hope to get some paint in the bay as well.

It’s not strictly to do with the project, but cleaned out my garage today as well. The amount of crap on the floor was unbelievable.


That pile was huge! It took 4 dust pan loads just to get the bulk of it in a bin bag. I must keep better standards of cleanliness in my garage.

So now the main aim of this week is to fix the cylinder head itself and also sort out my gear linkage now that the full kit and alignment tool are with me at home. This project is starting to get really huge now, far beyond anything I originally planned for.
« Last Edit: 08 December 2009, 16:53 by MikeMaher205 »

Moving over to Flickr, sorry for the broken picture links!

Offline th3_f15t

  • I live here
  • *****
  • Posts: 1,060
Re: MikeMaher205 - '91 Golf GTI
« Reply #14 on: 11 December 2009, 11:00 »
This is the final update for at least a month now. I’ve got the cylinder head welded up, did a good job for £25 so very happy with that. Also ordered all the new parts to build the head back up, they should be arriving at my mechanic’s today or next week. My uncle will take the cylinder head back into work, press out the old valve guides, press in the new ones and skim the head on the mill he has there. When I return in January I plan to re-build the head, clean up the engine bay a bit and get the car on the road again. No pictures, but a little heads up for anyone who follows this project.

Moving over to Flickr, sorry for the broken picture links!

Offline th3_f15t

  • I live here
  • *****
  • Posts: 1,060
Re: MikeMaher205 - '91 Golf GTI
« Reply #15 on: 25 January 2010, 19:15 »
Well, I’m home again for 2 weeks, and this time I’m going to crack on with the Golf. Got home on Saturday but today was the first day that I did something with the project. All I’ve done today is spend about 2 hours cleaning a few parts down, but it’s a start none the less.

Cleaner throttle body;


I will give that a proper clean up tomorrow afternoon or Wednesday morning. On cleaning the alternator I discovered this.


Had been covered up by some duct tape before, how the heck I missed this I have no idea. I will be getting it checked out by a local specialist hopefully who’ll also recon it for me at a low cost.

More to come daily, unless I get very drunk the night before. :laugh:

Moving over to Flickr, sorry for the broken picture links!

Offline th3_f15t

  • I live here
  • *****
  • Posts: 1,060
Re: MikeMaher205 - '91 Golf GTI
« Reply #16 on: 26 January 2010, 16:53 »
I didn’t really do much today, just finished cleaning the throttle body and tidied up a bit. I’m going to tackle the task of cleaning the fuel injectors and the injection rail tomorrow, but work is slow due to the cold.

Just so there’s something to look at, here’s some pictures of the old valves which are now in the box of scrap.

Exhaust valves at the bottom. Look at the state of them from all the oil that was burnt in the cylinder.


This is the faces of all the valves.


I’m also aiming to have the cylinder head half done tomorrow evening, with all new valves and springs in place. I’ve also got to sort out the camshaft as I didn’t number the cam holders when I removed them.

Moving over to Flickr, sorry for the broken picture links!

Offline th3_f15t

  • I live here
  • *****
  • Posts: 1,060
Re: MikeMaher205 - '91 Golf GTI
« Reply #17 on: 28 January 2010, 17:18 »
I know I said I would be posting daily, but I haven’t really been doing work daily due to the cold and also the fact that I can’t really do much more than clean parts up until I re-build the cylinder head.

I’ve put off doing the gear linkage and engine mounts as I’m hoping to do them with the help of my uncle or someone experienced. Also, I’m getting a Rally front end off a friend for £350 so will be taking a lot of the car apart to fit that, during that process I might as well remove the front bumper which is where the front engine mount is. Also want to inspect the radiator as if it’s looking a bit worn I’ll salvage a spare one to replace that too.

Anyway, here’s all the bits now cleaned up and ready for fitting back together. Still tempted to put some high temperature paint on the inlet manifold, throttle body, rocker cover and now the alternator, provided I can cover up the hole properly.


I think tomorrow is now the scheduled day for working on the cylinder head. But we shall see.

Moving over to Flickr, sorry for the broken picture links!

Offline th3_f15t

  • I live here
  • *****
  • Posts: 1,060
Re: MikeMaher205 - '91 Golf GTI
« Reply #18 on: 04 February 2010, 15:48 »
Today I finally managed to get some serious work done. However, yesterday also bore results. I haven’t been working as much as I’d like to on my Golf as I’ve had other things going on at home which have stolen my time, and also it’s been bloody cold.

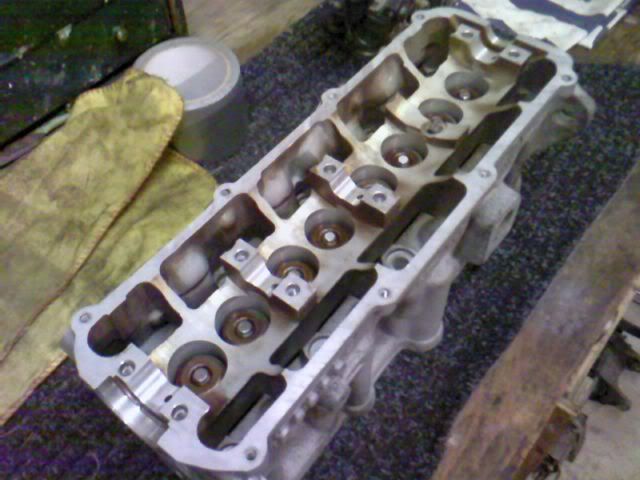
Anyway, yesterday I finally got round to putting the cylinder head back together. New valves are ground and in, with the new inner and outer springs and new valve stem oil seal, which were the cause of this whole engine re-build idea. I had a special tool made up which is a rounded socket piece that’s the perfect size to fit the valve stem seals. This is then welded onto an old screw driver. It worked a charm, using a hammer, gently pushed the stem seals on.


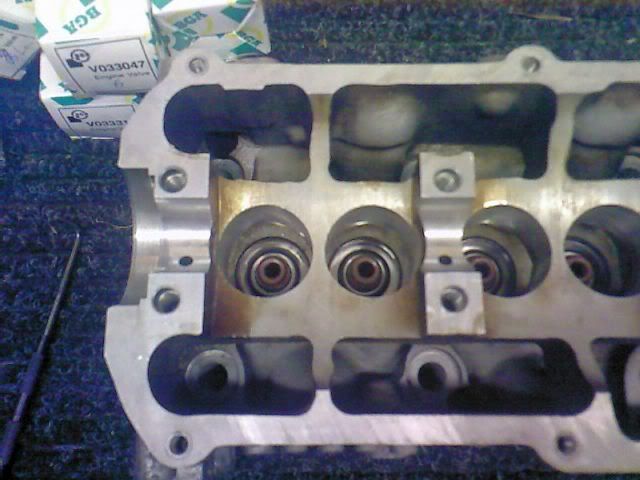
After that was done and checked, used the valve spring compressor to fit the new valves in and fit the collets. Wasn’t too hard, although definitely requires patience and surgical precision.


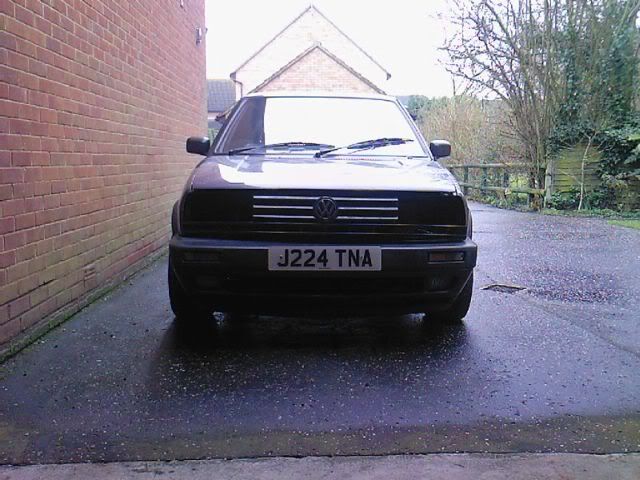
Also, last night I took delivery of my Rallye front slam panel, lights and grill. It cost me £350 but it is at show ground standard, bar a little bit of paint peeling around the bonnet lock.


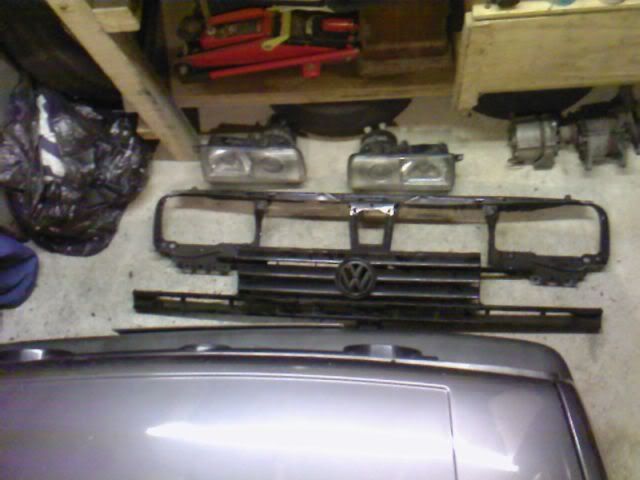
So this morning made a start on fitting it as I’ve been keen to get this part since my friend said he had it for sale. It’s quite a straight forward job at first, removing the old grill and headlamps. Now I was told you have to remove the front bumper to do this job, but I found to get the old slam panel off, you don’t. There’s a 10mm bolt that holds it on at the centre of the bumper just in front of the radiator. I’m blessed with small hands so I could get in the gap in the bumper and undo it. Next came removing the radiator bolts, horn and then the bonnet release cable. I took the slam panel out, but it was a bit of a struggle to remove it without removing the front bumper.


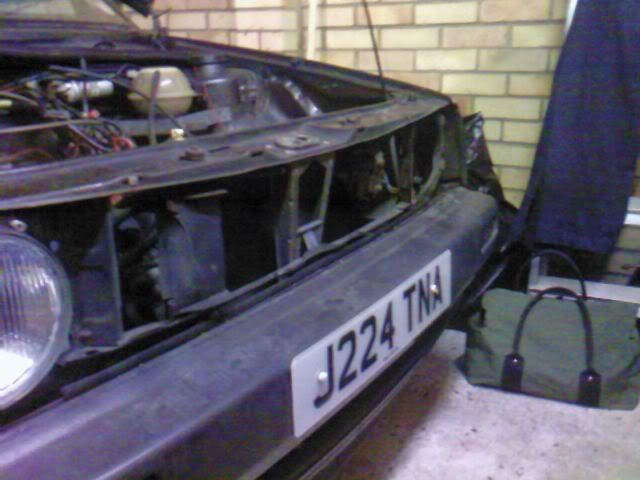
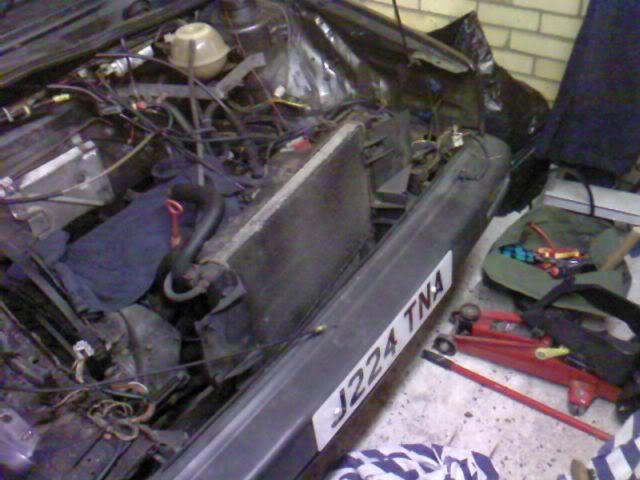
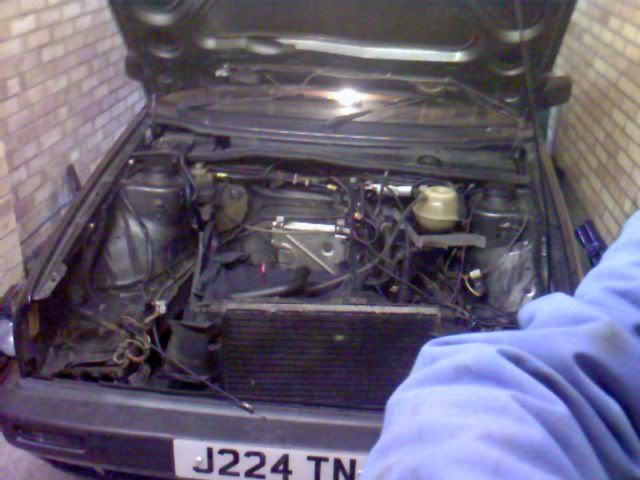
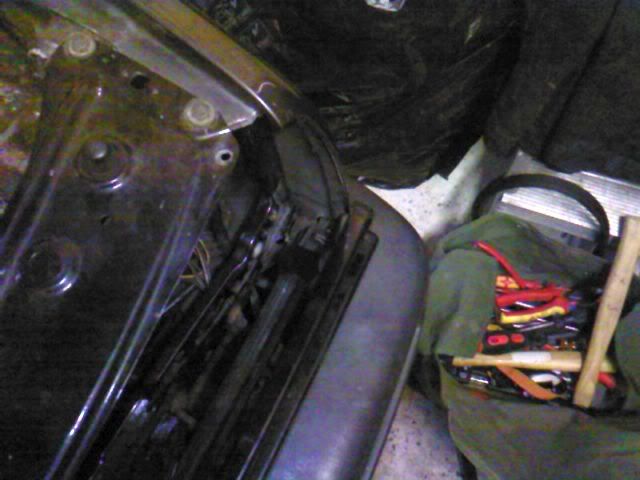
Once all that was removed, I had a quick brush down of the area, then began fitting the Rallye slam panel. This is a lot harder to do that removing the old one, I really should have taken the bumper off. Had to bend the panel to get it in and it took some convincing, but I got it to fit well and bolted it in. First problem arose when doing the bolts that hold it to the wings. The passenger side bolts don’t secure down so it’s not really help in properly. Next problem was the air intake. It won’t fit into the Rallye slam panel and also with the new headlamps it would get no air. Going to have to customise a new air feed at some point. Last problem I had was with the grill. It doesn’t fit between the wings, it’s too wide. What’s really weird is that on the driver’s side, it lines up perfectly with the slam panel and all the way along it clips in, but at the passenger side it’s out by about 1-2cm. Third problem is that I have no bolts to secure the headlamps with, so will buy some when I get a few other bits.


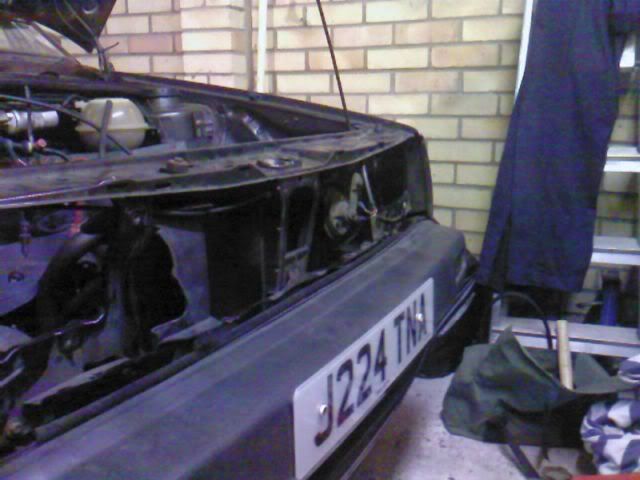
I will research this to find a solution. Overall I’m happy with the fact I have a Rallye front end on my Golf, makes it look a bit more unique. And square head lights on older, box cars look better in my opinion. I know that the round headlamps are iconic to the older VWs and BMWs but it’s not my favourite look.


I very much doubt I’ll do any more work on the car now until I’m next back at home again in mid April. But at the rate things have gone this time round, I’ll either go mad for it when I’m back or hand it over to my mechanic to finish off for me. I still have the idea of going down the 2.0 litre bottom end swap, but I don’t know if I can spend that much money, because it’ll mean other modifications will have to be made which I cannot afford. On saying that, I have decided that I will try and get some G60 arches and new side skirts as mine needs replacing and some Lenso BSX or BBS RM splits. If I can get some leather or Recaro seats that will fit straight into my Golf then I’ll invest in those, although my interior is in very good condition as it is.

For now though, the project will go back on hold until April. Any further posts before then will be little updates if I get hold of parts.
« Last Edit: 04 February 2010, 16:00 by MikeMaher205 »

Moving over to Flickr, sorry for the broken picture links!

Offline th3_f15t

  • I live here
  • *****
  • Posts: 1,060
Re: MikeMaher205 - '91 Golf GTI
« Reply #19 on: 04 April 2010, 12:52 »
The project is gone. I have sold it today for £500 to someone who's going to finish it off and use her as a daily.

It's been fun while it lasted and I've learnt a lot about engines and VWs, mainly that it's a little beyond my abilities right now to tackle a full cylinder head overhaul without planning and preparing for it properly. This won't be the last project post from me however as right now my troublesome 16V is looking to be moved to my friend's yard for storage ready for some serious talking to...

Who knows what will happen in the near / far future. For now though, I bid you farewell and good day. Thanks mainly to all those who've followed this build, helped me out and not taken the piss along the way.

Now time to shed my tears... :cry:
« Last Edit: 05 April 2010, 16:01 by MikeMaher205 »

Moving over to Flickr, sorry for the broken picture links!