Author Topic: madone_si - A4 Avant 1.8T RED Quattro  (Read 103634 times)

Offline Madone_si

  • I live here
  • *****
  • Posts: 1,529
  • Seattle WA, USA and Middlesex, UK
Re: madone_si - A4 Avant 1.8T RED Quattro
« Reply #80 on: 05 May 2013, 06:20 »


So here is the added Compressor Relay and kill switch, so if I can experience any issues with compressors I can kill the power to each of them for troubleshooting.


Here is the complete setup ready just before I installed in the car for the final time.


Nothing to see in the trunk.....


but there is.....


just to compare non carpeted version


Final product


Will upload video to utube and provide link.
Old Skool Mk1 Golf Gli (82), Mk1 US Cab 85 and 83
SOLD - BLACK SOY 92

Offline xtetx

  • I live here
  • *****
  • Posts: 1,426
  • started as a 1.6 now we here
Re: madone_si - A4 Avant 1.8T RED Quattro
« Reply #81 on: 12 May 2013, 17:10 »
naughty that! looks sick man

Offline Madone_si

  • I live here
  • *****
  • Posts: 1,529
  • Seattle WA, USA and Middlesex, UK
Re: madone_si - A4 Avant 1.8T RED Quattro
« Reply #82 on: 23 May 2013, 00:11 »
thanks.

Little more custom work inside the Audi

Started out as always by creating a template out of cardboard, to make sure I get a good fit in arm rest and can open and close lid properly.


Next up cut out holes to install Kill switch, AZ Pressure gauge and Air ride remote.


Now using the cardboard template, I cut out of MDF shape required.


Test fit, first time everything fits as required :)


Time to carpet MDF


Finished product


Now installed in the arm Rest :)


All cables are hidden inside the unit and are routed into center console all hidden and still able to raise and pull down arm rest. I had to do a bit of cutting and mod'ing to make the cables fit, as there is no room with the design Audi did.

and working

Old Skool Mk1 Golf Gli (82), Mk1 US Cab 85 and 83
SOLD - BLACK SOY 92

Offline Madone_si

  • I live here
  • *****
  • Posts: 1,529
  • Seattle WA, USA and Middlesex, UK
Re: madone_si - A4 Avant 1.8T RED Quattro
« Reply #83 on: 08 June 2013, 06:29 »
If you have not seen these yet, you should go have a look, will be installing mine over the coming week once it arrives, this will allow me to see so many options on how the car is running

 - B6 P3Cars Integrated digital Interface gauge.


http://www.p3cars.com/audi-a4-s4-a5-s5-rs4/p3cars-audi-b6-a4-s4-vent-integrated-digital-interface/
Old Skool Mk1 Golf Gli (82), Mk1 US Cab 85 and 83
SOLD - BLACK SOY 92

Offline Madone_si

  • I live here
  • *****
  • Posts: 1,529
  • Seattle WA, USA and Middlesex, UK
Re: madone_si - A4 Avant 1.8T RED Quattro
« Reply #84 on: 27 June 2013, 05:23 »
Installed and configured P3cars B6 A4 Avant digital Gauge. First B6 owner to have this.

In short this product is just great. Must go and test out the 0-60MPH function to see how fast the Audi is!!

P3 Cars Customer Service and support has been just amazing. Will do a more in-depth write up over the week. I also have a lot to write up and update you all on - not only on Air ride, but the Glove box pains, as well as new Wheels/Rims!

Gauge is showing RPM, there are so many options on this gauge, plus being able to clear codes is just a real bonus. I still have to plug in the Auto-dimmer option and Air ride, that will be done later this week.
Old Skool Mk1 Golf Gli (82), Mk1 US Cab 85 and 83
SOLD - BLACK SOY 92

Offline Madone_si

  • I live here
  • *****
  • Posts: 1,529
  • Seattle WA, USA and Middlesex, UK
Re: madone_si - A4 Avant 1.8T RED Quattro
« Reply #85 on: 20 July 2013, 06:16 »
Installation of P3.cars multiple digital Vent Gauge

So after researching about current gauges I could buy for my Audi B6, I ended up with the a P3.cars Multiple Digital Vent Gauge, due to the many features it has to show data from your ECU using OBD port, plus there are three additional connection for Analog connections and external Boost sensor.

Here is installation process and experience I had with this P3.cars product.

First of all I have to say a Big thank you to Rick at P3.cars, as I had spoken to them about a B6 version before they released this current product and they kept me informed of when this product would be releasing so I could be one of the first to get the product and test it out.
Product details I found useful;
   Ø P3.cars website - http://www.p3.cars.com
   Ø Installation, Configuration  and setup details  can be found below as well here - http://www.p3cars.com/install (either VW/Audi link)
   Ø Support information - http://www.p3cars.com/support/
   Ø Full Product details please refer to P3.cars http://www.p3.cars.com - features of Gauge;

Plug and Play install Quick plug and play install with zero cutting required.
All power, ground, and data points come directly from the diagnostics port connector.   
Boost/Vacuum Display High resolution boost/vacuum via diag port for FAST install.
Optionally read boost via boost tap (not included).   
Multiple Gauge Displays Boost/Vac, Coolant Temp, Intake Air Temp, Exhaust Gas Temp, Throttle Plate, Speed, RPM with Shift-light, Battery voltage and more!
Peak Recall & Run Record Recall the peak value from any mode, or record and playback 15 seconds of data from the current mode.
Temperature peaks recorded in the background.   
Universal Aux Inputs Includes additional inputs to optionally connect any 0-5v sensor with universal settings for display ranges and bar graph displays from -999 and 999 max values.   
On the Fly Configuration Menu Lockout/Display off mode, English(PSI, F, MPH) or Metric(BAR, C, KPH) selection, Adjustable boost display resolution, Ambient Calibration for boost sensor and more

Now on the goods :)


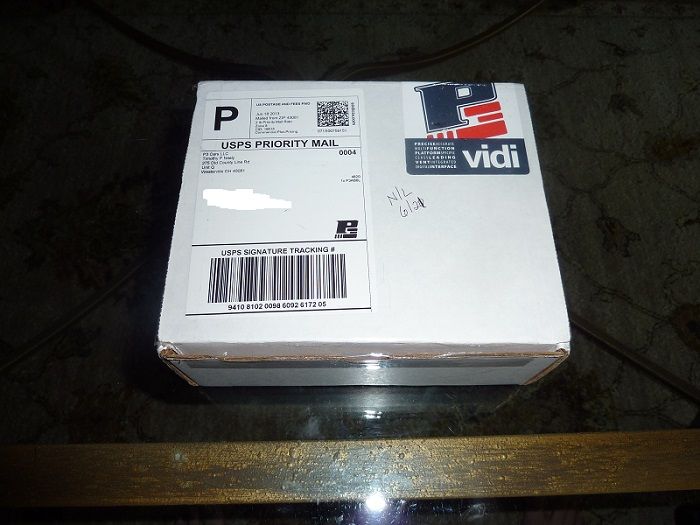
What I received in the box!

Now you can order two setups for your B6, the Gauge with vent or Gauge without vent, (plus you can order gauge for Left or right hand side vent). I actually ordered without the vent, but due to postage delays Rick at P3.cars not only upgraded my order and provided me with Gauge with vent, but I got a call from them apologizing for delay = First Gold Star to P3.cars for customer services :) :) I was not expecting that.

You should receive;

   - Gauge with vent or Gauge on its own (Depending on what you order)
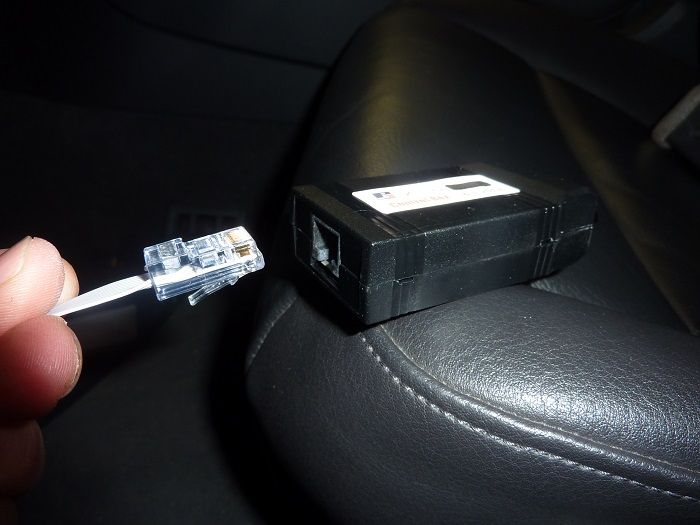
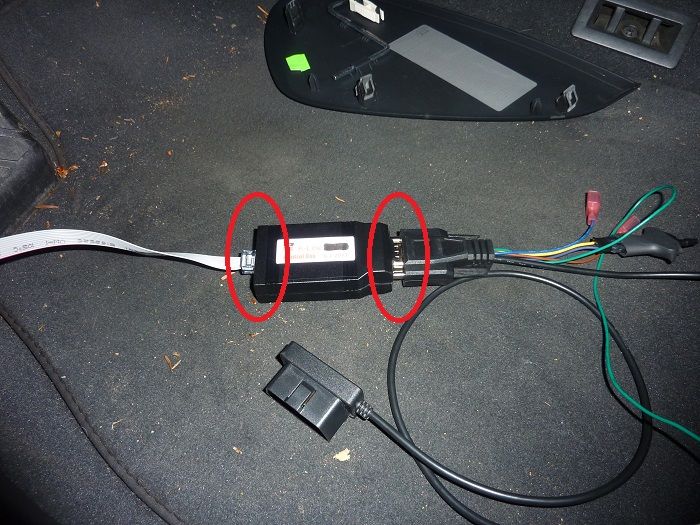
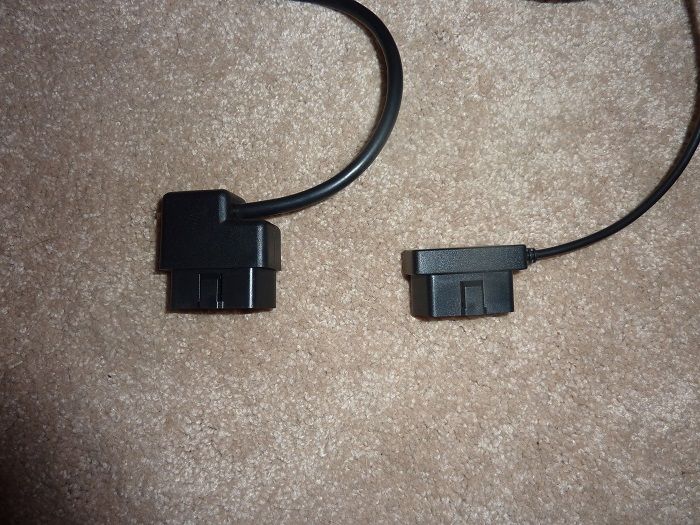
   - Wiring harness (OBD port at one end and looks like VGA connection on other)
   - Control box


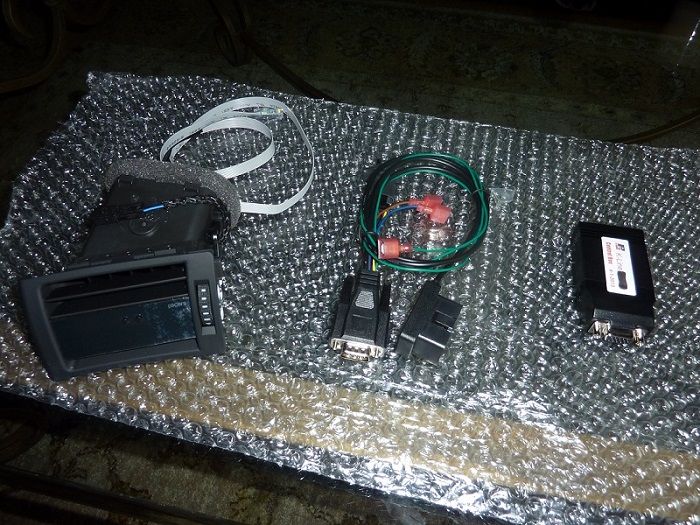
Here you can see the cable from gauge coming out of the back of Vent and another cable that connects to provide lighting to vent.


Time to install Vent

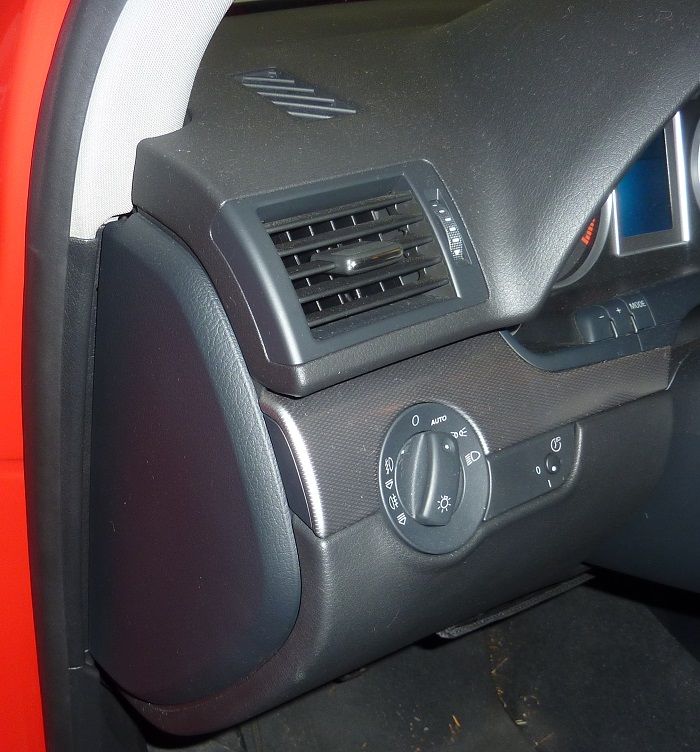
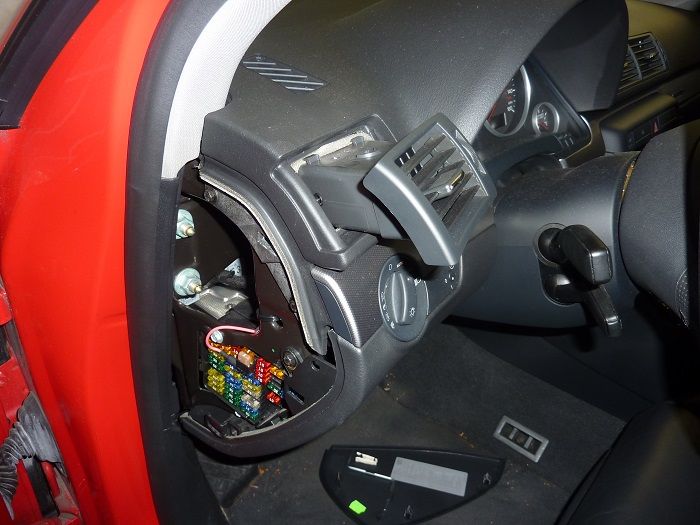
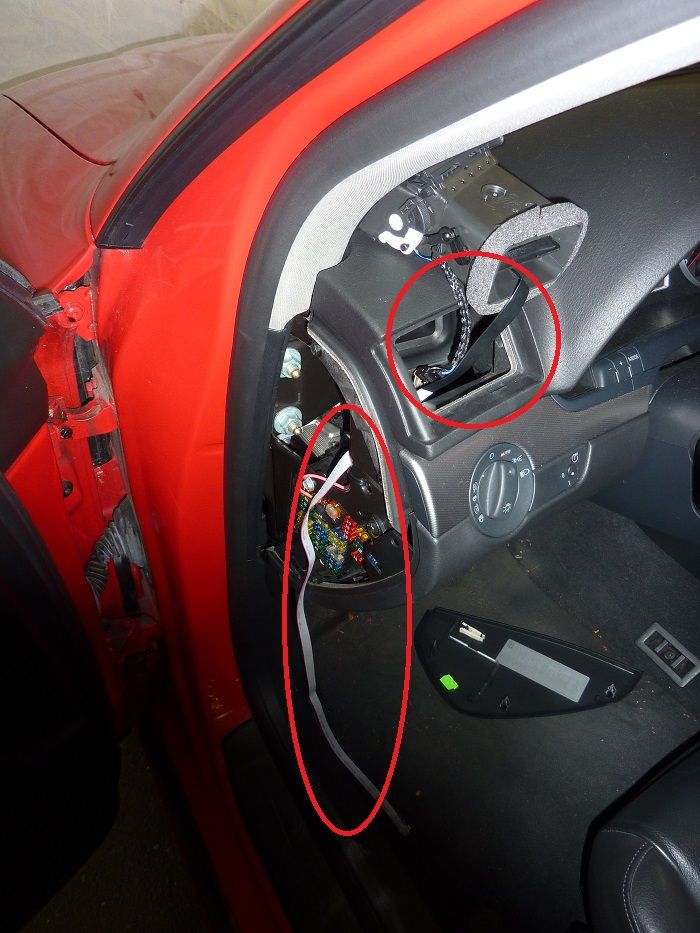
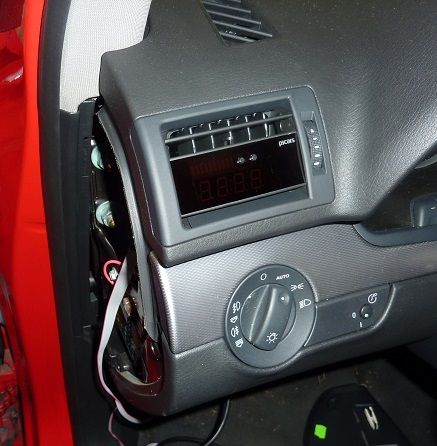
First up is to remove the current drive sides vent.

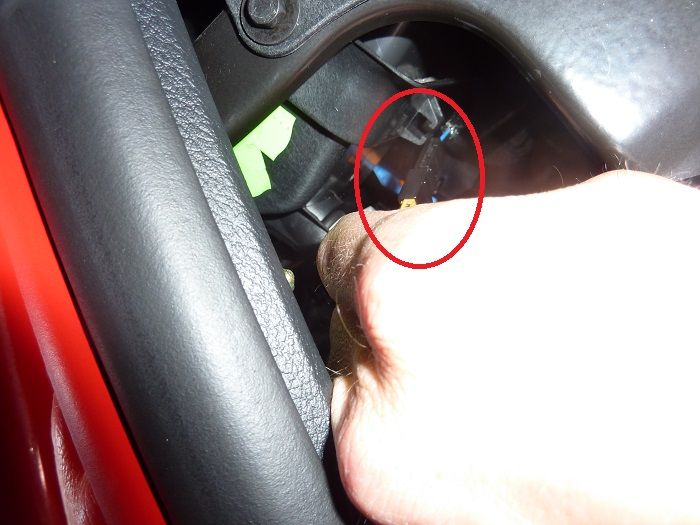
As usual, you need to remove the dashboard end cover, this can be done with either a flat screwdriver or using your ignition key.


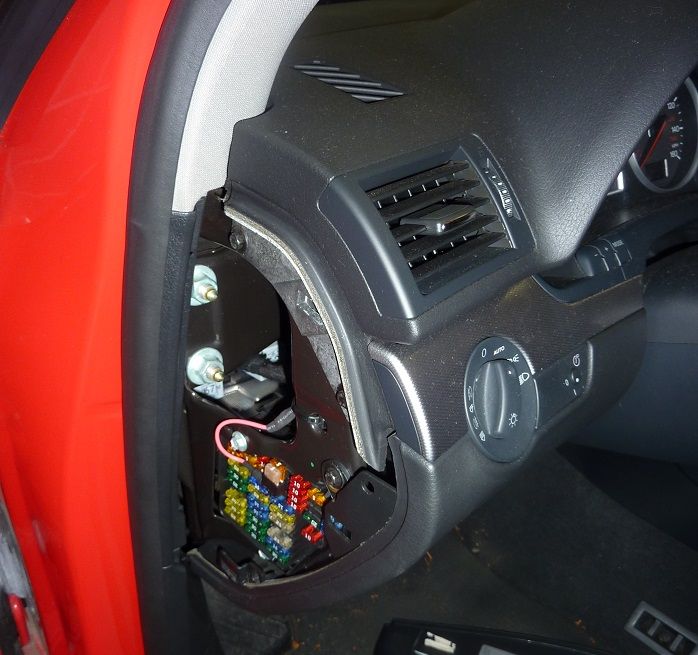
In the below image, you need to unplug the cable that connects to the vent, this cable provides lighting to the vent


Me disconnecting cable


Now place you hand inside the back of the dashboard and you want to push the vent forward, so that it comes out of the dashboard. I've read people trying to pull the vent out from the front, but this will only result in you breaking or damaging the vent.

The Vent should not be easy to pull out from the front and put out of the way, ready for you to install your new P3.cars Digital Vent gauge.


Now to install the Digital Vent Gauge. First up is to connect the first cable, which will provide light to the vent. This is straight forward push connect connector.


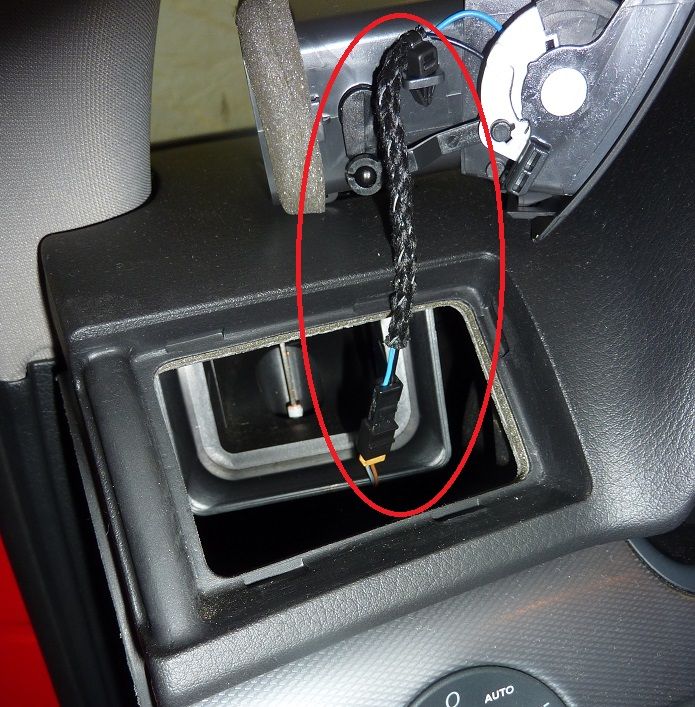
Next is to feed the second cable through the vent dashboard hole and out of the side dash end cover area. Do not yet put the Digital vent gauge into the vent hole, as we need to complete the installation first and do testing first, or else you might have to just un-install the gauge in vent! (Trust me I learnt from this experience)


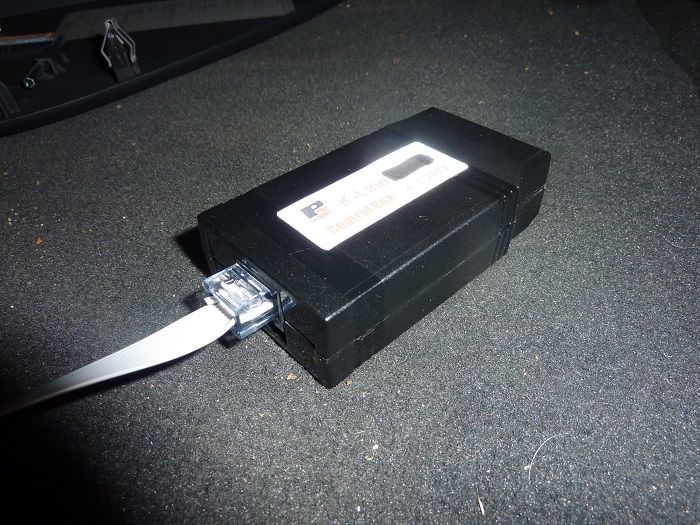
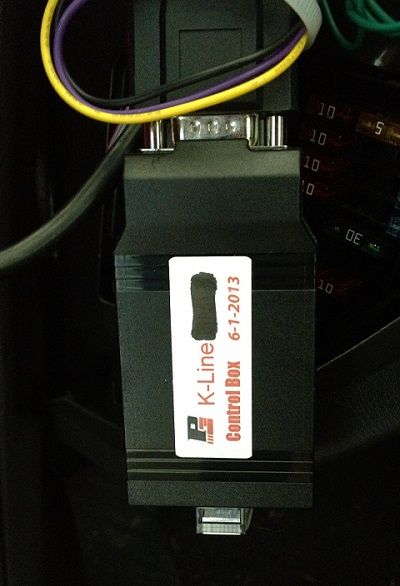
Now we need to connect the wiring harness and the gauge cable to the control box. This is straight forward as the connects are different for each part, so you cannot mess up connecting them together.

Gauge cable to control box


Make sure it clips in.


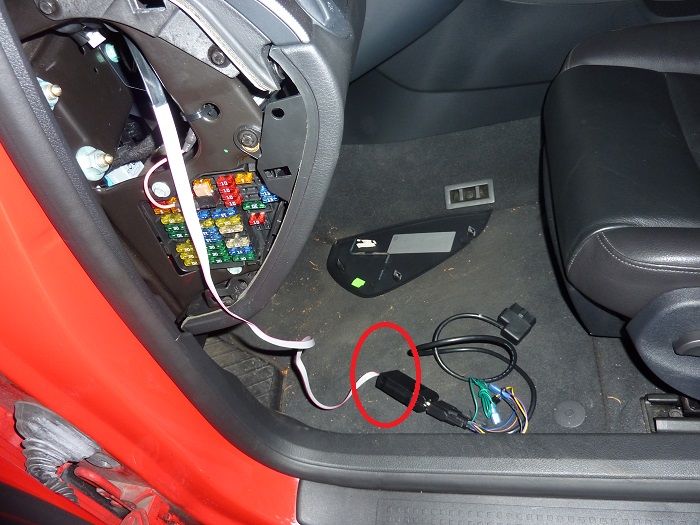
Now connect wire harness to control box. Push to connect and then tighten up harness to control box with two screws by using the plastic screw tops. (yes I know, the carpet is dirty, just means I need to clean up afterwards ;) )


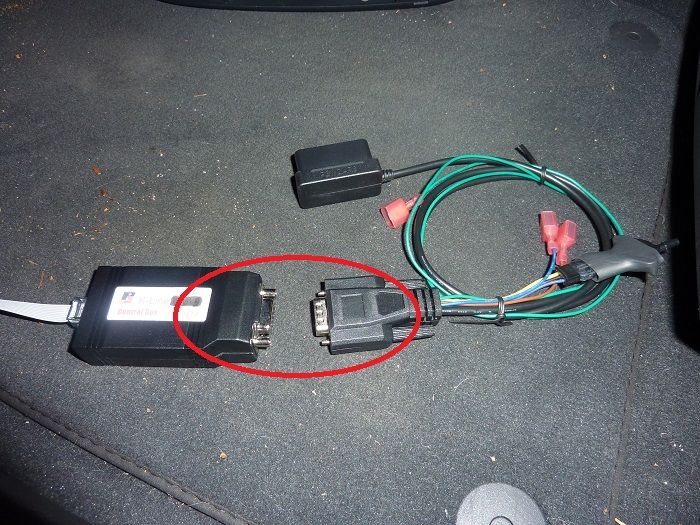
Connected. You will see the other cables in this picture, these are for the following;
   - OBD connector is big connector
GREEN=dimmer
   - BROWN=Analog1
   - BLUE=Analog2
   - YELLOW/PURPLE with BLACK AUX PLUG=external boost sensor


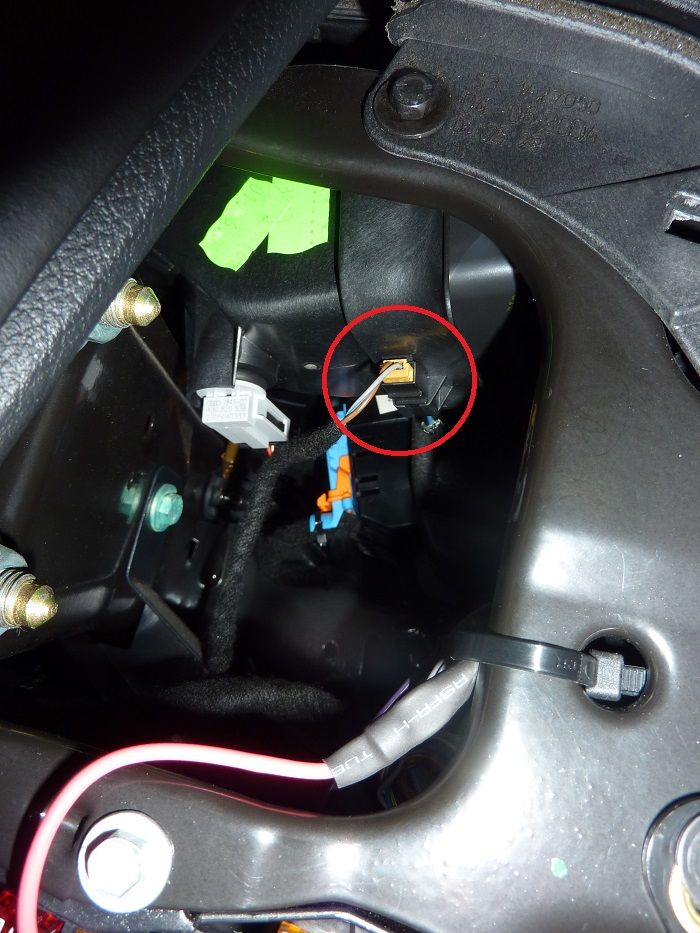
Now time to plug the OBD cable into the Audi OBD port, make sure we have the right connector, all looks good


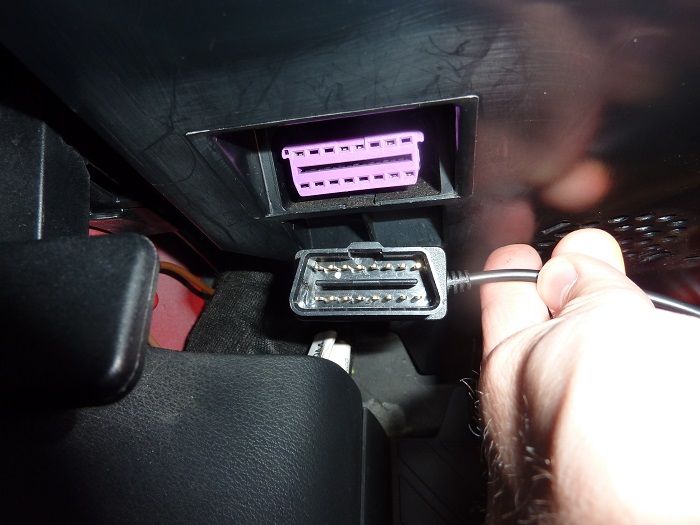
Now time to connect cable to OBD port and this is where straight away I saw a problem :(. With the current OBD connector with cable at side, the cable prevents me from even getting the cable any further then 1mm onto the OBD port in the Audi. (wow I need to clean underneath here!!)


So I emailed Rick at P3.cars Customer Service with detailed summary of what I had done so far with pictures and I got a response with hours saying they will be sending me another wiring harness with a different OBD port connector, I should receive it with-in few days. Now this is where I was surprised and happy to see they heard my issues and instead of asking more questions, they responded with action. :) P3.cars Customer Service gets another Gold Star (That’s 2 so far).

And true to what P3.cars said, with-in 2 days, received new wiring harness, here you will see the two harnesses, other than OBD port difference the rest of the cabling is the same.


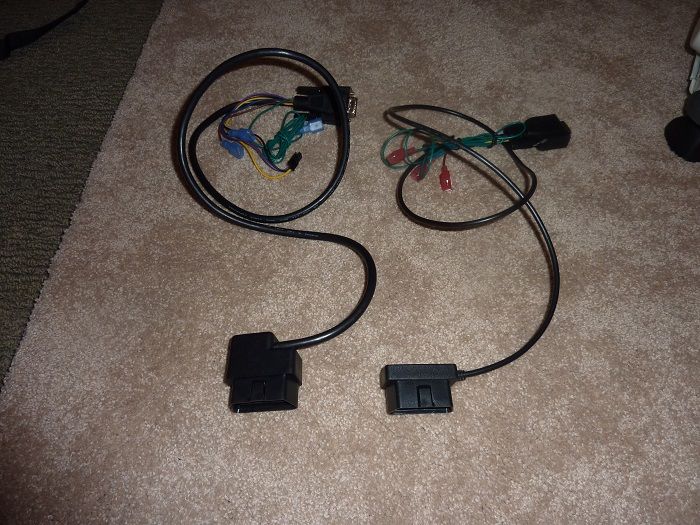
And the import part, the new OBD port cable, gives you that extra space to allow cable to connect into the Audi OBD port. :)


I disconnected the first wiring harness and reconnected the new wiring harness to the control box.


Time to connect OBD cable


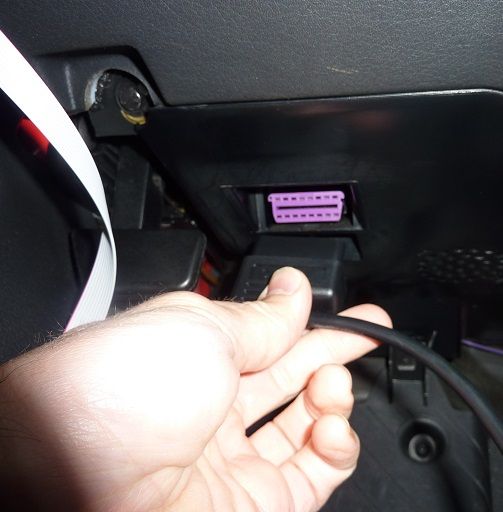
And Cable perfectly connected into the OBD port :)


So now time to test out your new P3.cars Digital Vent Gauge.

   I started the Audi and you should see the gauge after a few seconds come to life……… well you can guess that this didn't happen for me, all I got was a blank screen :( (see below image) Now you know earlier I said not to put the vent back into the dashboard - this is why… due to the Gauge in the vent not working, you want to make sure that all cables are connected properly, even cable to the gauge itself, so I had to push the vent out of the dashboard again. Not a big deal, but wanted to explain why I called that out earlier)


So onto troubleshooting the issue of Vent Gauge not working.

   1. I checked all cables are properly connected - check, done
   2. I again sent an email to P3.cars (Rick) explaining the situation, Rick replied with-in the hour and provide me with useful steps to check with also a reference to some information on their website.
   
   3. I did check on the P3.cars website support page beforehand, but wanted to hear from P3.cars first, just in case they had additional information to assist - details from P3.cars at - http://www.p3cars.com/vag-install, you will see details relating to your Audi type, they have a Video and PDF file, as well as configuration and setup data.
   
   Useful information I saw on the webpage, which Rick provided in email to me as well;
   
   Configuring the Gauge
   For version 2.1+ simply hold both buttons to enter the config menu, you can do this at any time! On older versions, to configure your gauge, you must first make sure the gauge is awake. The gauge goes to sleep about 3 seconds after the display blanks out, you can tell this by the double flash of the dot in the corner. After you shut off the engine, but BEFORE the gauge goes to sleep, simply hold the FIRST button until the gauge reads “Conf” , RELEASE the button as soon as you see the word “Conf”. SAVING YOUR SETTINGS: Your settings will not be saved until you exit the config menu by HOLDING the right button until the gauge resets.
   
   4. So with details from Rick and reading from the website, I tried the following;

   With the engine shut off, I pressing both the bottoms on the Gauge and straight away the gauge come up with "Conf" work on display :)
      Using the details from Rick I went through configuration details (details below) and changed TSI option, which interesting come up a not TSI but Car1, Car2, Car3, Car4 on my Gauge, after few emails back and forth with Rick, advised to try Car2 option for my model. Results = still guage not working properly. :(
   
      Config Button Functions:
      Left Button TAP = Change Value
      Left Button HOLD = Change Value fast repeat
      Right Button TAP = Change to next config mode
      Right Button HOLD = EXIT config menu and SAVE settings.
      Default   Values   Fuction
      D.On   On or Off or On.A or On.P   Turn the gauge display ON or OFF or ON-Auto-Dimming(if you have attached the green wire to your dimmer line) or ON-Persistant-Dimmer(for dimmer setting not resetting on restarts.)
      En.Y   Y or N or b   English units? No = Metric, Y = English, b = Boost only (boost in PSI, rest in metric)
      Pr0.1   0.1 or 0.5 or 1.0   Pressure resolution/decimal point. 0.1 = tenths, 0.5 is rounded to 5 tenths, 1.0 = whole numbers only
      U.bg.Y   Y or N   Vacuum bargraph in boost mode – set to N for no bargraph while in vacuum
      SL.57   30 – 80   Shiftlight activation RPM x 100, default is 5700
      Bst.d   d or A or n (beta, C)   Boost reading – digital or analog or none. (analog is for gauges with boost sender and tubing to manifold) Digital is for boost from diag port. C is raw charge pipe pressure from pre-throttle sensor vag data(beta, pre-throttle means no vacuum and subject to higher peaks, not available on all models).
      A1.N   Y or N   Enable or disable the first analog input (brown wire)
      A2.N   Y or N   Enable or disable the second analog input (blue wire)
      Clr.C   None   Hold the first button to clear codes.
      Cal.b   None   Calibrate the analog boost sensor to your ambient conditions. — tap left button after confirming engine is off
      tsi   tsi, fsi (tfsi) or 3.0t, 3.2, TDI   Select engine type – TDI is for diesel Golf and Jetta. TFSI is for 2.0T. 3.0t for S4/S5. 3.2 for boosted TT.
   
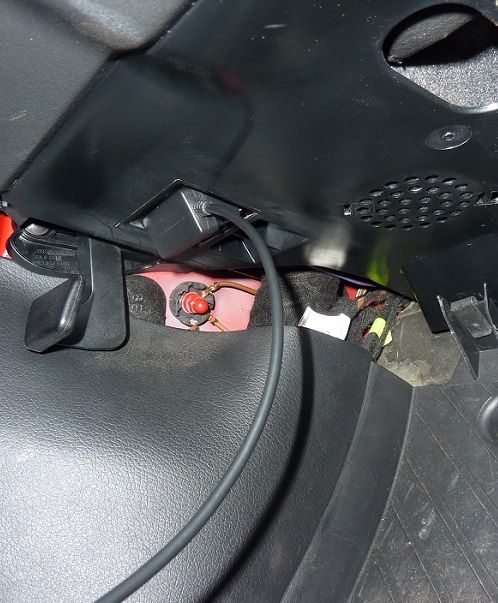
   5. So next Rick from P3.cars asked me to reset the control box, now I thought this was a great design idea and would never had known about this if not told, so unplugging the OBD cable from Audi port and then opening up the Control box, you will find a little bottom, which will allow you to reset the box.

   I used a flat screwdriver to open up the control box, which came apart easily. I did disconnect the Gauge cable beforehand.
   

   You can see below in the image the reset bottom at top right hand side, just press this and release.
   
      
   Now I connect back the gauge cable and connected the OBD cable back into the Audi port and fired up the car. Waited for 10 seconds and still no display :( I tired the resetting three times as per Rick information, but still no luck. Now at this point I was thinking, before I go back to Rick at P3.cars with more bad news, lets read the configuration details again on the website and go through all the configurations and see if one of those will make the display work.

   
Old Skool Mk1 Golf Gli (82), Mk1 US Cab 85 and 83
SOLD - BLACK SOY 92

Offline Madone_si

  • I live here
  • *****
  • Posts: 1,529
  • Seattle WA, USA and Middlesex, UK
Re: madone_si - A4 Avant 1.8T RED Quattro
« Reply #86 on: 20 July 2013, 06:17 »
So after about 30 minutes of changing settings one by one, I managed to end up with the following configuration and a working Vent Gauge :) (you have no idea how happy I was) After I replied to Rick at P3.cars with my success, he told me that the configuration I had used is for 2005 Golf 1.8T and that they had tested their device on early Audi B6 non Avant. Well the good news is that we both had learnt from this experience and so I hope this helps other Avant or late B6 owners if you buy this product and now P3.cars are aware too.
   
   Configuration required for B6 Audi Avant USP 2005

D. On.a
En. Y
Pr0.1
U.69.y
SL.80
B5t.d
A1.n
A2.n
Car.4
RdC.n
Clr.C
   
   
   So onto the last step now I have a working Gauge, was to clean up the wiring, so it is neatly hidden away inside the dashboard and also route the OBD cable out of the way.
   
   I zip tied the cables together and then placed inside the dashboard. I then zip tied the bundle of cables to part of metal inside the dashboard, to stop the cables from moving around.


   I also routed the OBD cable down the side of the dashboard underneath so cable was neatly away.
   
   
   Push the Gauge back into the Dashboard and put the end Dashboard cover back on.
   
   
   And the working Gauge with no visual able cables anywhere :) Gauge is showing RPM
   
   
   So now onto Gauge working :) I think I said this before, but will repeat here again, In short this product is just great and the P3Cars Customer Service and support has been just amazing. Rick you really made this experience great, even with issues coming up, so big thank you.
   
   There are so many options on this gauge, plus being able to clear codes is just a real bonus, lucky I had no error codes for me right now. I still have to plug in the Auto-dimmer option and Air ride, but I will be doing that a little later on.
   Configuration and Setup information, I found useful.

P3cars.com gauge is packed with many advanced features, but has been designed to work for your car pretty much right out of the box. There are a few settings that you may wish to change such as English or metric units, or selecting the proper engine model for your car, or setting the trigger RPM of the shift light. Below is a basic description of the gauges different features and modes.

Wiring:

When first installing, connect ONLY the obd2 connector.

GREEN=dimmer BROWN=Analog1 BLUE=Analog2 AUX PLUG=external boost sensor

Main Button Functions

Left Button TAP = Peak recall (and start 15 second record)
Left Button HOLD = 15 sec playback
Right Button TAP = View Current Mode Name (If pressed again within 5 sec, change mode)
Right Button HOLD = Night / Day Dimmer toggled (if auto-dimming is not enabled)

Gauge Modes

Boost: This mode will show vacuum and boost. Depending on settings in the config menu this may be from VAG ecu data or an external analog sensor. Boost is read in PSI by default and Vacuum is inHg. If you configure the gauge to metric boost will be in BAR.

Coolant: This mode will show your current coolant temp. Unlike the needle on your dash, this will show you exactly the temp that your engine is currently running at, and is configurable between Celsius & Fahrenheit.

Air: Air intake temperature. This is the reading of the temperature of the air entering the engine, and is configurable between Celsius & Fahrenheit.

Igntn: Actual ignition timing. This mode will show you the ignition timing of your engine in real-time.

Egt: Exhaust Gas Temperature. This is the temp of the exhaust gas as calculated by your ECU.

Throttle: Actual throttle plate position. Use this mode to see how your car changes the actual drive by wire throttle blade in relation to what your foot tells it to do.

rp-Shift: RPM readout. It can be handy to use this mode to see an exact RPM or to record/playback and see your shifts.

Speed: Actual roadspeed direct from VSS. This is the actual roadspeed value of the car, uncorrected. This is the raw value, therefore it may not match your cluster which tends to read high in many cars.

0-60: Zero to sixty Performance Timer. Come to a stop and this mode will read “Rdy…” The gauge is ready for you to accelerate to 60. As you accelerate the gauge will time you and automatically stop when you hit 60, leaving your time on the screen. When you slow to zero again the gauge will change to “Rdy…”

Batt: Battery Voltage. This is the voltage of your cars power system, anything between 13-14.5 volts while running is normal.

Configuring the Gauge
For version 2.1+ simply hold both buttons to enter the config menu, you can do this at any time! On older versions, to configure your gauge, you must first make sure the gauge is awake. The gauge goes to sleep about 3 seconds after the display blanks out, you can tell this by the double flash of the dot in the corner. After you shut off the engine, but BEFORE the gauge goes to sleep, simply hold the FIRST button until the gauge reads “Conf” , RELEASE the button as soon as you see the word “Conf”. SAVING YOUR SETTINGS: Your settings will not be saved until you exit the config menu by HOLDING the right button until the gauge resets.

Config Button Functions:

Left Button TAP = Change Value
Left Button HOLD = Change Value fast repeat
Right Button TAP = Change to next config mode
Right Button HOLD = EXIT config menu and SAVE settings.

Default Values Fuction
D.On On or Off or On.A or On.P Turn the gauge display ON or OFF or ON-Auto-Dimming(if you have attached the green wire to your dimmer line) or ON-Persistant-Dimmer(for dimmer setting not resetting on restarts.)
En.Y Y or N or b English units? No = Metric, Y = English, b = Boost only (boost in PSI, rest in metric)
Pr0.1 0.1 or 0.5 or 1.0 Pressure resolution/decimal point. 0.1 = tenths, 0.5 is rounded to 5 tenths, 1.0 = whole numbers only
U.bg.Y Y or N Vacuum bargraph in boost mode – set to N for no bargraph while in vacuum
SL.57 30 – 80 Shiftlight activation RPM x 100, default is 5700
Bst.d d or A or n (beta, C) Boost reading – digital or analog or none. (analog is for gauges with boost sender and tubing to manifold) Digital is for boost from diag port. C is raw charge pipe pressure from pre-throttle sensor vag data(beta, pre-throttle means no vacuum and subject to higher peaks, not available on all models).
A1.N Y or N Enable or disable the first analog input (brown wire)
A2.N Y or N Enable or disable the second analog input (blue wire)
Clr.C None Hold the first button to clear codes.
Cal.b None Calibrate the analog boost sensor to your ambient conditions. — tap left button after confirming engine is off
tsi tsi, fsi (tfsi) or 3.0t, 3.2, TDI Select engine type – TDI is for diesel Golf and Jetta. TFSI is for 2.0T. 3.0t for S4/S5. 3.2 for boosted TT.


Reading and Clearing Codes

For version 2.1 and higher there is a Clr.C option in the config menu, use this to clear codes!

To read codes, simply start your car. If you have a code, the gauge will read it back to you. If you have multiple codes the gauge will read off all codes. For a definition of codes, please check here.

To clear codes on OLDER versions of the gauge, once again turn the car completely OFF, while the gauge is off, HOLD BOTH BUTTONS, and then start the car. The gauge will say “hold” to confirm that you want to clear you must continue to hold for several seconds and then the gauge will read “CLRD” and the codes will be cleared.

Setting up the Optional Analog Inputs

Your gauge has 3 analog inputs, 2 of which can be used as universal displays for ANY 0-5v sensor. Do not hook up a device that sends more than 5 volts or you WILL damage your gauge.

To enable an analog input, enter the config menu and set the A1 input to Y for yes. After doing this, 3 new options will appear.

A1.DP, analog 1 decimal points. The gauge will show 9999 on the screen, and tapping the first button will move the decimal point. A1.Lo, analog 1 Low volt, or Ov reading, which the gauge will show when it sees ZERO volts on the input. -999 through 9999 A1.Hi, analog 1 High volts, or 5v reading, which the gauge will show when it sees FIVE volts on the input. -999 through 9999 A1.bL and A1.bH, limits of the bargraph for that input. L is the bargraph start, H is the bargraph end.

Simply set the values for the 0v and 5v readings of your attached sensor, as well as the number of decimal points, and the gauge will interpolate anything between 0 and 5v to the proper display.

EXAMPLE CONFIGURATION – LC-1 AFR Controller:
According to the LC-1 wideband controller documentation, Analog output 2 is the 0-5v output. By default it is 0V = 7.35 AFR and 5V = 22.39 AFR . To configure our gauge to show this on the first analog input, we would use the following settings:

A1.DP, 2 decimal points, 99.99
A1.Lo, 7.35
A1.Hi, 22.39
A1.bL 7.35
A1.bH 22.39

Next update will be on the finished Wheels and tires setup and then I can really show off the Air ride and short video for you all :)

Also in the planning, looking at possible 2.0T or 2.7T or 3.0T conversion, in the middle of researching at the moment, this will be winter plans.
Old Skool Mk1 Golf Gli (82), Mk1 US Cab 85 and 83
SOLD - BLACK SOY 92

Offline Madone_si

  • I live here
  • *****
  • Posts: 1,529
  • Seattle WA, USA and Middlesex, UK
Re: madone_si - A4 Avant 1.8T RED Quattro
« Reply #87 on: 26 January 2015, 17:37 »
4 Air ride cables, 4 electrical cables, 1 power cable, 1 remote cable and 2 earth straps and 8 bolts and its out, total of 45 minutes to pull out, all my planning ages ago worked out perfectly.

I have shut off values at each wheel corner, so can keep the air bags filled up without the air ride system and can be manually filled too. Again planning ages ago is working perfectly in this situation.


In the garage again, can now get on with the custom air art...


Like it was never in the Audi...
« Last Edit: 03 April 2021, 19:49 by Madone_si »
Old Skool Mk1 Golf Gli (82), Mk1 US Cab 85 and 83
SOLD - BLACK SOY 92

Offline Madone_si

  • I live here
  • *****
  • Posts: 1,529
  • Seattle WA, USA and Middlesex, UK
Re: madone_si - A4 Avant 1.8T RED Quattro
« Reply #88 on: 03 April 2015, 03:41 »
Well after several weeks the Audi is repaired  :smiley: feels so good to drive the Audi again, one very happy Simon

Audi rings removed from rear, new rings going back on (old ones were faded in areas, so replacing it)
Rear bumper was repaired and painted completely.
New trim installed and painted black.


Plus I got the Air tanks too, perfect match to the Audi color, now is the fun of putting the art on them and custom sign and get re-installed into the Audi and get car ready for car shows.


and while I was in the UK recently I got a little carried away with buying RC mini stuff!!! (have to hide this lot, the Mrs will kill me!!) [:D]

« Last Edit: 03 April 2021, 19:50 by Madone_si »
Old Skool Mk1 Golf Gli (82), Mk1 US Cab 85 and 83
SOLD - BLACK SOY 92

Offline Madone_si

  • I live here
  • *****
  • Posts: 1,529
  • Seattle WA, USA and Middlesex, UK
Re: madone_si - A4 Avant 1.8T RED Quattro
« Reply #89 on: 11 April 2015, 04:50 »
Tanks installed and ready to go back into the Audi this weekend.

I will apply art to the tanks once in the Audi.  :cool:

Old Skool Mk1 Golf Gli (82), Mk1 US Cab 85 and 83
SOLD - BLACK SOY 92