Author Topic: bens ... 1986 MKII 1.8 8v K-Jet Golf ... project  (Read 134468 times)

Offline Ben Lessani

  • I live here
  • *****
  • Posts: 3,873
  • The poor mans MK2 Haynes author
Re: bens ... 1986 MKII 1.8 8v K-Jet Golf ... project
« Reply #60 on: 17 February 2009, 09:55 »


Well, I got my mits on a gauge, abeit an industrial one and I have some really perculiar results. I'm trying to diagnose what is going on with my stupid noisy tappets, so heres what I can confirm.

I've uploaded a recording of the engine running, listen to my tappets here

When engine is cold, cylinder pressures are:

1. ~12 Bar
2. ~12 Bar
3. ~12 Bar
4. ~12 Bar

When the engine is hot (90 C oil temp), cylinder pressures are:

1. ~11.5 Bar
2. ~11.5 Bar
3. ~11.5 Bar
4. ~11.5 Bar

Cyl Head cold engine oil pressure 1000RPM ~4 Bar
Cyl Head hot engine oil pressyre 1000RPM ~3 Bar

If I rev over 1500RPM the gauge maxes out at over 5 Bar

When I turn the key to IGN, oil pressure light flashes
When engine is running, oil pressure light is off
If I ground the blue wire to the head oil pressure sensor, the light flashes on the dash

If I remove the wire going to the oil cooler pressure sensor, nothing happens
When the engine is running, the sensor is grounded
When the engine is running the wire going to it, is 12V

Spark plugs are black around the base and grey at the tips

Exhaust was smokey, but did not smell of burning oil, car also hadn't been run in 2 days (photo taken immediately after starting)


Offline Ben Lessani

  • I live here
  • *****
  • Posts: 3,873
  • The poor mans MK2 Haynes author
Re: bens ... 1986 MKII 1.8 8v K-Jet Golf ... project
« Reply #61 on: 21 February 2009, 20:40 »
i'm really starting to give up
after replacing the stem seals and putting in new tappets, my engine was noise free for about 15 minutes of driving. then since then, it rattles like theres no tommorow. i tested the oil pressure and it was fine, so time to cross off the remainders.

i drained 1 litre of oil, then refilled with 1l of ATF, then had to run in the ATF, so i drove to blackpool and back ~ 140 miles. when i got home, i left the car overnight, didn't start it.

the next day i went out in my step dads car and picked up a new rubber/metal sump gasket from GSF.


i drained out the oil, there was nothing in it but oil, no metal filings/swarf. so then i removed the sump to clean it out and inspect the pickup.


there was only a tiny bit of dirt on it, which i cleaned off. i inspected the sump and that was clean too


i refitted the sump, and put a new oil filter on. so now it was time to replace the tappets again with another set the seller gave me. off came the rocker cover, the only bonus was that the white crap had pretty much disappeared now


so i removed the belts and pulleys for the 3rd time this month, and have taken a tonne of photos of the cam incase anyone can see anything out of the ordinary.


then i pulled off the cam and double checked the bearing caps - they look ok to me, but again, maybe someone else can see something out of the ordinary


these are the 'old' new tappets (that were new, fitted 2 weeks ago), theres signs of scoring on the edges, but the oil did appear to be getting to them just fine


i guess the only bonus is that the atf did thoroughly clean most of the engine - you can see where its cleaned up some of the valve spring caps


and the oil feel holes for the tappets look fine


my new tappets were bathed in oil overnight, they weren't springy though - the pistons were solid in the middle - should they have been?


i fitted them, primed the engine, fitted the bits back on. started it up and ran it for 15 minutes whilst i tidied my tools.

end result - its not any better

« Last Edit: 21 February 2009, 20:44 by Ben Lessani »

Offline Ben Lessani

  • I live here
  • *****
  • Posts: 3,873
  • The poor mans MK2 Haynes author
Re: bens ... 1986 MKII 1.8 8v K-Jet Golf ... project
« Reply #62 on: 21 February 2009, 23:18 »
oh my god

i hope i'm not speaking too soon, but its either great news or catastrophic news.

i think i've gone deaf, because i can't seem to hear any lifter noise :undecided: i just went and took the car for a drive as my last hope, a quick 10 miles up the m'way, 10 miles round some twisty bits and 15 miles home on the m'way.

not a hint of noise the entire way!?!?!?! i don't know whether they needed to bleed down, but leaving the car after running it before (immediately after fitting) appears to have resolved the issue (fingers crossed).

so all in all, it sems on my mission to solve my tappet noise, i've had to do the following

strip down engine to get to tappets
strip down each tappet and clean out
£3 mr muscle
rebuild engine
stripdown engine
replace valve stem seals
£11
replace tappets
£25
replace rocker cover gasket
£9
rebuild engine
fill engine with atf
£4
drive to blackpool and back to run in atf
£14
strip down engine
replace sump gasket
£10
replace oil and filter
£10

total £86 and about 400 grey hairs - was it worth it, hell yeah. i've never been so happy to hear the trim rattling, wind noise and my screaming passengers

Offline Ben Lessani

  • I live here
  • *****
  • Posts: 3,873
  • The poor mans MK2 Haynes author
Re: bens ... 1986 MKII 1.8 8v K-Jet Golf ... project
« Reply #63 on: 07 March 2009, 22:31 »
here's what the postie brought me today
after my recent diagnosing debacle trying to figure out my noisy tappets cause, i decided its probably a safe bet to get a permanent oil pressure gauge, so i hunted eBay day and night to try and get a bargain - realised that was a lost hope as most vdo gauges were going for £60+ and by luck found a buy it now for only £45 delivered, bonus!

unwrapping 200 feet of bubble wrap releaved the gaugely greatness


i've read the vdo installation guide and come to the conclusion that there was two types of pressure senders, the low and high pressure, the 0.3 bar version which should be on the head, and the 1.8 bar version, which should be on the oil cooler. a quick glance at the sender i recieved showed,


well, not much, but some digital zooming greatness showed ...


i had a 0.3 bar sensor, so on the head it went. this was actually a bit of a saviour as it meant i didn't have to try and get to the oil pressure sensor on the oil cooler. so i dinked it on and went about testing the gauges to make sure they worked ok.


i started up the engine and the standard dash oil pressure light was happy and the gauge appeared to be reading just fine.

now to start hacking up my centre console to see if i can bodge my gauges in. well, not so much bodge, i've got a litte bit of experience fabricating since my last car - here's some  photos from my pc install in my 306 ...


i'm not going to this much effort for the golf, well, not until i bother finishing the interior that is.


a mild bit of dremmelling later and i'd cut out my ashtray - its not like i smoke anyway.


the fella that sold me the gauges also included the panel from the audi they came from. this is what i'll be cutting up to fit my car, i lined it up for a quick test fit, looks like its a long waaaay off


to get a nice neat edge, i clamped the gauge pod to a big ass piece of keybar whilst i sanded it back with the dremel


after a bit of cutting and sanding, it started to look a little bit like this


then a teeeny bit more trimming and some very sticky tacky gutter sealant later


i got a load of sealant all over the plastic, so i'll clean that off tommorow after it sets - i can't imagine it being too diffcult (famous last words). the sealant needs to set overnight, so i'll continue tommorow ...
« Last Edit: 07 March 2009, 22:42 by Ben Lessani »

Offline Ben Lessani

  • I live here
  • *****
  • Posts: 3,873
  • The poor mans MK2 Haynes author
Re: bens ... 1986 MKII 1.8 8v K-Jet Golf ... project
« Reply #64 on: 08 March 2009, 21:00 »
... vdo gauges part two
so after waiting a day for the glue to go off, i managed to crack on again this afternoon. removing the ash tray wasn't a big deal, but removing the cig lighter was, so i had to work that back into the console.

i removed it from the old plastic, then separated it into its parts, it was a bit tricky to separate the green ring, it was stuck fast. i just ended up sticking it on top of the vice jaws and gently tapping the barrel out. i gave it a quick blast with some sandpaper to get the corrosion off


then, for the very first time, i got to use the red compound that comes with the dremel - wooo. i stuck the little polishing wheel on, span it up on the lowest speed, then plunged it into the compound to get it on the wheel. after about 3 minutes of polishing, the score marks from the abrasive were gone and it had polished up to an amazing chrome finish. its really tricky to take a photo of it, so take my word for it.


i stuck the green stone tool on again and buzzed a hole into the side of the centre console. then a little bit bigger until it was about the right size


the bulb for the lighter socket was dead, so i went about replacing it with a spare LED. it was pretty easy to do, just yank the old bulb out and solder the new led in.


you can pretty much see how the gauges sit in the centre console, this is probably the most electronics my mk2 has :grin:


then i got to sticking the wiring into the engine bay. i only needed to run two wires, the pressure sender and the temp sender, so i grabbed two lengths of spare wire and ran them through the engine bay. i wrapped them in some spare corrugated trunking and its all pretty discrete.


then all i needed to do was finish the up the loom for the gauges themself. as the connectors on the back of the gauges are tight, they'll be fitted permanently, and it has bullet/socket crimps to connect to the wiring on the car so they can be removed. its all colour coded and wrapped and ready to go into the car.


so now it was just time to put it all together. you can see how dirty my dash is in the photos - so it spurred me on to give the dash a quick clean and run the hoover over the car.


i've got to say, i'm well chuffed with the gauges, they look smart and work well!

i'm still undecided as to what colour to do all my switches and dash, so until then, i won't have any illumination on the dials (all three bulbs that came with it were blown). i dont want to do the blue or red everyone does, i was thinking either yellow, white or seriously bright green.

Offline Ben Lessani

  • I live here
  • *****
  • Posts: 3,873
  • The poor mans MK2 Haynes author
Re: bens ... 1986 MKII 1.8 8v K-Jet Golf ... project
« Reply #65 on: 09 March 2009, 10:03 »
gauge tastic
the gauges are awesome, well chuffed with them! i can see now that at first start (when the oil presumably is quite thick), the oil pressure on idle is near 4 bar. but the as the oil gets up to temp, its about 1-2 bar. i just want more gauges now - its the closest way of the car telling me exactly what its thinking.

Offline Ben Lessani

  • I live here
  • *****
  • Posts: 3,873
  • The poor mans MK2 Haynes author
Re: bens ... 1986 MKII 1.8 8v K-Jet Golf ... project
« Reply #66 on: 10 March 2009, 00:25 »
vdo gauge installation


Tools required: 24mm socket, 17mm spanner, crimp tool, soldering iron, wire snips

as I've had a few pm's about this - I'm sticking up a quick wiring guide. its seriously easy hooking up these gauges, i don't quite know where the confusion comes in. basically, a standard mk2 golf has

a low pressure warning light
a low pressure warning buzzer
oil temperature gauge built into the mfa

these are operated by 3 sensors,

one being in the head (the low pressure warning light sender)
the other in the oil cooler (the low pressure warning buzzer sender)
and the last in the oil cooler (the oil temp. mfa sender)

when you turn your IGN switch, you'll see the oil light flashing, that's a sign that there is low oil pressure - obviously as the engine isn't running. the buzzer doesn't start sounding however until the engine hits about 1800 rpm. ideally - you want both these fail safes operational to prevent the early death of your engine.

so, now we have a problem, we're going to have 3 different places the oil pressure is reported to

dash bulb
dash buzzer
vdo gauge

which basically means we need 3 senders, kindly though, the audi's have a twin pole (its got 2 connectors) sender for pressure. each pole is marked, WK for the standard mk2 loom wire and G for the vdo gauge. that's fine - but where do i put the twin pole sender you ask?

well, that's up to the gauge you get. on the spanner flats (see images above), it is marked as to what sender it is. the 0.3 bar twin pole sender needs to replace the original pressure sender in the head. if it is marked 1.8bar, then it needs to replace the pressure sender in the oil cooler. the pressure sender is easy to differentiate from the temp sender as its a 10mm x 1 thread (1/8 NPT), whereas the temp. sender is smaller.

if you've got your twin pole pressure sender and gauge from the same car - then you need not worry, but if you bought the bits individually, you need to match the parts. the 0-5bar sender *should* only work with the 0-5bar gauge, although as they as basically just resistance devices the 0-10bar sender is just as likely to work with the 0-5bar gauge - but don't take my word on it.

so where are we, you've fitted your pressure sender in the right location, you plugged the original dash wiring into the pole marked WK and you've run a new wire to the cabin for the pole marked G. now you've got to take care of the oil temperature. lets re-hash though. we have ...

the oil temperature digital gauge on the mfa
the oil temperature vdo gauge

you can see a theme appearing here, there's two gauges - so we'll need 2 senders. BUT there isn't a twin pole sender for oil temperature, so we have two choices. you can either just disconnect the wire for the mfa and just solely have the vdo gauge for oil temp. or you can go out to a shop and buy what is called a tee piece.


as you can see, its a really simple thing. basically a threaded splitter. so you remove the original oil temp. sender, screw in the tee piece, then you have two new holes to screw in your two senders, the original oil temp. one and the audi oil temp. one.

i couldn't be bothered fitting a tee piece, so i've just stuck with 1 oil temp. gauge - the vdo one. it happily works off the original mk2 oil temp. sender, so i didn't need to bother changing it.

now all you have left is wiring, which is really straightforward.


you need 5 wires in total

blue/white illumination 12v live (you can share the one from the cig lighter)
12v + IGN live (run a fresh wire from one of the many available spades on the fusebox)
gnd (either run a wire from the fusebox, or share the cig lighter ground if your a pikey)
oil temp. sender wire
oil pressure sender wire

the diagram above pretty much speaks for itself, its obvious where the wires go on the gauges as they are marked. remember to only use the ign +ve though, otherwise the gauges will be on permanently.

now sit back and enjoy your new gauge greatness, and try not to crash the car admiring them whilst driving :tongue:

Offline Ben Lessani

  • I live here
  • *****
  • Posts: 3,873
  • The poor mans MK2 Haynes author
Re: bens ... 1986 MKII 1.8 8v K-Jet Golf ... project
« Reply #67 on: 08 April 2009, 19:22 »
merry easter
a lot has happened since my last post, mostly that I am 23 now - a relative old man and it was MOT time again. well actually, that was about 2 weeks ago now - its been a saga!

the old girl went in for her MOT and unfortunately didn't do her best on the day and failed on me and failed herself. the breakdown was


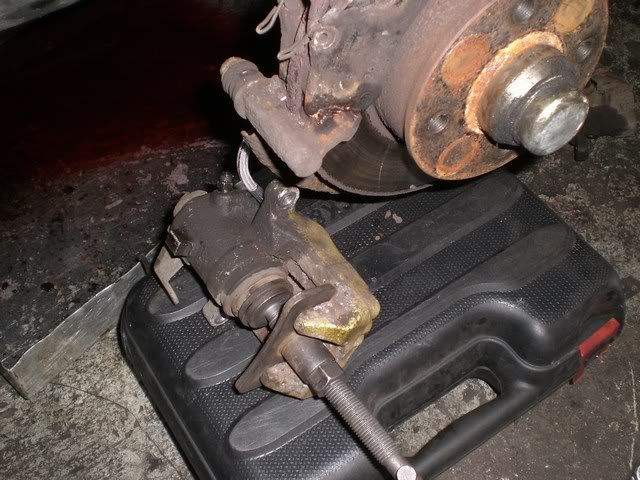
so i had a few little jobs ahead of me over the next few days. i've had a right saga with the handbrake though! i didn't want to pay for a new caliper, but couldn't seem to get the handbrake working 100%, it was running at 50-60% of what it should be. i was faced with a choice, bribe the MOT man, fit a mk2/mk3/mk4 caliper. mk2 means i'd replace it next year, mk4 means i need hose adaptors and mk3 would drop on, but mean i need to find a mk3 (or buy new).

the quickest option was mk4 units, theres a decent supply of them kicking about scrappies nowadays and i found a fresh-un, about 1 month old. so i nicked the calipers off it, a right arse i might add, the stupid 18" wheels were still on because of locking nuts, so i was having to work around it!

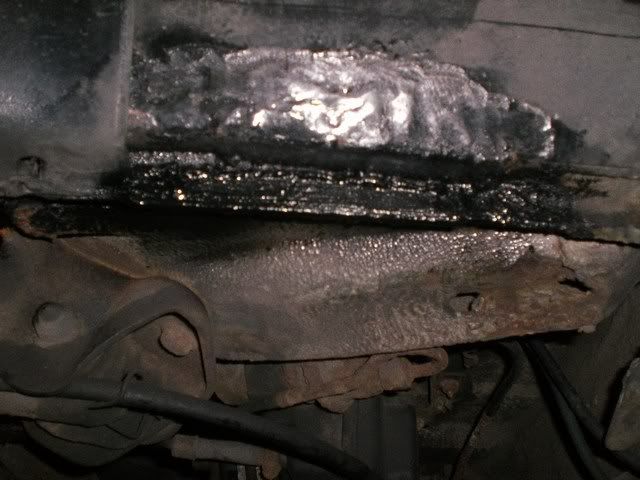
so, onto the holes in the sills. i didn't have my camera with me, so its crappy phone photos, only a few too (otherwise my phone gets all oily).


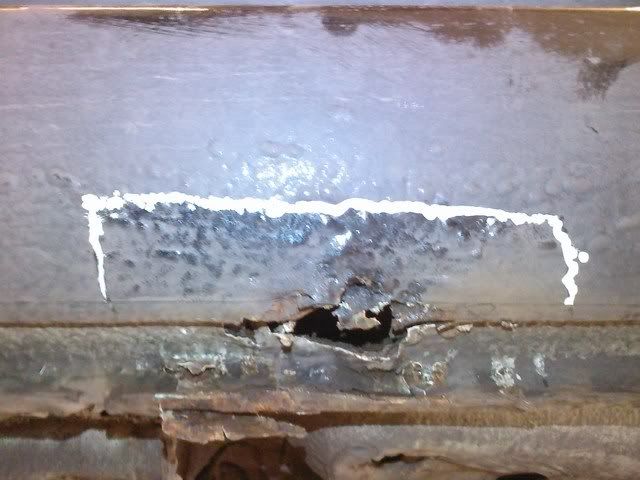
it wasn't looking too good, so i marked up around the area with some tipex as to how far i wanted to cut to get fresh metal. a mild spot of grinding later and i had got to here ...


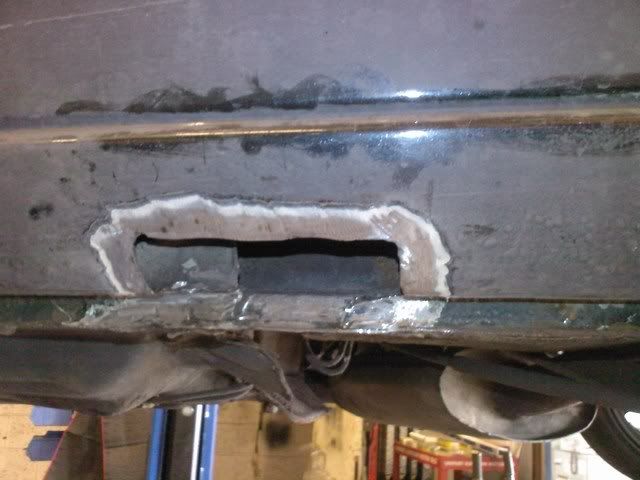
i cut a plate of 18 gauge steel, bent it into the rough shape, tacked it into place, then seal welded around it. if you're doing this yourself, remember to tack it at each end, then tack towards the middle with 1-2" gaps. this way, when you seam weld it, the panel won't distort and bend out of shape.


after this was welded up, i gave it a base coat of terosol underseal, then just blasted over with some spray paint - not even remotely the same colour, but more as bare metal protection.

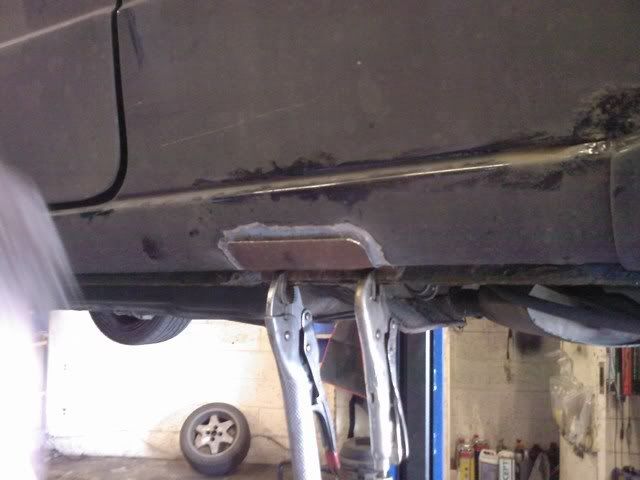
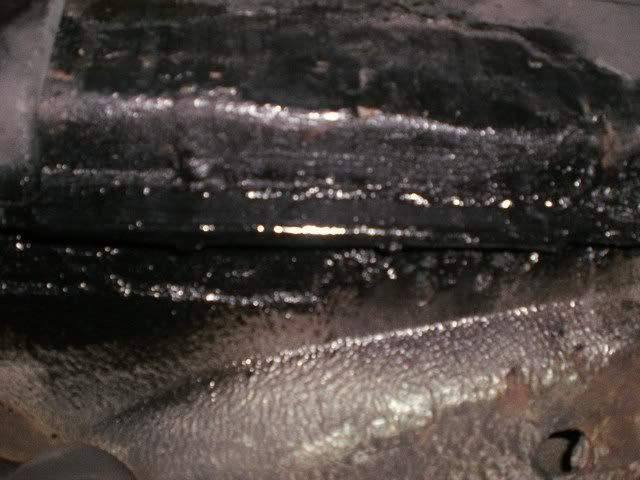
the other side was really bad, the jacking point on the sill itself had thinned right out, so i cut it away the sill, then i found the rear arch was holed too, so i cut that out as well. my welding wasn't that neat this time round because i didn't have the car on the ramp, i was doing it on axel stands, so it was a bit trickier.


the arch was plated with 18 gauge again, plug and seam welded. the sill was triple reinforced, plug welded at 1" intervals and seam welded between each layer, its stronger than factory now, so that's awesome. i got bored of grinding though, so the finish wasn't neat at all. when i actually spray this the right colour, i'll sand it back flat and use filler properly.


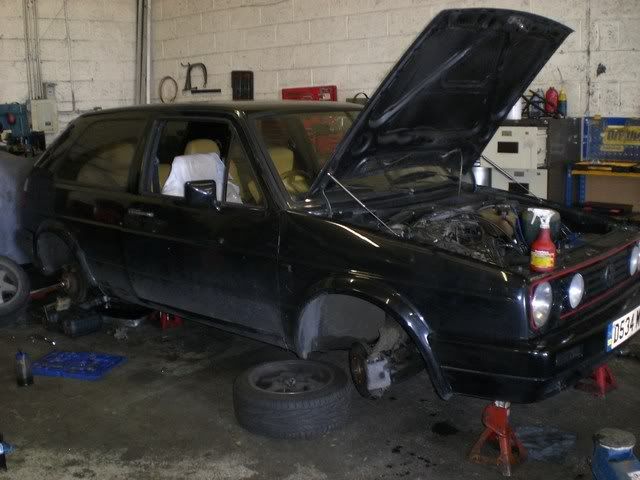
so, now the sills were sorted, its onto the brakes. as above, step one, make a floating car


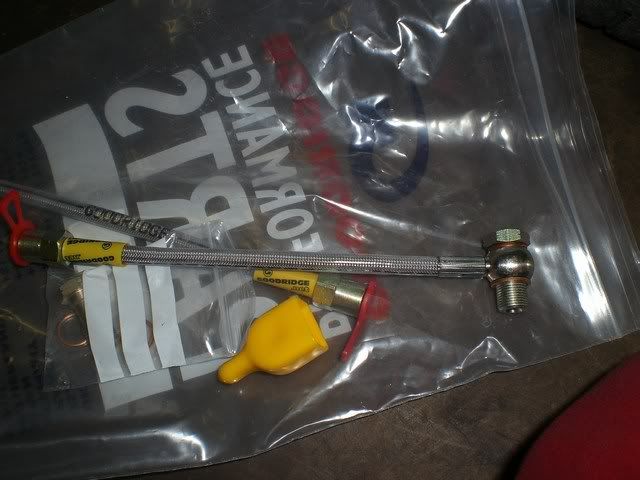
i settled with mk4's and ordered a set of hoses from TSR to get them to fit.


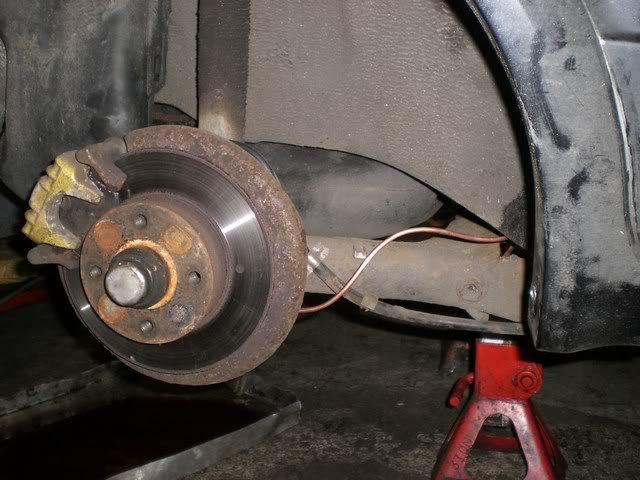
as i've got a pre-88 brum brum, i have handbrake cables which reach over the top, so instead of faffing with them, i just mounted the calipers upside down the wrong way round. there's not a problem doing this, it just means that you need to remove them to bleed them, so the bleed nipple is at the top. i just whacked a brake winder into the gap to hold the piston, so i could bleed it.


as the brake lines were looking pretty corroded, and mostly because i hacked them to bits to remove the caliper flexi, i made up some new ones and fitted them.


i still intend to do the rear beam pipes - but again, as the car was only on axle stands, i wasn't in the mood of really fiddling trying to get the pipes out. i'll replace them next year ;)


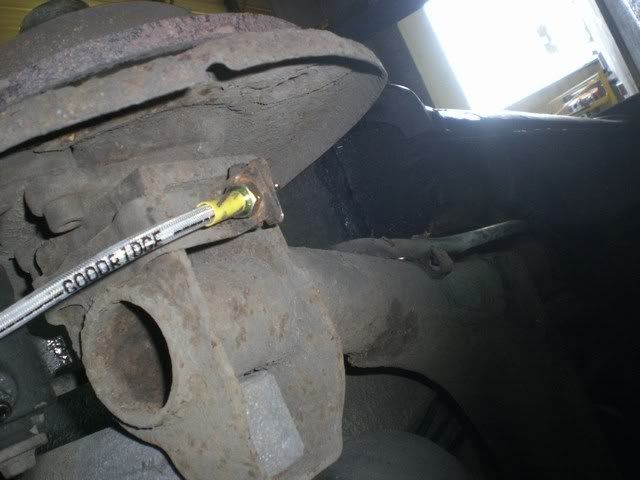
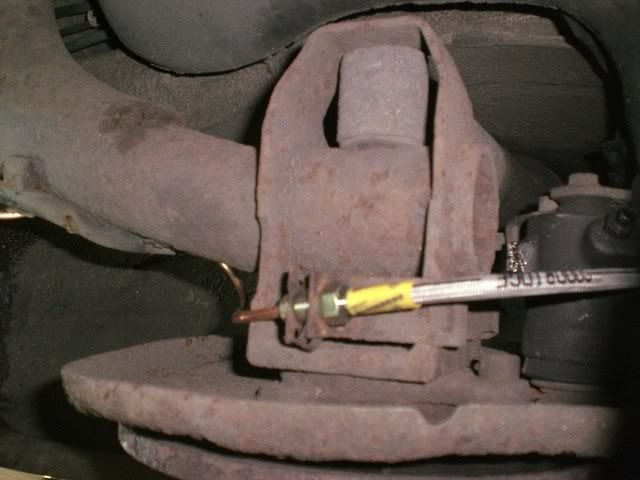
the hoses have plenty of room to move and i'm pretty chuffed with the result, the hoses look sweet!

but i've got to be honest, before the caliper change, the mk2 handbrake forces were

nearside: 60 kgf
offside: 120 kgf

and with the mk4 calipers

nearside: 120 kgf
offside: 120 kgf

the handbrake isn't particularly lighter to operate (probably as a result of the cable design/layout), its certainly not any stronger and the overall foot braking certainly isn't any different. the calipers were £30 and hoses £35, was it a waste of £65? in my opinion, yes - but it was a necessary evil for the pissin mot. my advice to others - don't expect miracles from the mk3/mk4 calipers :(

my pas was leaking from the pump where the metal elbow on the return feed sits, its an interference fit, and the fact i pulled it out with no effort at all pretty much means i should fit a new pump, but the pump's alright, so i just got a tonne of araldite, coated the outer surface on the elbow sleeve and slipped it into the pump and let it set overnight. it set rock solid and looks factory - so fingers crossed no more leak (its not like ATF is cheap nowadays!).

all that was left was the main beam then, its a funny one actually. i run stupid wattage bulbs, which have the power of the sun, the only downside was that running the power of the sun through the 23 year old h4 connectors took its toll and basically melted it to nothingness.

i jumped to the scrappy and chopped some h4 plugs off a nice 55 plate kia and soldered them back into the loom on both sides. the lights work perfect again and with everything ticked off, it was mot retest time.

... and as you can imagine, it went through no bother, all advisories cleared and the old girl running like a champ. i'm setting the co2 again tomorrow because its a bit off after fixing the stem seals. this should stop it running so rich (i hope).

until tomorrow ;)
« Last Edit: 08 April 2009, 21:06 by Ben Lessani »

Offline Ben Lessani

  • I live here
  • *****
  • Posts: 3,873
  • The poor mans MK2 Haynes author
Re: bens ... 1986 MKII 1.8 8v K-Jet Golf ... project
« Reply #68 on: 12 April 2009, 20:39 »
laziest photoshoot ever
I gave the car a wash the other day, well correction, my mate who owned the garage said he was ashamed of having such a dirty car at his garage, so he insisted on washing it, so i let him go nuts. i think i'm the worst car owner ever, last time i washed it was about 18 months ago - literally :grin: its a shame actually, as the paint job is mint. you can see how dirty it was here ...


 :embarassed:

here's a quick snap of the new calipers tucked under my wheels, i don't think they are gold from the factory, the last owner must have sprayed them.


i keep meaning to drive somewhere awesome to take some proper photos, but its either raining or raining - which doesn't make good for a photoshoot. maybe at some point i'll take some proper shots.


mk2 vs. mk5 - my sisters brum brum


looooooooom tape
i found a roll of loom tape and just cleaned up a little bit of the wiring in the bay. when i was in the garage, it looked pretty tidy, but then when i brought it into the light, its still a big fat mess. nevertheless, it looks something like this ...

from (a long time ago) ...


to ...


and my headlight loom was a wiring mess, so i just wrapped it up too. you can see the new connectors i dropped in.

from ...


to ...

« Last Edit: 12 April 2009, 20:51 by Ben Lessani »

Offline Ben Lessani

  • I live here
  • *****
  • Posts: 3,873
  • The poor mans MK2 Haynes author
Re: bens ... 1986 MKII 1.8 8v K-Jet Golf ... project
« Reply #69 on: 21 April 2009, 01:05 »
not so much of an update
nothing new to report, the car still drives like a peach. i thought i'd take the old girl for a spin tonight and having my camera with my i thought i'd give it a bash at filming.

it didn't really turn out good. i just got some duct tape and taped the camera to my rear view mirror, but not very tight because i needed to push buttons and see the screen :laugh:

i've upped it to youtube anyway, but its like watching cloverfield on steroids. for legal purposes, i was under the speed limit the whole time :wink:

http://www.youtube.com/watch?v=XpBP4aCWOXs

it gives you a pretty good impression of what main beam / dipped beam are like in the real world too. but the funny thing is, because the mic on the camera faces forwards, you can't actually hear the exhaust at all - but its pretty loud when you're in the car!

and whilst i'm at it, here's an old one from 2006, me just jumping from 70 > 120 on a german autobarn

http://www.youtube.com/watch?v=j8ZwaH1bY-E
« Last Edit: 21 April 2009, 01:07 by Ben Lessani »