Author Topic: bens ... 1986 MKII 1.8 8v K-Jet Golf ... project  (Read 134334 times)

Offline Ben Lessani

  • I live here
  • *****
  • Posts: 3,873
  • The poor mans MK2 Haynes author
Re: bens ... 1986 MKII 1.8 8v K-Jet Golf ... project
« Reply #40 on: 15 April 2008, 13:53 »
bling bling baby
so, as promised today, the wheels came off 1 by 1 to get their clean. i took about 1 million pictures, so i will try and remain calm  when posting - i have a habit of going image crazy. i cleaned all the wheels in the same fashion, after realising that plain old autosol couldn't manage the job on its old, i went to the car bits shop and picked up a few things...


farecla 6" compound mop, farecla 2" compound mop, poloshing mop and backing plate, fine grade steel wool

i first scrubbed the wheel down with a sponge and some diluted fairy liquid (not neat), rinsed it off, applied some farecla g3 cutting compound and went over as much as i could with the 2" mop, i cut the surface until the compound had disappeared (keeping the mop moist at all times). then i rubbed the surface down by hand in the hard to reach areas with the g3, cleaned it off with a clean rag, then used a diluted mix of about 1/10 water and autosol in a spray bottle and went over it with the polishing pad until all the liquid had gone, then just gave it a quick wipe by hand in the hard areas again. because the wheels weren't in great nick when i first got them, i always meant to spray the gaps between the spokes black again, so now was my chance. i masked off the centre and rim and primed with some zinc 182 and then sprayed it in halfords matt black spray paint.

i started with the drivers wheel - which fortunately had been kept dry and warm in the garage for the 4 months the car was off the road (shame i can't say the same about the two rears  :cry: ). it wasn't in too bad condition, but i worked over it the same as the others to ensure a consistent result.

front offside before


after


now the sad ones, the rear offside, it had been sat in the winter weather for 4 months taking a beating, it was badly corroded with pitting, and discolouration of the metal. i, against my better judgement, had to attack this with wire wool (the sponge wasn't shifting anything). it did score the metal - but i hoped to be able to buff this out with the g3 (and i did :D )

rear offside before


after


front nearside after


rear nearside before


after


i started it at about 12pm and finished at 8pm, so about 2 hrs per wheel to clean it up and give it a primer coating (i will put the final coat on tomorrow and put about 5 coats on over the next few days to be safe). i don't expect the paint to last very long (6 months +) but at this point, i can always get the wheels professionally refurbished. look at my poor car teetering on the edge on a sloped driveway on 3 axle stands. i slapped myself, came to my senses and put the old p-slots on at this point.


when the paint is all done drying - i will post the photos of them finished, fingers crossed i masked off well enough and they don't come out looking crap! wish me luck.
« Last Edit: 19 April 2008, 02:39 by Ben Lessani »

Offline Ben Lessani

  • I live here
  • *****
  • Posts: 3,873
  • The poor mans MK2 Haynes author
Re: bens ... 1986 MKII 1.8 8v K-Jet Golf ... project
« Reply #41 on: 17 April 2008, 23:53 »
whats black and chrome with 6 legs
...and here's how they turned out post-painting. 2 coats of primer and 5 coats of satin black hammerite and this is what it looked like.

from


to


got to say - it looks pretty damn smart, a hellish improvement if i do say so myself. i was a little bit curious about whether i made a mistake doing it in satin black - rather than matt. so i used the remainder of my matt spray and did half a wheel in that for comparison...but i'm torn, i don't know whether i prefer the satin or matt, time will tell...


spot the difference  :cool:
« Last Edit: 17 April 2008, 23:58 by Ben Lessani »

Offline Ben Lessani

  • I live here
  • *****
  • Posts: 3,873
  • The poor mans MK2 Haynes author
Re: bens ... 1986 MKII 1.8 8v K-Jet Golf ... project
« Reply #42 on: 19 April 2008, 02:32 »
i cleaned my car, again
this wasn't just a car clean, but a chance to go nuts with my new kit. so as mentioned before i got...


meguiars quick clay kit
autogylm srp
collinite 476s

and applied them in that very order. i'll let the pictures do the talking - but if i recommend anything to anyone - claying your car has to be the (slowest) best thing in the world for old rough paintwork. it went from making mine feel rough and gritty to glass smooth. the srp added a brilliant wet look and the collinite sealed it all up for the next 6 moths  :grin:

before


washing


claying


polishing


waxing


i polished and waxed my chrome rims, put them back on the car, and will do some nice photos tomorrow. if you were wondering, i started cleaning my car at about 3:30pm - and finished about 1:30am, 10 hours to clean your car....sure is slower than a drive-thru.
« Last Edit: 19 April 2008, 02:38 by Ben Lessani »

Offline Ben Lessani

  • I live here
  • *****
  • Posts: 3,873
  • The poor mans MK2 Haynes author
Re: bens ... 1986 MKII 1.8 8v K-Jet Golf ... project
« Reply #43 on: 23 May 2008, 23:34 »
hit rock bottom
or rather, just the pavement. i had to do a three point turn when i spotted a nice open driveway, pulled onto it, and before i realised, it was very steep, and the moment i went for reverse, the weight of the car shifted and it sat its ass on the floor. i tried to back out and the car was stuck fast, i did manage to almost tear the exhaust off the head before a kind person with a massive jack helped ramp my car into the air and put big sleepers under the tyres to slowly back the car back out.


4 wheel laser alignment
so yeah, as per a botched alignment from kwik fit, i took my dollars and my baby elsewhere and got it aligned. it happened to be pro-grip in bonnybridge. i'll let the pictures do the talking on this one.


a rather unlikely location


so after looking at what looked like a 1980's sci fi film prop set, i got my results from the fella - and what looked pretty shocking, i was reassured quite a lot of hatchbacks were squint and only really mercs and bmw's tend to be found 99% spot on.


as per what everyone here, and i, thought - the rears can't be aligned. the best you can do is just put new poly bushes in to square up the rear end, other than that - there's not much you can do. although the rear beam is off, cumulatively it was fine, which is the figure you need.
« Last Edit: 23 May 2008, 23:40 by Ben Lessani »

Offline Ben Lessani

  • I live here
  • *****
  • Posts: 3,873
  • The poor mans MK2 Haynes author
Re: bens ... 1986 MKII 1.8 8v K-Jet Golf ... project
« Reply #44 on: 13 December 2008, 19:54 »
Warning: this topic has not been posted in for at least 30 days.

Man, where have I been for the last 7 months. Well, I have been driving the car and that's pretty much it, nothing has gone wrong :smiley:

... And then more recently, I hadn't had any antifreeze in the car and it has been exceptionally cold. So much so, that I lost a few parts to ice expansion. The radiator and the metal pipe cracked.

So after a few days of mucking in, I got everything fitted up, then had difficulties starting her, it kept backfiring in the intake. I checked and re-positioned the intake pipe, unplugged and replugged all the electrical contacts I had removed. Removed the dizzy cap and cleaned up the contacts then soaked it in WD40. Reseated the battery clamps and prayed to all the popular deities ...

... turned the key, and low and behold, SHE FIRED UP! She seems to run ok without any issues  :grin:

There was a small leak from  the water pump; I did remove it yesterday to check the impeller was ok. But I drove it to GSF to get a new seal, but by the time I got there, the leak had stopped. I drove round a load more and let it run on the driveway for 5 mins, but no leaky - so maybe the rubber seal needed to reseat itself....But I'll keep an eye on it.

After driving it for 5 minutes though - it was totally worth putting in a few hours labour :cool:

No pictures on this post, but I'll post some more later. But I've got more on my checklist to fix ...

replace nearside bumper indicator bulb holder
give the car a thorough clean, mop and polish
fix scraping noise when steering wheel turns 30/03/08
weld in proper brackets for split rear seats
re-make fibreglass sub box, recover and fit
replace both front doors with 90 spec units
get proper centre console for leccy windows
finish door pod builds, sand, paint/recover
use loom tape on engine bay to tidy it up
recover the door cards to match the seats
fix all dents/scratches/chips in bodywork
give the carpets in the car a full valet 01/04/2008
find and fit boot interior plastic trim
make some kind of new front wiper mech 28/03/08
re-spray chrome strip on dashboard
get proper central locking button
replace offside up and over seal
replace top starter support bolt 28/03/08
clean leather seats up properly 01/04/2008
replace passenger door membrane 01/04/2008
replace parcel shelf supports
put new seat runner bushes in 01/04/2008
smooth over rear wiper hole
replace parcel shelf straps
replace speedo cable gasket
smooth nearside wiper hole 28/03/08
buy new front components
fix chip in windscreen
replace steering wheel 01/04/2008
fix bouncy rev needle
replace parcel shelf
fit boot rubber seal 01/04/2008
secure PAS resevoir
refurb alloy wheels
replace back window
re-code alarm fobs 01/04/2008
fix noisey tappets
get wheel spacers
get hid lights
get MOT 28/03/08
fit new sunroof interior panel
fit n/s rear seatbelt
replace passenger door handle

Offline Ben Lessani

  • I live here
  • *****
  • Posts: 3,873
  • The poor mans MK2 Haynes author
Re: bens ... 1986 MKII 1.8 8v K-Jet Golf ... project
« Reply #45 on: 19 December 2008, 00:33 »
mother f***ing stupid piece of ****, god-damn p***ing me off, ****

so, i was replacing the heater matrix after noticing a weird residue on the windscreen and a slight smoke coming out the dash vents. so i stripped the dash down and had the matrix out within 1.5 hrs. i had to grind off the lower 10mm stud because it had seized solid but most of the rest was smooth sailing.


Tools Required: 10mm ratchet, flat blade screwdriver, posidrive screwdriver, wide grip pliers,


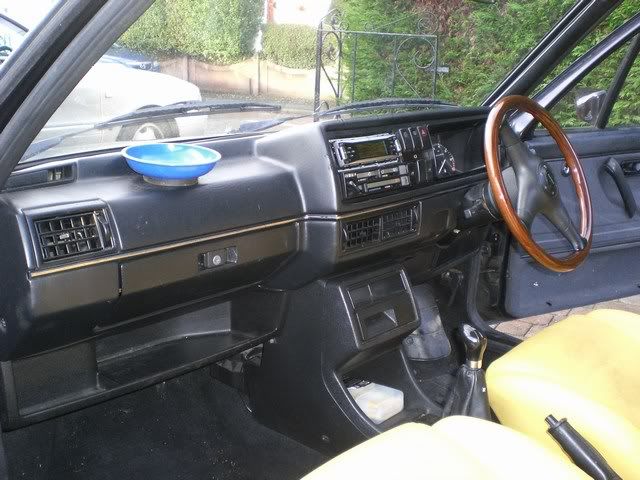
i started by removing both sides of the lower and centre dash, all screws are plainly visible. ignore the steering wheel, its temporary until i find a bargain momo off ebay!


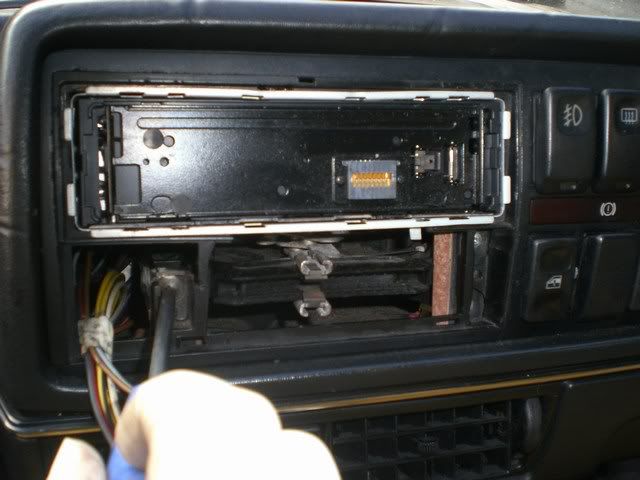
then pull the two levers for the heater controls off, they might be stiff, but just yank them off. then pull the selector for the fan speed. you then will be able to click off the bezel for the heater to reveal the screws behind, just go ahead and unscrew them. it does make it easier later on if you remove your stereo (if you have one).


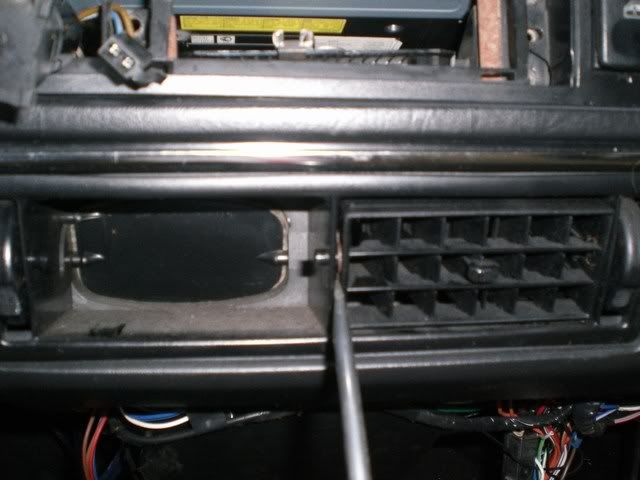
then remove the centre vents, this is really easily done. gently pry the side of the vent, as per below, then it will pop out one edge. then repeat on the other side of the vent. repeat this for the remaining vent. you now have access to the 2x screws that go through the vents into the dash, go ahead and remove these too.


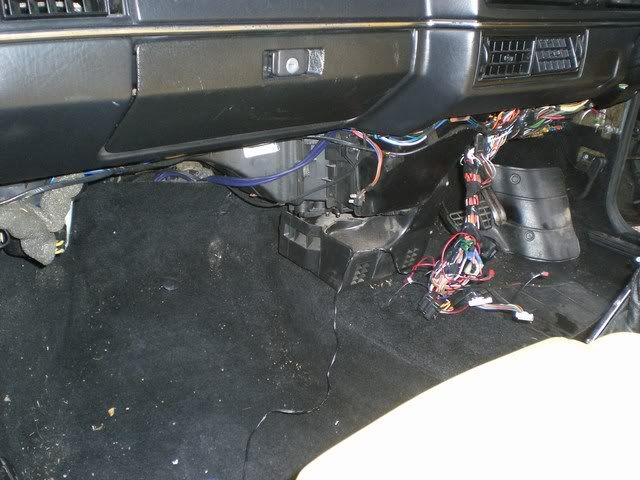
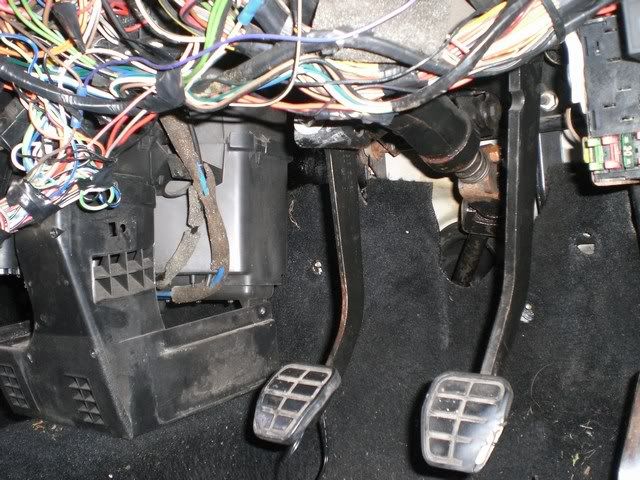
to the left of your driving feet there is a big plastic cover that keeps everything together, you can remove this by again, undoing the visible screws. now go ahead and remove the lower vent section (that blows on your feets), its pretty tough because its wedged between the exhaust tunnel and the fresh air box, remove the retaining screw on the drivers side then just yank away gently and it will come out.


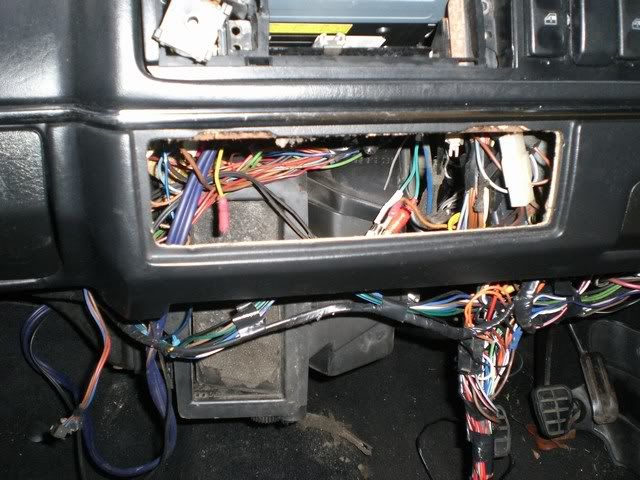
next up is tricky, you have to remove the pipe that goes to the face vents. this is a bit of a pig, and you will definately think you're doing it wrong, but just reach under the dash first and pry away (with your hands) the left and right vent connections. then you can begin to manipulate the pipe and pull it down, the middle vents have to squeeze between the dash and the fresh air box - its tough plastic, so dont worry. now, remove the two screws that hold the windscreen vent in place, one to the left, one to the right.


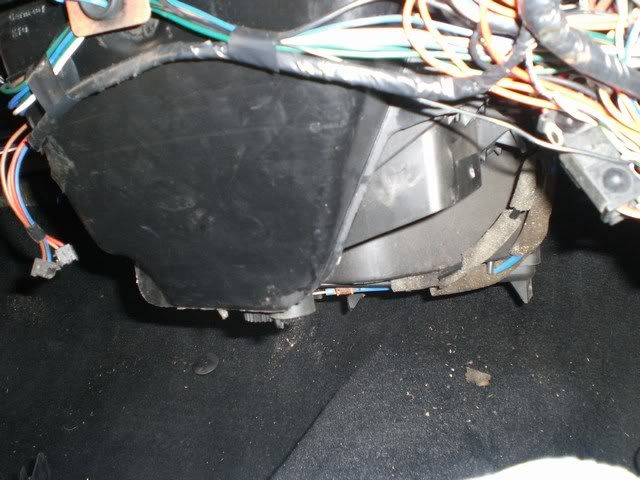
now you have exposed the fresh air box itself, congrats - go get some coffee and take a breather!


we're going to jump into the engine bay now, this bit is really easy and should only take a couple of minutes.


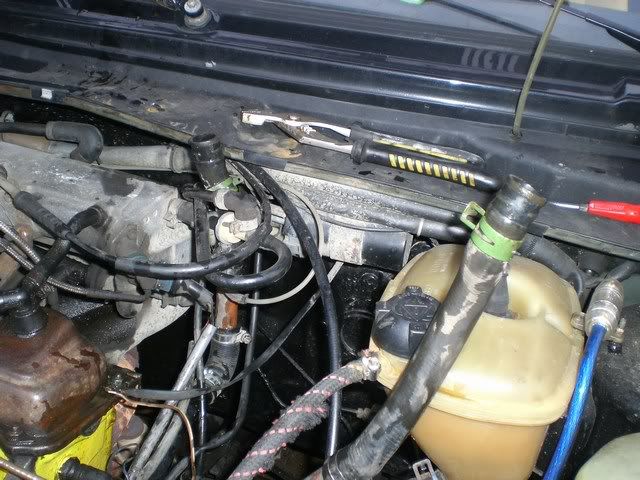
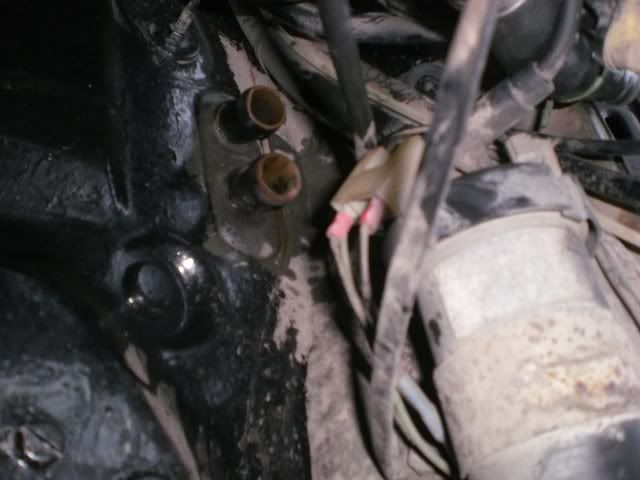
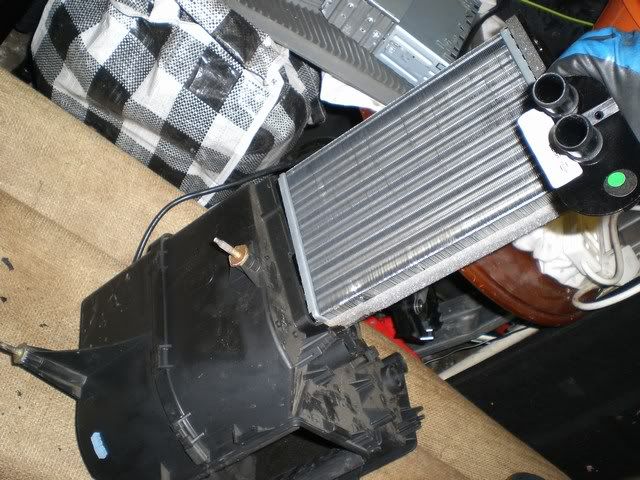
first remove the inlet and outlet pipes. grab your pliers and lean into the engine bay, reach your hands under all the wiring and ancillaries above the g/box and you have enough room to compress the hose clip and slide it backwards. repeat on the other pipe. remove the two host pipes by teasing them off the matrix, a little bit of antifreeze is going to leak out, but don't worry. prop the two hoses up in the engine bay to stop it leaking any more.


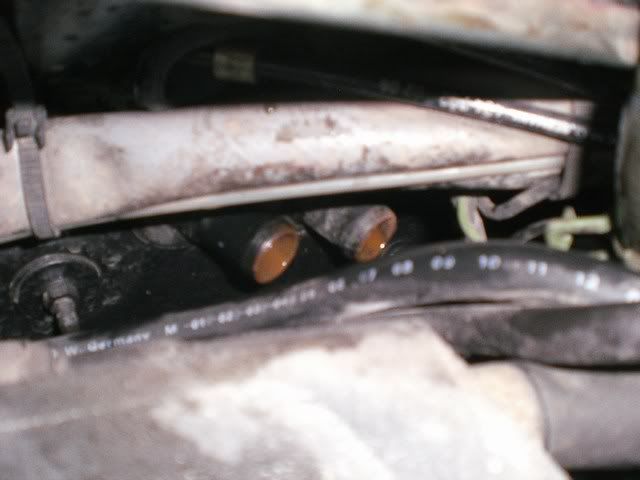
there is two 10mm retaining nuts that hold the matrix to the bulkhead, you can see one of them in the picture above, the other is about 12" lower down. i managed to remove the top one without bother, but the bottom one was seized and turning the nut was just mangling up the plastic on the fresh air box - i was getting nowhere, so i dremelled it off!


right, get back into the car now, there's only 5 metal retaining clips holding the matrix in place. these need to be pried off. removing the glovebox will *not* give you any better access, so don't bother - out of frustration i smashed mine to bits!


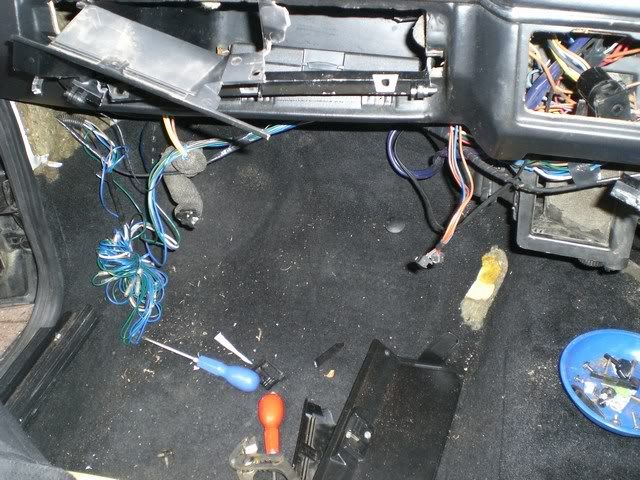
the metal clips are visible if you get level with the matrix, there is a pipe which runs from the blower to the matrix housing, where the pipe joins the matrix housing you'll see 2x metal clips, if you slip a flatblade screwdriver behind the right edge, you can flick it off. there is another underneath, which is quite easy to get to. there is another on top, which is tough to get to, i found putting my hand in the gap where the vents were i could get just enough leverage to flick it off. theres two left now, both on the back of the unit, if you reach underneath, you'll have to feel your way round - you can flick the lower one off, but the one at the top is nigh on impossible. i just wiggled the fresh air box until the clip pinged off.

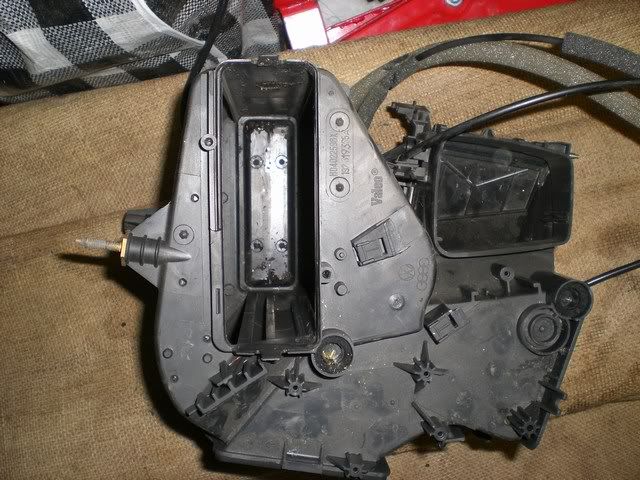
now push the heater controls back and down to the right, because they are attached to the fresh air box, they're going to come out with it. pull the matrix forward and down, it will take a bit of effort to separate from the windscreen vent. try and keep it upright to prevent leaking in the car. once its out, just pull back the two retaining clips and lift the matrix out - easy peasy.

now on my car, my vent controls were busted, the gates were damaged and didn't work right, so i'm getting another from a scrapyard - yay, i get to repeat the whole process again !!! if the foam on the gates is mouldy take this opportunity to replace it with some self adhesive foam. when inserting the new matrix, remember to put the foam gasket off the old one (that goes over the inlet and outlet) onto the new one. drop the matrix into the fresh air box and installation is the reversal of removal. but whilst you've got access to the gears, put some grease on it to make sure its smooth flowing!


the guide isn't as comprehensive as i really wanted it to be, but i'm in a foul mood after having to replace the heater box as well. so i'm off to the scrap yard tommorow, and this is what i need.

Edit: so i refitted the fresh air box today and it was pretty straightforward.

first fit the windscreen vent pipe and screw it into place loosely, then grab the fresh air box and stick it in place. the only trick here is to line up the two studs, which to be honest, i managed first time. as soon as i lined the studs up and had the box snug in the windscreen vent i dipped under the bonnet and tightened up both studs and re-attached the hoses.

screw down and tighten the windscreen vent, then slide the feet blower section under the matrix and screw in the two screws on the drivers side.

first you need to position the controls in the right place, don't screw them down just yet as you'll want to get your hands in. this is the only bit i found tricky, getting the face vents pipe in place. you have to squeeze it up through the gap, i found putting the top right corner in first, then compressing the two face vents and pushing the left up. then when its roughly in place, position the drivers side vent tube, then locate the passenger side. this took me about 10 minutes and was a little fiddly - expect cut hands and arms! put the two 10mm nuts back on the pipe to secure it


now, fit the face vents holder you withdrew and screw in the 2 screws. then just push the vents back in place - no leverage needed.

now just test the blower, make sure there's no leaks and that the controls work ok. if so, screw in the controls, then screw in the centre console, and the driver and passenger lower dash sections.

easy peasy!

scrapyard check-list

speedo surround
electric windows centre console
heater matrix housinng
glovebox and door
interior boot trim
rear o/s seatbelt
3dr up and over seal
parcel shelf straps
pas resevoir bracket
sunroof interior panel
passenger door handle
ashtray draw
99 relay
weighted shift rod
« Last Edit: 20 December 2008, 22:53 by Ben Lessani »

Offline Ben Lessani

  • I live here
  • *****
  • Posts: 3,873
  • The poor mans MK2 Haynes author
Glove box removal (glovebox remove mk2)
« Reply #46 on: 20 December 2008, 22:17 »
glove boxes are easy to remove  :laugh:


Tools Required: 8mm long socket and ratchet, posidrive screwdriver

the only reason i'm posting this is so that no one else's glovebox ends up like this ...


the glovebox is a bit confusing for removal because it's not obvious.

start by removing the lower dash on the passenger side.

then remove the door off the glovebox, there is two latches either side and two plastic hinge pins. squeeze the latches and lower the door a little more, then use your screwdriver and push the hinge pins out.

Then remove all the screws, there is two either side next to the latches, three on the top and three on the bottom iirc. then there's one last hidden one in the top middle but is about 1" in the glovebox.

now the glovebox will be loose, but you still won't get it out. you have to loosen the dashboard a little to flex it out.


remove the 8mm bolt on the left hand side of the dashboard, visible only when you open the passenger door. theres one more which is under the dash and slightly recessed just to the right of where the glovebox ends - remove that too.

now there is enough flex in the dashboard, grab the underside and pull it forward, but be gentle - you don't want to damage it. you'll give yourself just enough room to get the glovebox out from underneath the heating duct.

easy peasy
« Last Edit: 14 January 2009, 20:51 by Ben Lessani »

Offline Ben Lessani

  • I live here
  • *****
  • Posts: 3,873
  • The poor mans MK2 Haynes author
Re: bens ... 1986 MKII 1.8 8v K-Jet Golf ... project
« Reply #47 on: 20 December 2008, 22:24 »
scrapyard success

this has put a smile on my face, which is nice after a frustrating few weeks. i ransacked a local scrappy and got the majority of my bits, realising i forgot my wallet, i drove 15 miles home, then got my wallet, then 15 miles back and paid for it - i'm a pleb!

heater matrix housinng
glovebox and door
interior boot trim
rear o/s seatbelt
pas resevoir bracket
sunroof interior panel
passenger door handle
99 relay
weighted shift rod
speedo surround
electric windows centre console
3dr up and over seal
parcel shelf straps
ashtray draw

first thing was to drop in my nice new old weighted shift rod, this took about 20 seconds, i did it in the dark with no light. just remove the two P clips on each end (don't drop them!), lift out the standard rod, then just slot the weighted one in place, grease up the moving parts a little, and pop the P clips back in.


my passenger door handle was dead too, it barely worked and i've never had a lock barrel for it, i just locked a bolt through it.


so when i was in the scrappy, i grabbed the rear passenger handle off a 5 door. i noticed that the lever was a different shape for the rear lock


so i forced out the locking pin with a screwdriver, removed the lever and swapped it over, then pushed the pin back into place


i then fitted it back on the car, and it works perfect, woo woo!


i finally got a mount for my pas reservoir, so instead of it holding in place by sheer luck, its actually bolted to the engine bay.


when i had half the dash out, i thought i may as well tidy up and go over the wiring, so far i've managed to remove about 10m of dud wiring. but, i did have a cause for concern. there is an amber wire which runs from the constant live on the fusebox, under the dash and disappears behind the fan blower pipe. it was too dark outside to see if it ran into the engine bay. the wire in question was in a sorry state, the insulation was worn away and most strands were broken. i don't think its part of the oem loom, i replaced the short length of the wire, but i'll have to trace it to see where it goes. i have a feeling it might be for one of the headlights?

« Last Edit: 20 December 2008, 23:32 by Ben Lessani »

Offline Ben Lessani

  • I live here
  • *****
  • Posts: 3,873
  • The poor mans MK2 Haynes author
Re: bens ... 1986 MKII 1.8 8v K-Jet Golf ... project
« Reply #48 on: 10 January 2009, 21:45 »
lots of little repairs
a mini service was due, so i grabbed a new VAG oil filter and a can of forté oil flush. flushed it through, then stuck some new oil into it. i think the mileage is somewhere around 171,500k right now. i also stuck on a new set of bosch super sparkies. i also stuck on a new set of washer jets because mine were at the end of their useful life. i'm going to get some pressurised ones soon, but these normal ones will do the job for the time being.

there's been a few niggles annoying the proverbial poop out of me recently and another few things that have just decided to break on me.

when i hit 2k rpm there's a loud resonant vibration
turning lock to lock induces a slight knock
minor play in both front wheels
slight grinding on left turns
drivers window dead
central locking dead
slack pas belt

with the great help of my friend, he loaned me a ramp in his garage for a day.


after getting my car airborne, i ordered up

offside bottom ball joint
2x front wheel bearings
2x steering arm gaiters
2x rear strut top mounts (to be fitted at a later date)

after not very long, i had the front hub off


i replace the steering gaiter, bottom ball joint and anti-roll bar bush. it was all straightforward apart from the stupid lower slide bolt for the calliper, the hex rounded out, so many minutes swearing and breaking my hands locking down vice grips, i managed to get it off - it was the same story on the other side. i ended up grinding two flats, to bring it to 11mm so i could use a spanner to get them back on. new pads are going on soon, so i'll replace all the slide bolts. talkin about pads, mine are boned, only half of the material is even on one of the pads! a new calliper is also needed for the passenger side as the piston isn't moving very freely and the seal is quite warped.


uber dead pad


what's most annoying is that the parts places were shut, so i've had to put the dodgy pads back on for the time being.


replacing the wheel bearing was very straightforward - but fat chance doing it without a press.

one of the pressure pipes for the pas was supplied a bit busted, and it leaks ever so slightly, so i stuck a bit of silicone on it to maybe cure the drip. i don't really have a huge amount of faith, but it will do temporarily anyway.


my pas belt has never fit right, i've tried different sizes but can't seem to get the exact right one. because the bracket is located slightly differently on the block (i had to drill holes for it), it sits different to standard. i had the adjuster on full tension and the belt was still slack. so i removed the bracket, then drilled a hole in it a bit further down, to extend the tensioning section. so it went from this...


to this


and this seems to have done the trick, i can tighten up the belt perfectly ;) that has sorted the play in both wheels, the knock on turning and the grinding when turning. now to sort the annoying vibration noise. it has progressively gotten worse, so i had a look around under the car and i found two things which were loose. the steering rack heat shield and the downpipe heat shield. i sorted the pas shield by adding a spacer in, which fixed it solidly in place. then the heat shield on the downpipe, which was rusted to bits, i wasn't even going to bother to tighten the nut as it would shear instantly, so i just tapped it further up the pipe and its nice and snug. now thats stopped my vibration!

now the damn drivers window, i think this is the fourth time i've fixed this, i hope this is the last. the little bracket that attached the window to the wire that moves up and down always breaks. first time i welded it, second time i made an aluminium bracket and used a metal cable tie, third time i made another aluminium bracket and used pink grip to bond it together. this time, i made it out of steel and popped it together

the central locking on the drivers side also came loose, just days after the passenger side threw a hissy. so i changed the way it was oriented from 45 degs to vertical. i had to drill a hole to do it, which is why i never did it in the first place (because i didn't have a drill handy)
« Last Edit: 11 January 2009, 21:37 by Ben Lessani »

Offline Ben Lessani

  • I live here
  • *****
  • Posts: 3,873
  • The poor mans MK2 Haynes author
Re: bens ... 1986 MKII 1.8 8v K-Jet Golf ... project
« Reply #49 on: 10 January 2009, 22:29 »
when's my service actually due
i've been thinking, i've replaced parts on such a regular basis that i'm not sure what's outstanding to do, so i have a checklist ... which is now on the first page ;)

« Last Edit: 10 January 2009, 22:31 by Ben Lessani »