Author Topic: madone_si - A4 Avant 1.8T RED Quattro  (Read 103623 times)

Offline Madone_si

  • I live here
  • *****
  • Posts: 1,529
  • Seattle WA, USA and Middlesex, UK
Re: madone_si - A4 Avant 1.8T RED Quattro
« Reply #40 on: 17 March 2012, 09:52 »
As promised

Step 1 Removing Headlights from Audi B6 (Bi-Xenon's)
NOTE: The following is a detailed procedure on how I removed my Headlight assembly's from my Audi B6, so I could complete three jobs (complete O-ring fix stop condensation, remove amber inserts and stealth side indicator Blubs), I am sure others will find ways to do this or improve on it, but this is what worked well for me :)

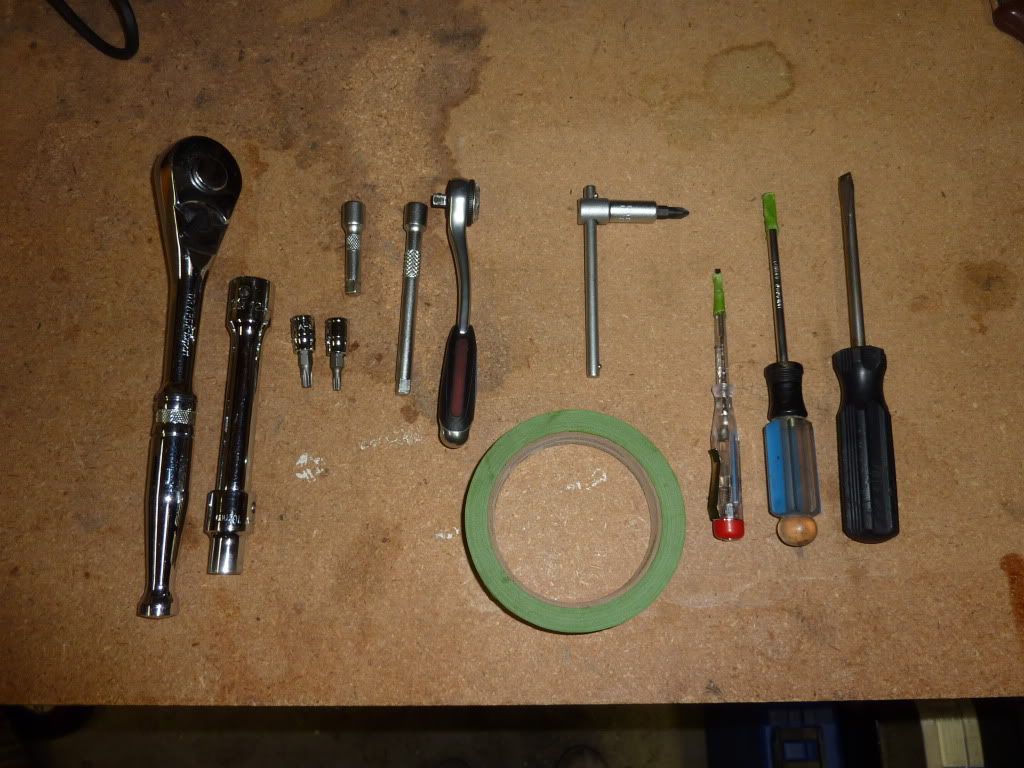
Tools needed;

   - Torque wrench, extension bar and  T30 1/4"Torx socket
   - Torque wrench, extension bar and 10mm socket
   - Phillips screwdriver
   - Flat head screwdrivers
   - Tape

Picture shows all the tools outlined above for this procedure, but also for completing O-ring fix, removing amber inserts)

Preparing car, before starting work

I recommend starting by first parking the car on a level surface in front of a wall or garage door and noting the position of the beam pattern on the wall. This will make it easier to realign the lights later once everything is completed.

Removing head light left side

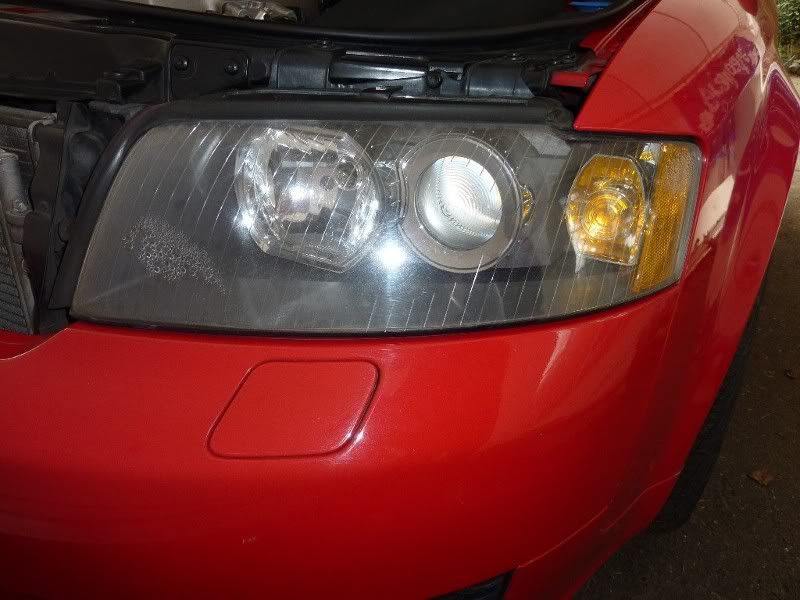
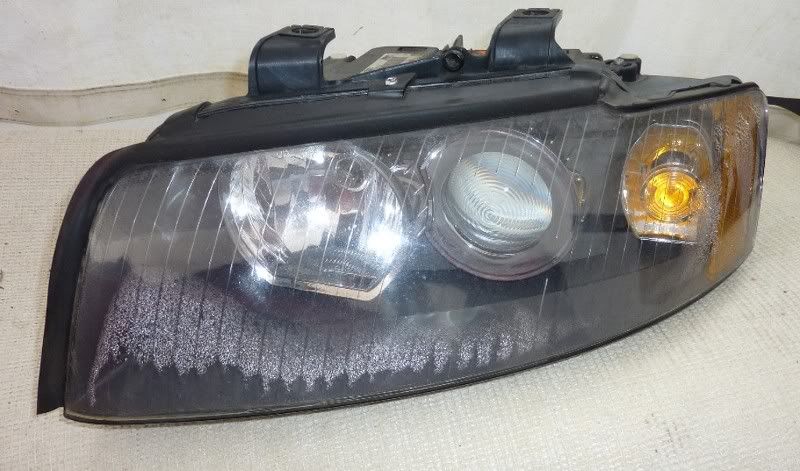
Here is pictures of headlight before any work.

Step 1. First job is to remove the left engine cover as pictured below, this is held in place by two rubber screws, at the front and to the right, you just need to gently pull cover up and out towards the front of the vehicle.
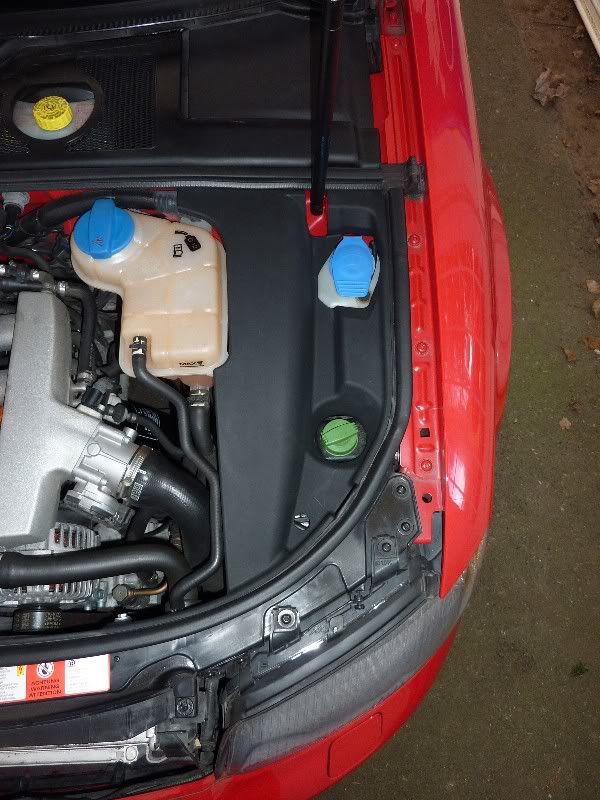


Below picture shows engine cover removed.
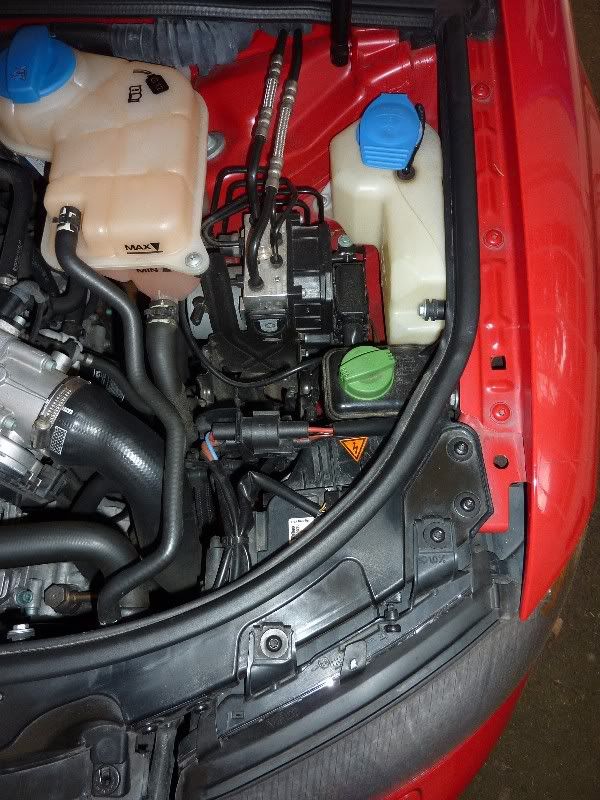

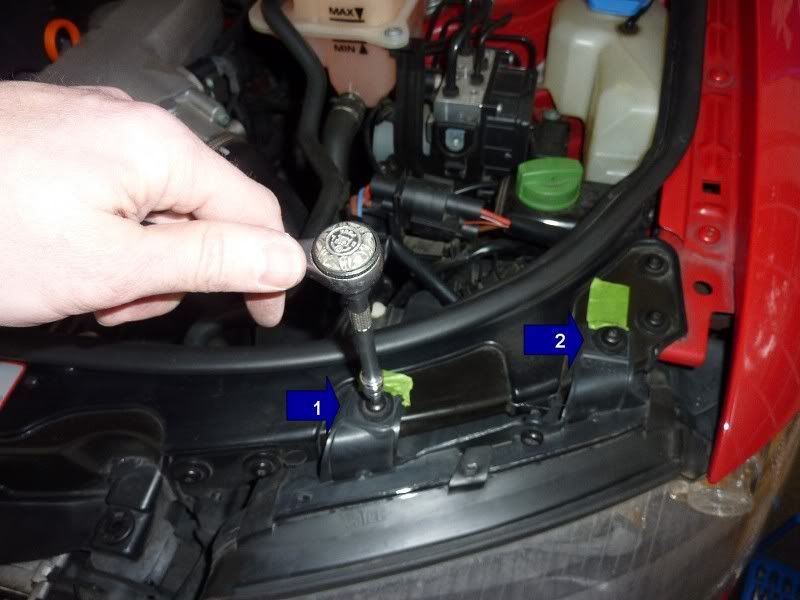
Step 2. Below picture is close up of all the bolts and cables, we need to work on over the next few steps. I have outlined each one, so you understand

No.1 & 2 Bolts = hex bolts (these will be completely removed)
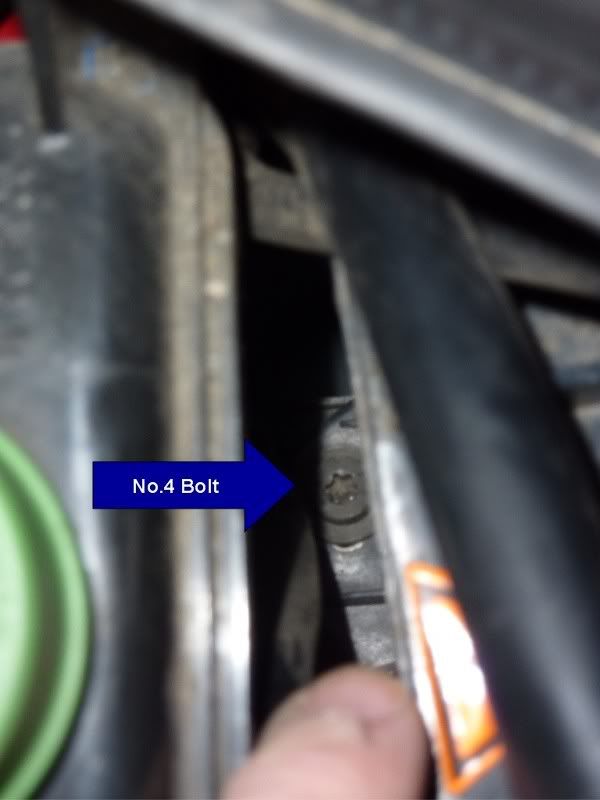
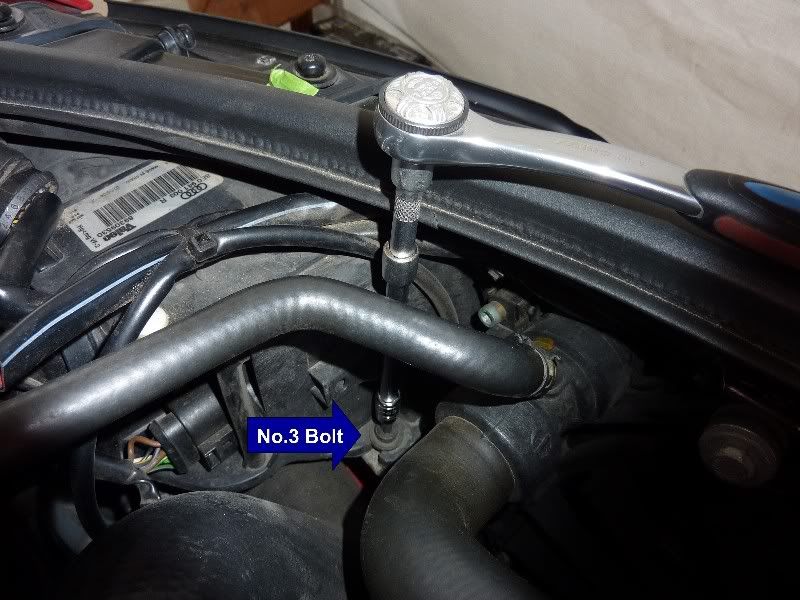
No.3 & 4 bolts = hex bolts (these only need to be loosen, 2-3 turns, not completely removed)
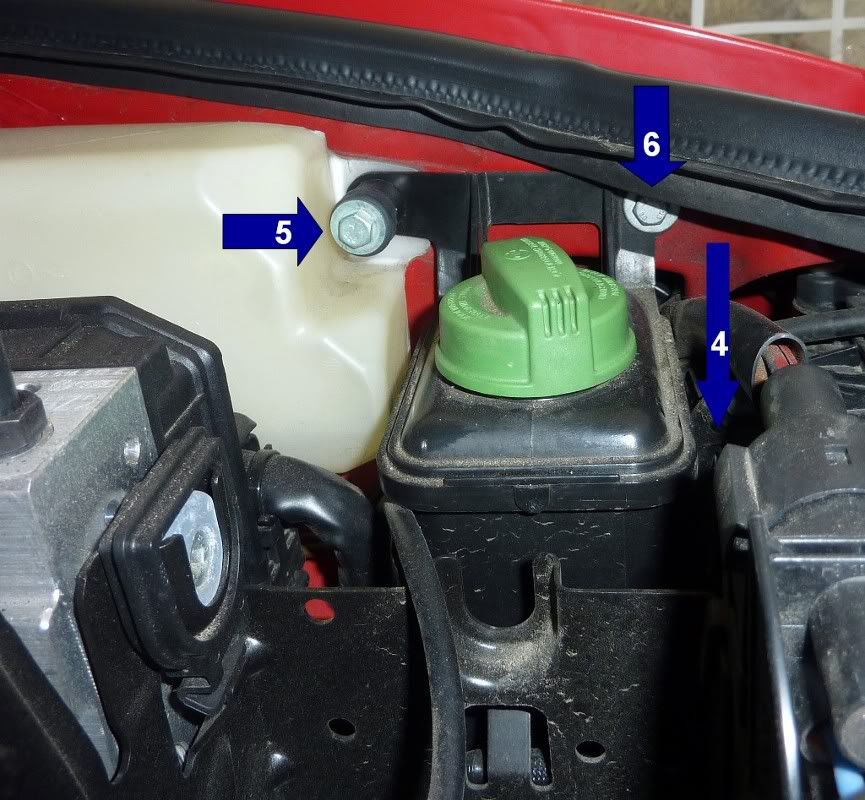
No.5 & 6 bolts = 10mm bolts (these will be completely removed) so that you can get to No. 4 bolt.
Three cables that require disconnecting/removing from clip holders
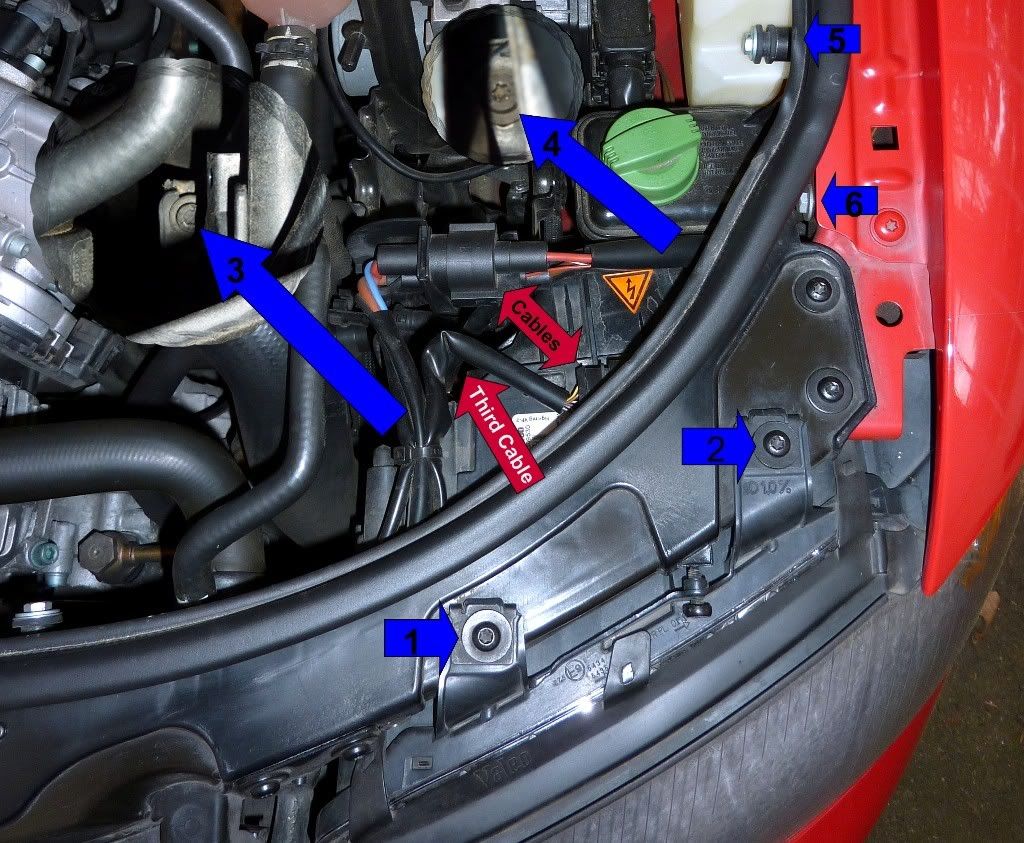

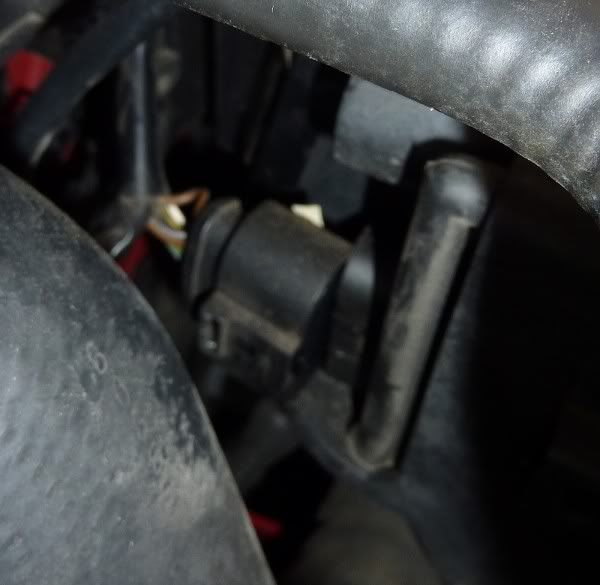
Step 3. Need to disconnect two cables that are connected to headlight and in way of getting to No.4 Bolt.
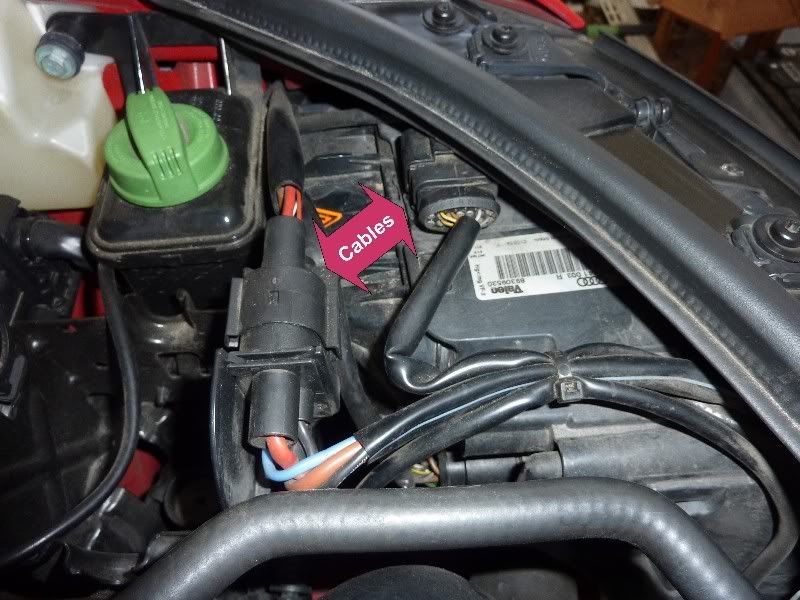

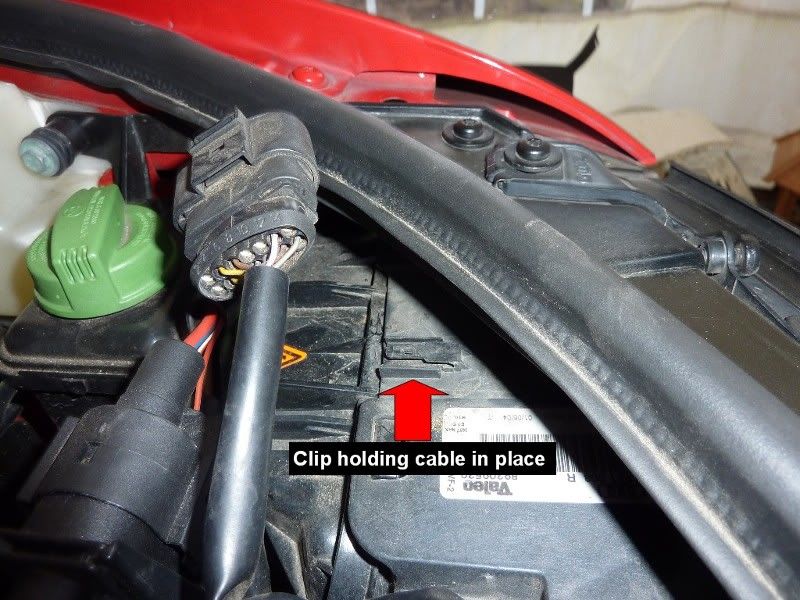
You can remove cable connected on top of the headlamp, by pushing down gently on the clip holding cable in place, as outlined in picture below. Then slide the cable out towards the engine .

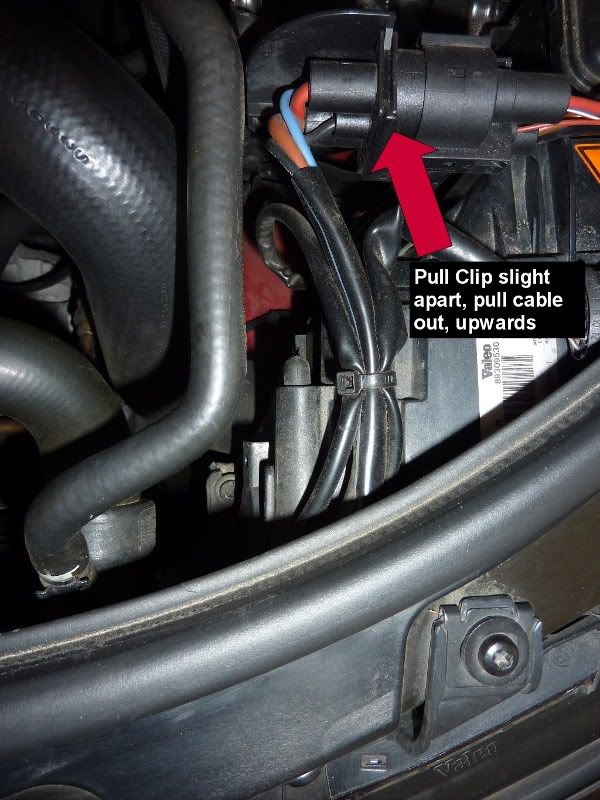
Second cable is held in place by plastic clip, you need to gently pill clip apart and pull cable out upwards, this cable doesn't require to be disconnected, but by removing from clip, can move cable out of the way to get to No.4 Bolt, which you will see in next few steps.

Step 4. Removing Bolts 5 & 6 using 10mm socket, with torque wrench, do can allow you to get to No.4 bolt. Outlined the bolts in the below picture.

Undo the 10mm bolts. This bolt (No.5) on my car is used not only to hold this break fluid bottle, but also to hold the engine cover in place)
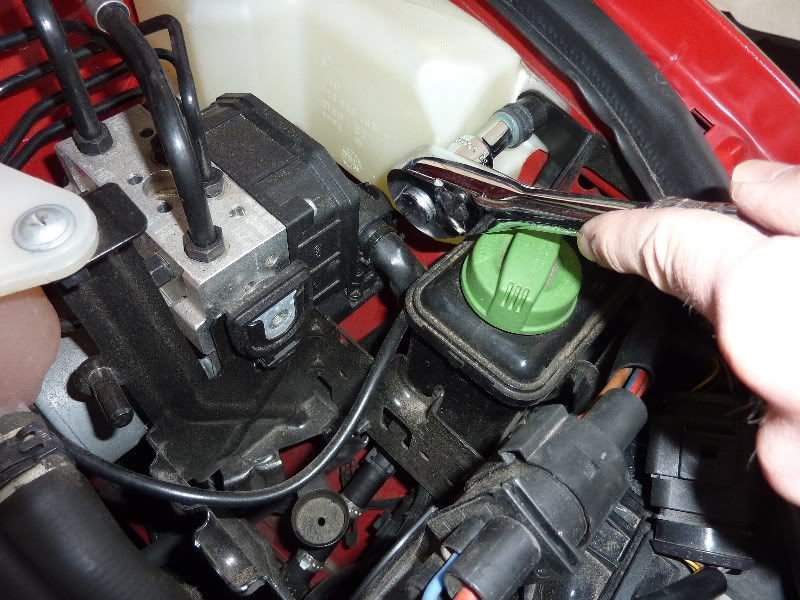

Both No.5 & No.6 10mm Bolts removed, which allows you to move the unit over a little, so you can see and access No.4
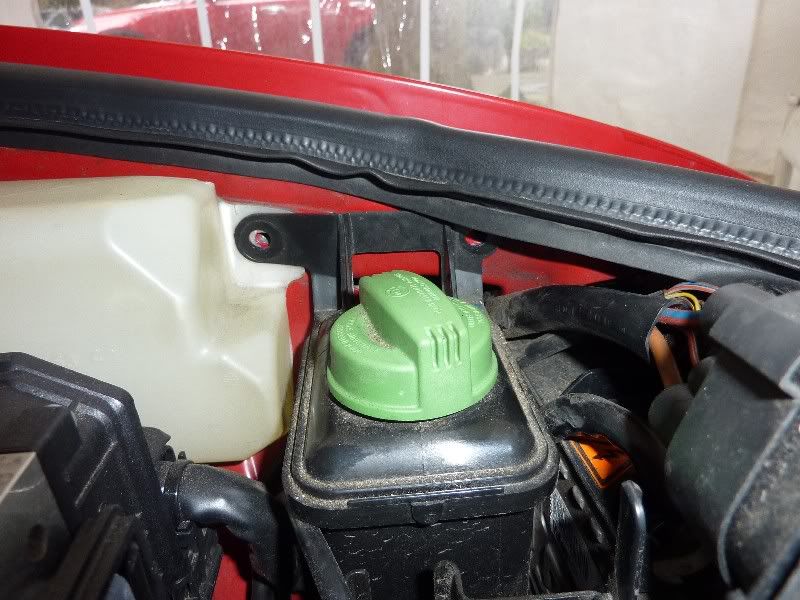

Now see and access No.4 :)


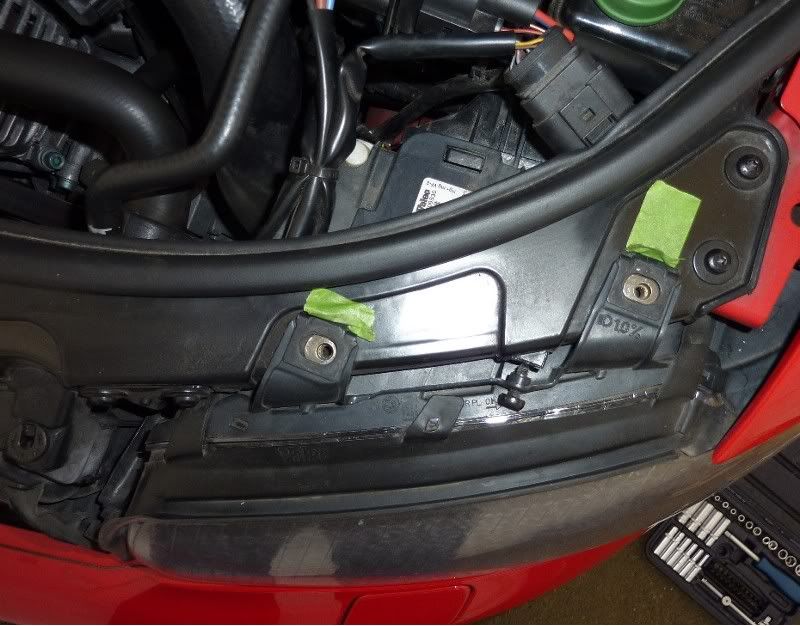
Step 5. Remove headlamp bolts. To make sure you can align the headlamp back in the same position, I used tape to make up where the top bolts are tightened up.
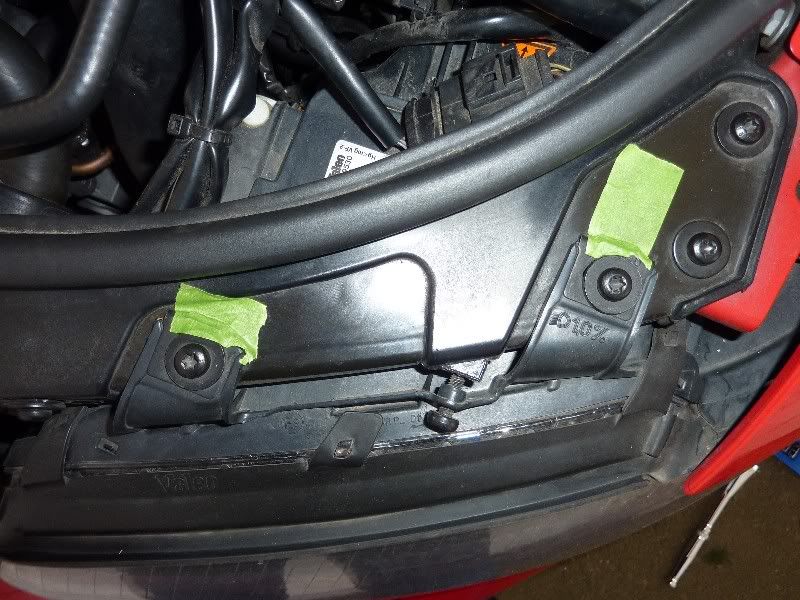

Now using torque wrench with T30 1/4 Torx socket), to unscrew No.1 & 2 Bolts = hex bolts (these will be completely removed)
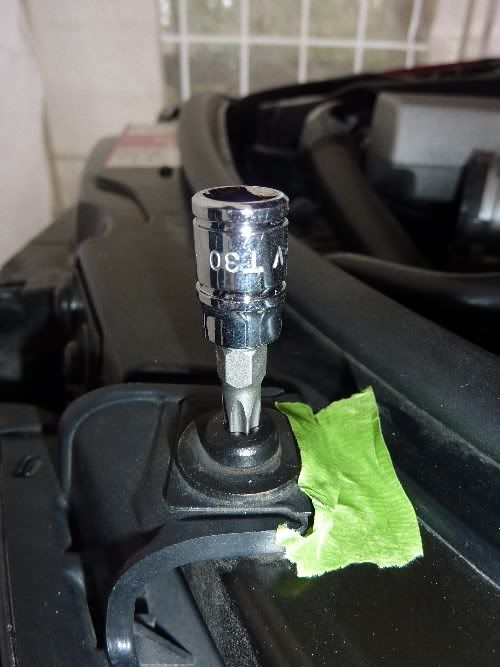
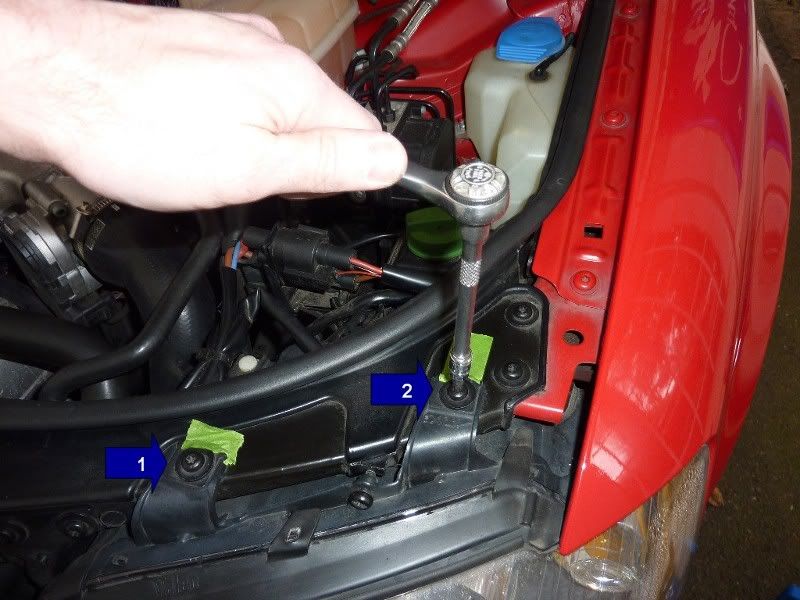


Now using torque wrench with T30 1/4Torx socket, to unscrew No.3 & 4 bolts = hex bolts (these only need to be loosen, 2-3 turns, not completely removed)
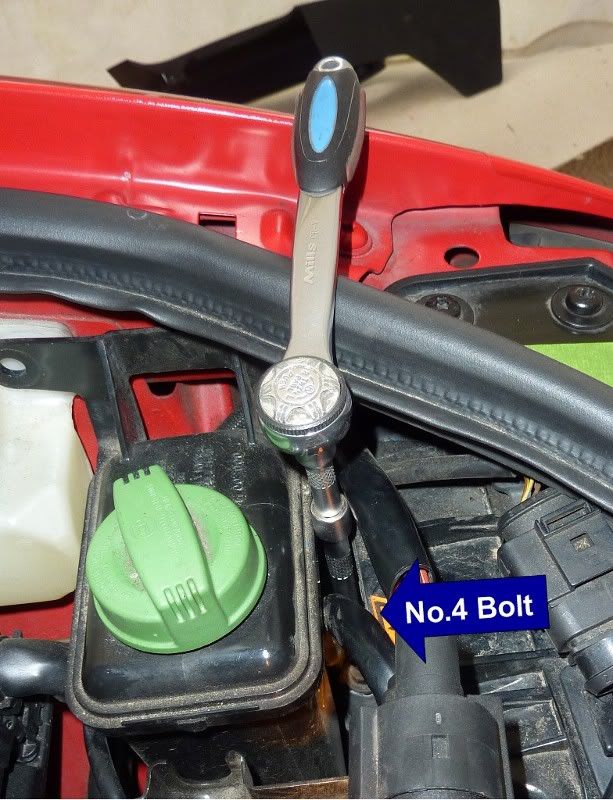
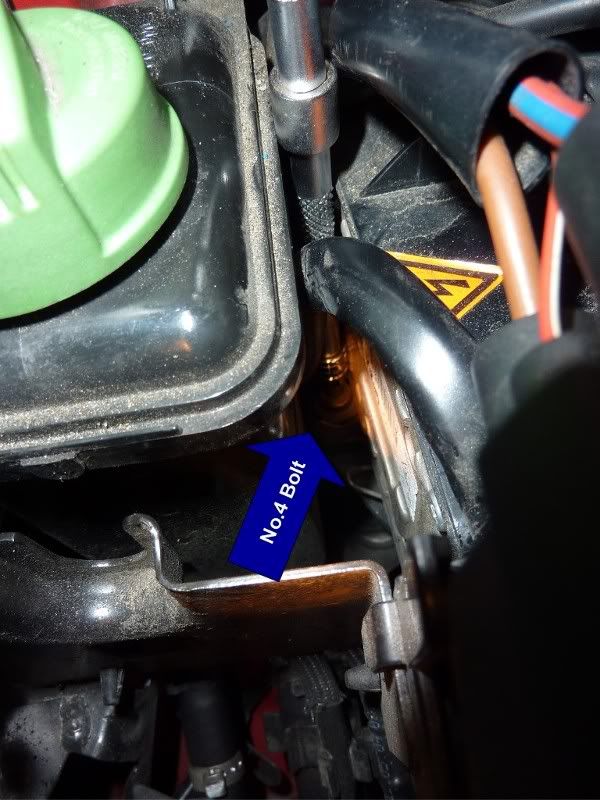


Now that you have removed No.1 & 2 bolts and loosened No.3 & 4 bolts, you can now pull headlamp slightly out, reason for not pulling headlamp out completely, is you need to disconnect last 3rd cable from headlamp.

Step 6. remove final 3rd cable connected to the back of the headlamp as outlined in the below picture.  Now you have headlamp slightly pulled out, you can now see the final cable (3rd Cable) to disconnect.
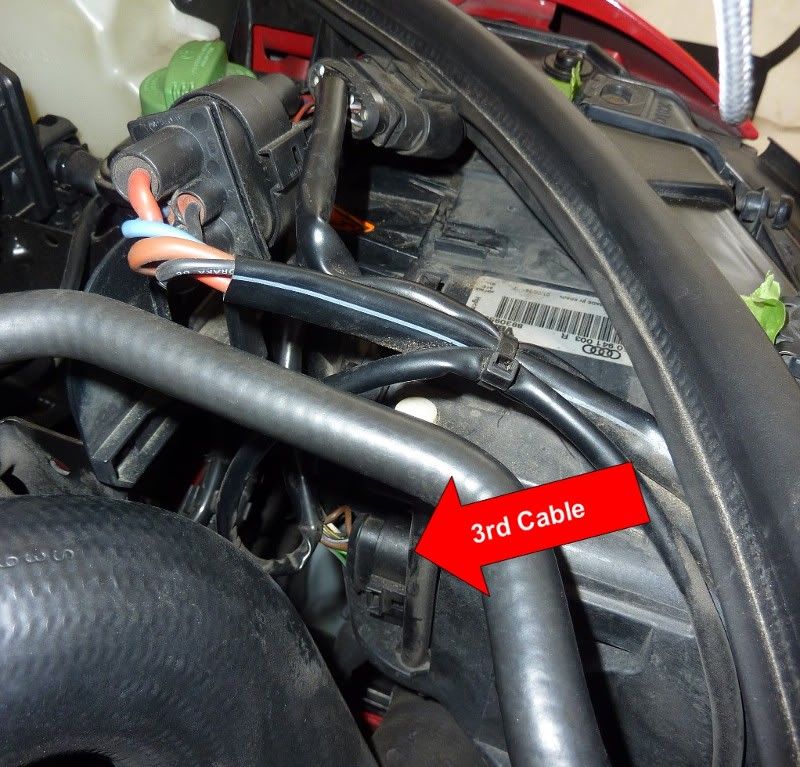

Using flat head screwdriver, gently, push down on clip on cable, so you can then pull cable off its clip.
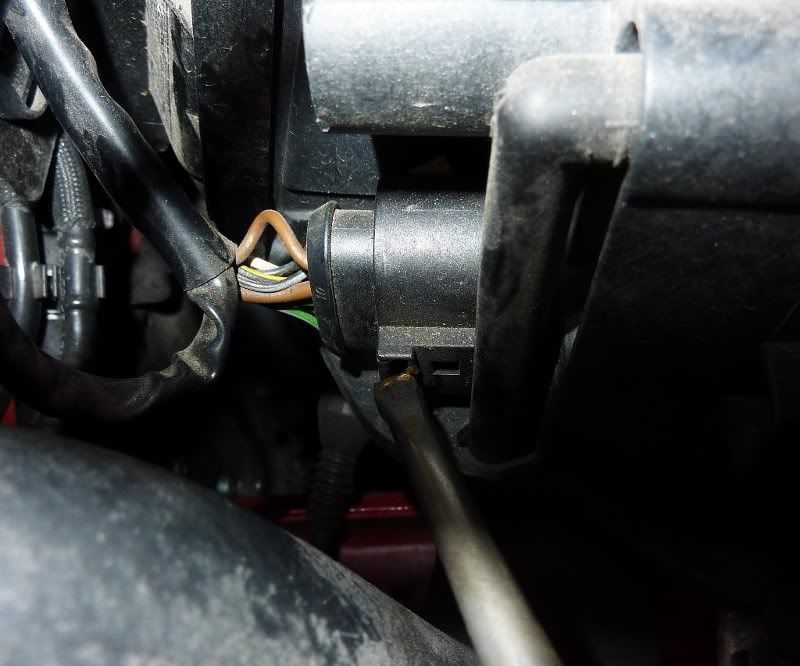

Cable now disconnected :), can now remove headlamp completely.


Step 7. Remove headlamp completely, by pulling headlight unit out. Take care not to scratch your bumper paintwork. To prevent any scratching you can either put cloth or tape on bumper before pulling head unit out.
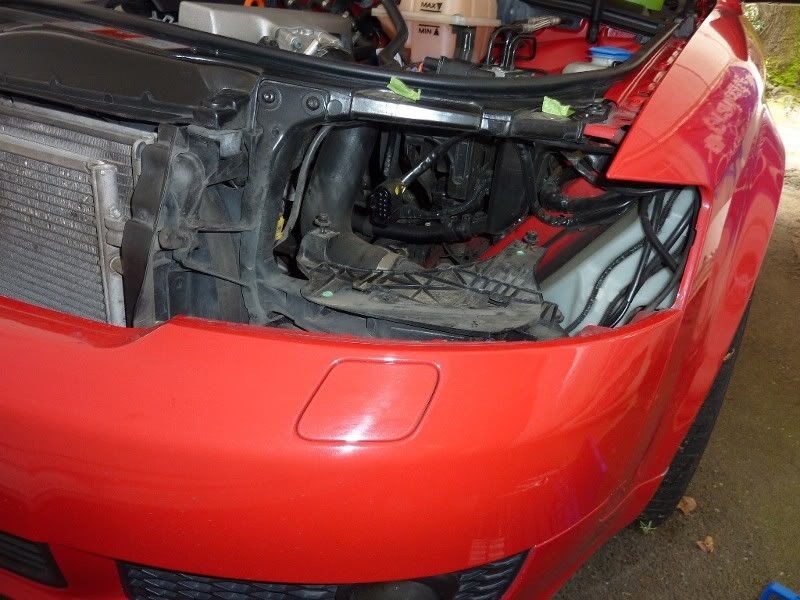

Now have Left head light  unit successfully removed from Audi.
Old Skool Mk1 Golf Gli (82), Mk1 US Cab 85 and 83
SOLD - BLACK SOY 92

Offline Madone_si

  • I live here
  • *****
  • Posts: 1,529
  • Seattle WA, USA and Middlesex, UK
Re: madone_si - A4 Avant 1.8T RED Quattro
« Reply #41 on: 17 March 2012, 09:53 »
Removing headlight right side

Here is pictures of headlight before any work.


You will see on the right hand side of the engine bay, that the Air Duct is in the way of getting  to all headlight bolts, so need to remove this first.


To make sure you can align the headlamp back in the same position, I used tape to make up where the top bolts are tightened up.

Now using torque wrench with T30 1/4Torx socket, to unscrew No.1 & 2 bolts = hex bolts (in few steps later we will completely remove these bolts)


Now to remove Air Duct, there are two screws that you will need to unscrew, I used a Philips screwdriver socket in mini wrench, but you can use normal screwdriver. Unscrew these and remove completely.


Now the screws are removed, we can remove Air duct.
Do this by pushing air duct so the middle part compresses together, allowing you to remove air duct from front panel. The air duct is in three parts, which you can pull apart if need be to make taking out easier. I found that once the front duct was out from front panel, I could pull the whole unit out as seen in below picture.


Below picture is close up of all the bolts, we need to work on over the next few steps. I have outlined each one, so you understand

No.1 & 2 Bolts = hex bolts (these will be completely removed)
No.3 & 4 bolts = hex bolts (these only need to be loosen, 2-3 turns, not completely removed)
There will be two cables that will require disconnecting too on the back of the headlight unit.

Now using torque wrench with T30 1/4Torx socket, go ahead and unscrew No.1 & 2 bolts and completely remove.


Now using torque wrench with T30 1/4Torx socket, to unscrew No.3 = hex bolts (this only need to be loosen, 2-3 turns, not completely removed)


Now using torque wrench with T30 1/4Torx socket, to unscrew No.4 = hex bolts (this only need to be loosen, 2-3 turns, not completely removed)


Now that you have removed No.1 & 2 bolts and loosened No.3 & 4 bolts, you can now pull headlamp slightly out, reason for not pulling headlamp out completely, is you need to disconnect 2 cables from headlamp


Now remove cable connected to the back of the headlamp via clip as outlined in the below picture.


Remove final cable connected to the back of the headlamp as outlined in the below picture.  Using flat head screwdriver, gently, push down on clip , so you can then pull cable out.


Last cable is now disconnected, you can pull headlight unit out completely.


Remove headlamp completely by pulling headlight unit out. Take care not to scratch your bumper paintwork. To prevent any scratching you can either put cloth or tape on bumper before pulling head unit out.


Now have right headlight  unit successfully removed from Audi.


Here is the front of my Audi without the headlights


Now that you have both headlights removed from your Audi, can move onto doing the required repair work to the units.

I will post up next procedure in next few days; 
2. Replaced O-rings in headlights, stop the housing condensation

And the others next week;
3. Removed the Headlight amber inserts, without drilling anything, so can use amber inserts again in future if you require
4. Paint front side indicator lights for a stealth look
5. Re-install of headlights (right/left)
« Last Edit: 17 March 2012, 09:58 by Madone_si »
Old Skool Mk1 Golf Gli (82), Mk1 US Cab 85 and 83
SOLD - BLACK SOY 92

Offline jamie1989

  • I live here
  • *****
  • Posts: 1,177
Re: madone_si - A4 Avant 1.8T RED Quattro
« Reply #42 on: 17 March 2012, 11:12 »
Fair play mate you have some sweet write ups.
Not once have I seen you cut any corners  :cool:
1.6-1.8t AGU K03s, Forge actuator, Forge 007p, turbo back exhuast, Ths front mount, Catch can, 5 piece silicone boost pipes and creation sports tip. Stage 2 atm 232bhp 270lbs. Waiting for custom mapping :-)

Offline Madone_si

  • I live here
  • *****
  • Posts: 1,529
  • Seattle WA, USA and Middlesex, UK
Re: madone_si - A4 Avant 1.8T RED Quattro
« Reply #43 on: 19 March 2012, 05:08 »
thanks alot Jamie1989 :)

Step 2 Replaced O-rings in headlights, stop the housing condensation Audi B6 (Bi-Xenon's)

NOTE: The following is a detailed procedure on how I replaced O-rings in my Headlight assembly's from my Audi B6, I am sure others will find ways to do this or improve on it, but this is what worked well for me :)

Tools needed;

   - Torque wrench, extension bar and  T20 5/32" Torx socket or Torx 5/32'' Screwdriver
   - Phillips screwdriver
   - Flat head screwdrivers
   - 1/2'' Brush (any will do)
   - Hoover / Vacuum

Parts require to buy
   - #6 O-rings 7/16'' O.D x 5/16" I.D. x 1/16" (10 O-rings Enclosed) #96723
   - White Lithium Grease
   - Black Silicone Instant Gasket
   - Tape (Green Frog Tape 1-1/2 in. x 180 ft. Multi-Surface Tape
   - Fiber cloths
   - Electrical black tape

Picture shows parts I ordered to complete O-ring fix.


Step 1. You will need to un-install the Headlight units from you vehicle to complete this work. Refer to my previous instructions of how to complete un-install of headlight units.


Step 2. Now you have headlight unit off you vehicle, working on flat surface, bench or table, place fiber cloth or paper on bench or table, so not to scratch the headlight unit.


Step 3. Above the turn signal bulb on each headlight unit, there is a little adjust screw with a black cap.


Step 4. Using Torx 5/32'' screwdriver, or Torque wrench, extension bar with 5/32" Torx socket, unscrew the screw completely and take off the cap.


You can see there is a lot of dirt :(, which you will need to clean (go over that in next step)


Black cap taken off (below) and looking at the inside of it which was clean. If there is any dirt, clean that off, using cloth, small hoover or brush


Step 5. Need to clean and remove the dirt, so when you remove the plastic rod, no dirt will fall into the headlight unit. I used a small brush first, to remove as much as possible and then used vacuum to suck up anything else left, which resulted in clean area as pictures shows below.


Step 6. Using flathead screwdriver, gently pry underneath the edge of the plastic rod top, as shown in the below picture and gently pry up. You need to be careful not to turn the rod, as this will adjust your headlight position, which you don't want to do. Once you have it raised up about 10mm you can then with you fingers grab the rod and completely remove.


Once Rod is removed, you can see more dirt on the edge, again clean this out. I did this by using vacuum and wet cloth to pick up as much of the dirt. Be careful not to drop any dirt inside the headlight unit.  If you, it just means you will have to take back of the unit panel off and take out the main light internals to clean up dirt. (I will exlain how to do that step as part of my next procedure for removal of Amber insert)


Step 7. Now you have the headlight unit rod out, you can see the current O-ring outlined below, to the right just underneath the top. I had a lot of dirt around my O-ring :(


Clean the plastic rod, so all the dirt is removed.


Step 8. Now remove the current O-ring from plastic rod. Do this by using flat head screwdriver, pry screwdriver under the O-ring and push over the lip. Once out of the groove, using fingers to pull the O-ring off the plastic rod completely.


You can now compare the original O-ring with new O-ring. The original O-ring is not in good shape.


Step 9. Give the Plastic rod another clean and make sure there is not dirt in the groove that the new O-ring will be placed.
Using the new O-ring, place over rod and drop into the groove.
« Last Edit: 19 March 2012, 05:10 by Madone_si »
Old Skool Mk1 Golf Gli (82), Mk1 US Cab 85 and 83
SOLD - BLACK SOY 92

Offline Madone_si

  • I live here
  • *****
  • Posts: 1,529
  • Seattle WA, USA and Middlesex, UK
Re: madone_si - A4 Avant 1.8T RED Quattro
« Reply #44 on: 19 March 2012, 05:09 »
Step 10. Now to prevent and keep out water better than just installing new O-ring, using Lithium Grease, add this around and above the new O-ring  as shown below.


Step 11. Time to re-install the Plastic rod into the Headlight unit, using your fingers, slowly drop into the headlight unit, make sure you carefully don't turn the rod, when down rod is at 90% inside headlight unit, as this may adjust the headlight position.


To get the plastic rod into its final position, you will need to press down on the top of the rod, as shown below, again gently do this until it is completely in the groove.


Step 12. Now place the cap back on the headlight unit, this should drop in easily.


Step 13. Now place the screw back and using Torx 5/32'' screwdriver or Torque wrench, extension bar with T20 5/32" Torx socket , tighten up the screw.


Step 14. You have successfully replaced you headlight 0-ring on your Audi Headlight. If you still have condensation in your headlight unit, this is the time to take out the side indicator light, by turning plastic cover to open position (will see open & close words on unit - see picture below) 


Now remove the side indicator blub and place to the side.


Step 15. You now have a nice hole to use ("borrow") your Mrs/GF hairdryer... Blast some hot air in the headlight unit for about 5-10 minutes to get it nice and dry or until all condensation disappears.


You now need to repeat these steps on your other headlight unit.

This completes the O-ring fix procedure, so well done :)

Additional steps

To make sure you don't get any further housing condensation and a few people on Audi Forums (AZ) have learnt this the hard way too, that the O-ring replacement does not, in all cases fix the condensation issue. You need to complete the following steps, this is what I did; (I will add more pictures of this part shortly, as some of the pictures I took where unfocused and not clear)

1. I checked the front of the headlight first, to make sure there was no gaps or cracks in the rubber holding the Glass front to the plastic back part of the unit, I found none. If you do, add black silicone to the edge (As I didn't have this issue, I have no pictures to show)

2. Add electrical tape over the top of the O-ring rod, cover, this will prevent dirt or any water entering from top.
(I will add picture here in next few days, this picture was out of focus)

3. On the back of the headlight unit, there is metal cover with 6 Tex screws, that allows air and water in if seals isn't perfect. Unscrew 6 Tex screws using Torx 5/32'' screwdriver, or Torque wrench, extension bar with T20 5/32" Torx socket and add Black Silicone to the edge of the metal cover, sealing the unit properly.


4. There is an additional large back piece that you can disconnect on the back of the headlight unit. This is held in place with two Tex screws on Left and right and at the bottom with a metal clip as outlined in picture below.

   
Unscrew the screws and pull the clip down, you can pop off the plastic cover, (note there will be cables connecting to plastic cover, so be careful not to pull on those)
You will need to add Black Silicone to the edge of the plastic cover edge, so that when put back on it seals it to the headlight unit.
   
Put a thin line of black silicone on the edge of the lip, as highlighted below where red dots are and then put the cover back on and tighten up two screws and pull the metal clip up, to properly lock in place.

   
Unit is now all sealed and secure :)

   
5. Now you have completed steps 1 to 4 let the silicone set for 15-20 minutes. You now need to test if the unit is sealed properly. Best to do this part outside. You need to pour water over the top of the headlight unit everywhere. I used my hose pipe to have a continual supply of water and with-in a few minutes you will see if condensation returns inside the headlight unit or not.
   
I found no condensation even after 30 minutes and I left the headlight units outside in the cold too.
   
Time to re-install your headlights back on your vehicle.
Old Skool Mk1 Golf Gli (82), Mk1 US Cab 85 and 83
SOLD - BLACK SOY 92

Offline Madone_si

  • I live here
  • *****
  • Posts: 1,529
  • Seattle WA, USA and Middlesex, UK
Re: madone_si - A4 Avant 1.8T RED Quattro
« Reply #45 on: 19 March 2012, 05:09 »
My AudiIPod MLINK1 V1.B turned up at last :), I will be installing it in the next few days.
 
I will also get to finishing these write ups this week too :)
 
3. Removed the Headlight amber inserts, without drilling anything, so can use amber inserts again in future if you require
 4. Paint front side indicator lights for a stealth look
 5. Re-install of headlights (right/left)
 
parts for the air ride are starting to turn up too, very excited about getting this done ready for summer.
Old Skool Mk1 Golf Gli (82), Mk1 US Cab 85 and 83
SOLD - BLACK SOY 92

Offline Madone_si

  • I live here
  • *****
  • Posts: 1,529
  • Seattle WA, USA and Middlesex, UK
Re: madone_si - A4 Avant 1.8T RED Quattro
« Reply #46 on: 23 March 2012, 05:35 »
Step 3. Removed the Headlight amber inserts, without drilling anything, so can use amber inserts again in future if you require. 
NOTE: The following is a detailed procedure on how I removed the my Headlight amber inserts from my Audi B6, complete stealth blub look and optional seal up headlight with Black Silicone. I am sure others will find ways to do this or improve on it, but this is what worked well for me :) Hopefully you will find this useful.
 
Tools needed; 
   · Torque wrench, extension bar and  T20 5/32" Torx socket or Torx 5/32'' Screwdriver
   · Flat head screwdrivers
   · Hoover / Vacuum
   · Fiber cloth
 
Picture shows all the tools required to take un-install headlights, complete O-ring fix, as well as removing amber inserts.

 
B]Step 1[/B] You will need to un-install the Headlight units from you vehicle to complete this work. Refer to my previous instructions of how to complete un-install of headlight units.
 
Step 2. Now you have headlight unit off you vehicle, working on flat surface, bench or table, place fiber cloth or paper on bench or table, so not to scratch headlight unit.

 
Here is useful diagram of two different Audi headlight units, to help you understand each part. Mine are the Bi-Xenon (HID)

 
Step 3. There is the main back housing cover  can disconnect on the back of the headlight unit, that is held in place with two Tex screws on Left and right and at the bottom a metal clip as outlined in picture below.

 
You need to using torque wrench, extension bar and  T20 5/32" Torx socket or Torx 5/32'' Screwdriver
unscrew the screws and with your finger push down the clip at the bottom.


Now pull out the bottom of the housing cover first as this is held in place by two slots at the top, you should be able to easily pull the housing cover off, as outlined below in pictures. NOTE: there will be cables connecting to housing cover, so be careful not to pull on those.


« Last Edit: 23 March 2012, 05:47 by Madone_si »
Old Skool Mk1 Golf Gli (82), Mk1 US Cab 85 and 83
SOLD - BLACK SOY 92

Offline Madone_si

  • I live here
  • *****
  • Posts: 1,529
  • Seattle WA, USA and Middlesex, UK
Re: madone_si - A4 Avant 1.8T RED Quattro
« Reply #47 on: 23 March 2012, 05:37 »
Step 4. Now you have housing cover off (placed to one side), you can see inside of the headlight unit. Time to disconnect cables and get the main head light blub and lens out, so you can get inside the headlight unit to remove that amber insert :)

 
There are 3 cables that you need to disconnect and then 4 Torx screws, which will then allow you to remove the mai head light blub and lens as one unit.
 
Disconnecting the cables
 
No.1 Cable

 
Now gently remove the green/yellow cables from the clips at the bottom, so you can place the cable over to the left out of the way.

 
No.2 Cable - pull main headlight lens blub cable down and then out.

 
You will see that this cable too is held in place via clips at the bottom, gently remove cable and again place cable to the left out of the way.

 
No.3 Cable - pull cable gently out and place down at the bottom of unit. Removing this allows you to move cable when pulling out the main blub and lens as one unit. (its very tight space)

 
STEP 5. Now onto removing the 4 Torx screws holding the main blub and lens in place.
using torque wrench, extension bar and  T20 5/32" Torx socket or Torx 5/32'' Screwdriver
unscrew the screws
 
No.1 Screw, undo and remove

 
No.2 Screw, undo and remove

 
No.3 Screw, undo and remove

 
No.4 Screw, undo and remove

 
You are now ready to remove the main blub and lens as one unit
 
Using your fingers, hold the blub/Lens as outlined in below picture and slowly pull out.

 
When you the lens at the point in the below picture you need to tilt the lens to get out. Now be really careful at this point as the lens can get scratched and you don't want that. Take you time.

 
The main blub/Lens is out :)

 
What the main blub/lens looks like.

 
And how the headlight units from the front

 
STEP 6. Time to dry out the headlight unit if required.
 
Turn the side light rear handle to open position (you will see close and open on the back of the headlight unit) and then remove the side light unit.


You now have two areas to use ("borrow") your Mrs/GF hairdryer... Blast some hot air in the headlight unit for about 5-10 minutes to get it nice and dry or until all condensation disappears.
 
First area, through side indicator hole.

 
Second area - through main headlight blub/lens hole

 
Look my new custom headlight with built-in hair dryer!!!!!

 
Back to serious work on headlights…….!
 
STEP 7. Time to remove the amber inserts without drilling or damaging the headlight units, so you can if you want reuse the amber inserts in the future.
 
Using a small flat head screwdriver for this part, you need to put tape on the end of the screwdriver, to make sure you don't scratch anything inside the headlight unit.

 
Now with screwdriver in your hand, put you hand through where the main bulb/lens was (make sure you don't scratch anything) . Work the flathead screwdriver gently prying underneath the amber insert as outlined in the below picture. The amber insert is held in by a tiny tab at the bottom and at the top.  Gently keep working it and eventually it will pop out and you can shimmy it out with the screwdriver. Again, take your time and be careful not to scratch up the inside.
 
NOTE: You can if you like unscrew the silver light ring, to make it easier to get inside the headlight unit, but I found I didn't need too.


Now you have the bottom part of the insert out of the tab, you will find it hard to get the top out by only pulling on the bottom area. This is when you now remove you hand and screwdriver and put the screwdriver through the side indicator hole at the back of the headlight unit as below picture. You can then push on the back of the amber insert which will then pop out the top tab. You now have the insert free. You can guide the amber insert down to the bottom of the unit.  Now you can put your hand back in through the main blub/lens area and using your fingers pick up the amber insert and remove it from the headlight unit back through the main blub/lens hole.
 
Following pictures show above actions
 
Screwdriver pushing on back of amber insert from side indicator hole

 
Amber insert free now, gently moving to the bottom of the headlight unit, so can remove

 
hand back in through the main blub/lens area and with your fingers pick up insert and remove.

 
Pulling amber insert out through main blub/lens hole.

 
And the headlight unit without amber insert - looking good :)

 
And the amber insert on the table after removed from headlight unit :)

Old Skool Mk1 Golf Gli (82), Mk1 US Cab 85 and 83
SOLD - BLACK SOY 92

Offline Madone_si

  • I live here
  • *****
  • Posts: 1,529
  • Seattle WA, USA and Middlesex, UK
Re: madone_si - A4 Avant 1.8T RED Quattro
« Reply #48 on: 23 March 2012, 05:38 »
STEP 8.[/B} Time to re-install the Main Blub/Lens and reconnect up cables.
 
Taking the main blub/lens unit in your fingers, you need to put the unit in tilting at the top downwards, until you can get the lens large edges into the headlight unit as seen below.


Now you need to make sure the cables don’t get  in your way, gently move cables out of the way, mainly on the right hand side as outlined in below pictures.


Now you should have the main blub/lens back inside the headlight unit, ready to screw in the 4 screws holding it in place.

 
Using torque wrench, extension bar and  T20 5/32" Torx socket or Torx 5/32'' Screwdriver unscrew the screws
 
No.1 Screw, install

 
No.2 Screw install

 
No.3 Screw install

 
No.4 Screw install

 
You can see all screws tightened up, now onto reconnecting the cables

 
Cable no.3 Reconnect
Push cable back into the pins


Cable No.2 Reconnect
This is the main Blub/lens cable, this will need to be placed underneath the main blub unit and pushed up as shown in pictures below;

 
Make sure you secure the no.2 cable into the clips at the bottom of the headlight unit as outlined in below picture

 
You now have cable connected and secure.

 
And final No.3 cable Reconnect
Cable just connects over pins next to the main headlight bulb/lens unit.


You need to make sure the last cables yellow/green cables are secure in the bottom clips as outlined in below picture, which also shows the No.2 Cable secure as well.

 
You are now ready to put the housing cover back on the headlight unit and re-install screws to finish the job, but before you go that, there is one more step to do :)
 
STEP 10. Last step, Sealing up the headlight unit, additional steps to prevent condensation.

Parts required
   · Black Silicone
   · Usage of hose pipe connected to water supply
   · Fiber cloth
 
To make sure you don't get any further housing condensation and a few people on Audi Forums (AZ) have learnt this the hard way too, that the O-ring replacement does not, in all cases fix the condensation issue. You need to complete the following steps, this is what I did; (I will add more pictures of this part shortly, as some of the pictures I took where unfocused and not clear)
 
1. I checked the front of the headlight first, to make sure there was no gaps or cracks in the rubber holding the Glass front to the plastic back part of the unit, I found none. If you do, add black silicone to the edge (As I didn't have this issue, I have no pictures to show)
 
2. Add electrical tape over the top of the O-ring rod, cover, this will prevent dirt or any water entering from top.
(I will add picture here in next few days, this picture was out of focus)
 
3. On the back of the headlight unit, there is metal cover with 6 Tex screws, that allows air and water in if seals isn't perfect. Unscrew 6 Tex screws using Torx 5/32'' screwdriver, or Torque wrench, extension bar with T20 5/32" Torx socket and add Black Silicone to the edge of the metal cover, sealing the unit properly.

 
4. There is an additional housing cover that you can disconnect on the back of the headlight unit. (this is the cover that in this procedure we have not yet put back). This is held in place with two Tex screws on Left and right and at the bottom with a metal clip as outlined in picture below.

    
Unscrew the screws and pull the clip down, you can pop off the housing cover, (note there will be cables connecting to plastic cover, so be careful not to pull on those) If you already have this disconnected, like I did, you move onto adding add Black Silicone to the edge of the housing cover edge, so that when put back on it seals it to the headlight unit.
 
Put a thin line of black silicone on the edge of the lip, as highlighted below where red dots are and then put the housing cover back on and tighten up two screws and pull the metal clip up, to properly lock in place.

 
Where to put black Silicone on housing cover edge

    
Placing housing unit back on headlight unit

 
Install of screws


And push bottom clip up to lock housing from bottom


Unit is now all sealed and secure :)


5. Now you have completed steps 1 to 4 let the silicone set for 15-20 minutes. You now need to test if the unit is sealed properly. Best to do this part outside. You need to pour water over the top of the headlight unit everywhere. I used my hose pipe to have a continual supply of water and with-in a few minutes you will see if condensation returns inside the headlight unit or not.
    
I found no condensation even after 30 minutes and I left the headlight units outside in the cold too. Once you are happy all is good, using fiber cloth dry off any water on the outside the headlight unit.
 
« Last Edit: 23 March 2012, 05:41 by Madone_si »
Old Skool Mk1 Golf Gli (82), Mk1 US Cab 85 and 83
SOLD - BLACK SOY 92

Offline Madone_si

  • I live here
  • *****
  • Posts: 1,529
  • Seattle WA, USA and Middlesex, UK
Re: madone_si - A4 Avant 1.8T RED Quattro
« Reply #49 on: 23 March 2012, 05:40 »
STEP 11. You now need to repeat this whole process for you other Headlight unit. :)
 
STEP 12. This step is optional, but I found it a nice touch to keep that clean look to the front headlights, seeing as you spent all this time taking out the amber inserts, only to leave the amber side light bulb in, seems like the bulb needs a stealth look to get rid of the amber look still in the headlight unit , but still retain amber glow with in usage.

Parts required
   · Green tape 
   · Dupli-color Engine enamel Paint (can)
   · Spraying mask (health reasons)
 
Here is the step’s to complete stealth blub look :)
 
You need to remove the side light from headlight unit. You do this by turning side light rear handle to open position (you will see close and open on the back of the headlight unit) and then remove the side light unit.


You now need to remove the bulb itself from the side light unit, do this by pulling gently on the bulb and it will pop out of its holder.


You now need to using tape, tape up the bottom of the bulb so that the electrical part doesn't get any paint on it.


Now it’s time to paint the Bulbs to get that stealth look. Using Dupli-Color Engine Enamel Paint, which you can buy at local car specialist store or amazon. You spray each bulb evenly with one coat of paint, wait 5 minutes and then add another coat of paint on the bulbs until most of the bulb is covered. Please note any spraying of paint, should be done in a well-ventilated area and not in an enclosed room inside. I highly advise also to be wearing a correctly spraying mask which again you can get cheap on amazon.


Let the painted dry for while on the Blubs, I left mine for 1 hour.
 
I then removed the tape from the bottom of the bulbs and re-installed the bulb into the side indicator unit.

 
I then re-install the side light holder with the new stealth bulb back into the headlight unit and switched the switch to the closed position.


You have now successfully completed Stealth look on your blub for side lights :)
 
STEP 13. Time to temporary re-install your headlights back on your vehicle and test to make all the lights are working, which you can see the first picture all connected up to the Audi and second picture showing the side light working :)


« Last Edit: 23 March 2012, 06:25 by Madone_si »
Old Skool Mk1 Golf Gli (82), Mk1 US Cab 85 and 83
SOLD - BLACK SOY 92