Author Topic: ...joe - black mk2  (Read 37716 times)

Offline ...joe

  • Forum Supporter
  • Forum addict
  • *****
  • Posts: 6,294
bit of progress?
« Reply #20 on: 14 April 2005, 12:26 »
ok, things are almost falling into place!!!

my head is now all back together having been returned from being polished/ported and with all new valve guides, stem seals and valves with 3 angle cut seats. i pieced it up ready to be fitted to the block once i get theat back from being bored out.


the head was done by the same guy that did the 16 valve head tophers just bought and i can arrange to get others done if anyone is interested, cheaper than TSR and all of the other tuner out there and bloody good job too!!!

i also got a solid engine mount for the front. these deliver the power a bit better and apparently cause no increase in vibration so should be good.

by the way if anyone's interested in one of these mounts i can get them for you, i think they will fit all 8v and 16v and i know there was a prototype done for a vr6 so they should also be available. these are used alot on g60's with good results. pm me for more info if you want?

also the milltek down pipe that i was after which was designed by my friend john mitchell, for miltek (and only available through him) is a great bit of kit that shows big improvements on g60's. i wanted one of these to help out with removing the old gasses but couldn't justify the relatively high cost of them at the moment as i'd need to do some exhaust tweaks to get it on. they were designed for corrado's with a cat and my pipe is just a round end so i'd need a link pipe or a plate welded on the end of what i've got at the moment, to make it fit.
anyway one came up on ebay with only a few months use. as john is the only supplier of the i asked if he knew the seller and if so the age of the pipe. he said the guy who owned it had not had it long and had drifted to the japanese market and was breaking his corrado. i bid, i won, it turned up today!!!!


it looks kinda brown but is alot cleaner in the flesh so i was very happy and have saved some cash for when i get the exhaust adapted.

you can see the bore size is much larger than the exhaust manifold so should work well and my manifold is getting ported to match the head and the downpipe.


again...not that i'm trying to pimp parts, if anyone wants anymore info on these pipes i can get you in touch with john. topher will vouch for his knowledge!!!!
team grumpy....... its a way of life, not a forum post

mail@trimdeluxe.co.uk
www.facebook.com/Trimdeluxe

Offline ...joe

  • Forum Supporter
  • Forum addict
  • *****
  • Posts: 6,294
getting there eventually
« Reply #21 on: 18 April 2005, 11:37 »
well the bloke has finally got my block and is apparently doing it. i added that i wanted it a.s.a.p so with any luck it'll be back to me and pieced up soon.

other than that i cleaned up the engine bay a bit more, hid a few more wires and generally sorted things out. fitted one of the new bits of chrome in the form of a coil bracket. wow. added a home made 'chrome' cover for extra effect!!
 

here it is in place, with the home made coil cover......


ages ago i bought off someone on here a set of poly steering rack bushes. didn't really need them but they were so cheap! as the engine was out i thought i'd get round to doing them. i had an absolute nightmare as the bolts were in such a state that a few neede cutting off then one just would not drop out. i hammed the f**k out of it and it didn't budge, tried drilling it out but i think i must have had a sh!tty drill as i got so far then it all went blue and hardened even more!! in the end i got a blow torch and heated the subframe up and gave it another belt with the hammer and out it popped!!! wanting to do a proper job i had bought new bolts etc and the brackets as mine were rusty. they were sooo tight to fit i spent ages trying to get them on. i even took the steering rack out to try to get some proper force on the bastards but got there in the end. almost wish i hadn't bothered but they look alot better for it.


also i noticed that after a while of not driving my brakes had turned a nice shade of orange!! so i took them off, cleaned up the disc (easier than i thought it would be!) and painted the calipers. i had painted them black before to keep with the subtle look but i also thought this was a bit boring. so decided as my engine will be detailed with little bits of blue, and a certain brand of silicone hoses will go on eventually, that i'd paint them blue. they looked alright although i didn't do the best job, wasn't in the mood really but they look better than before. while the brakes were off i cleaned up the hubs etc and gave them a lick of paint too. also noticed that the coils of my springs are almost an identical colour to my fresh calipers! result!
here they are peeking out from behind my sh!tty winter sebrings
« Last Edit: 21 April 2005, 20:47 by gtijoe »
team grumpy....... its a way of life, not a forum post

mail@trimdeluxe.co.uk
www.facebook.com/Trimdeluxe

Offline ...joe

  • Forum Supporter
  • Forum addict
  • *****
  • Posts: 6,294
Re: gtijoe - low 'n polished mk2
« Reply #22 on: 21 April 2005, 20:44 »
things have been a bit stale. i hadn't heard from the guy boring my block out since he took it so i chased him up today and he told me he's been busy and would try to get it done tonight. fingers crossed!
as a result i'm not sure wether the car will be at inters or not? on the one hand the block is the last thing that needs doing and building it up and installing it shouldn't take a weekend to do, but on the other hand i'd like to have run it in and had time to sort out any niggles so not sure how its all going to work out....
so while i was bored i decided i'd colour code my roof spoiler so took it off and took advantage of the good weather and sprayed it up. my conservatory was roasting hot today so i left it in full sunlight to get baked on!!! here it is in place, looking good!!


while i was at it i gave my eyebrow spoiler another few coats as it had managed to pick up a few scratches since i did it.


and a quick pic of one of the most important mods i've ever done!!!! the infamous golfgti.co.uk sticker!!

team grumpy....... its a way of life, not a forum post

mail@trimdeluxe.co.uk
www.facebook.com/Trimdeluxe

Offline ...joe

  • Forum Supporter
  • Forum addict
  • *****
  • Posts: 6,294
well being a realist i'm not gonna make inters with me golf... i'll be there but just in a frickin astra!! mind you looking on the bright side the new astra is quiet, comfy, fast and being a turbo diesel very economical so i'll be shopping up at the show for finishing touches to the engine.

yesterday (bank holiday monday) i ad a spare day as my girlfriend was busy so with nothing to do i decided to smooth out the number plate recess in my front bumper. i've never really used filler before so i prepped it as i thought it should be and decided to go for it. the bumper had picked up a few dings from being on and off the car so much recently so needed working over anyway! it went alot easier than i thought. i used a piece of wood to get the radius of the front edge right then when it was pretty good i used some filler primer before sanding the bastard back. was surprised and pleased with what i achieved in the day. i guess because it was so sunny everything dried fast and speeded up the whole process. will get some pics before i paint it.

but towards the end of the day i get a knock from the guy doing my block saying he's got it outside all built up with the new pistons, new bearings as well as the crank, conrods, pistons all fitted and ready for everything else to be bolted on!!


got all the gaskets apart from the metal g60 head gasket i'm going to use for piece of mind. so my evenings will be putting as much together as possible until i can get a free weekend to stick it in the car.

i also got hold of some chrome rings to go round my dials from a guy in germany. they look cool but to be honest i'm a bit dissapointed. they don't even have any way of fixing them so i think it could be tricky to get them in place without making a mess. plus it means taking my dash apart AGAIN to put them in!!! mind you while i'm doing it i might put some blue l.e.d's in there or maybe even a dial kit as i've found someone who'll do matching faces for my VDO gauges. anyway, pics of the rings:


another slightly annoying thing... i got given a set of chrome bolts for the wings but when i went to fit them they were the small washer type and on removing the old ones it was obvious where the old ones had been so i'll need to do some crafty paint work to hide this descrepancy before i fit them. or i might wait till the wing gets the vent put in and get the sprayer to do the lot.
they look pretty though!


as i said at the beginning of this post, i'll be shopping at inters and i'll be after more chrome to go with the small pile i'm amassing under my bed! some bits are biiiiiig!!!!
team grumpy....... its a way of life, not a forum post

mail@trimdeluxe.co.uk
www.facebook.com/Trimdeluxe

Offline ...joe

  • Forum Supporter
  • Forum addict
  • *****
  • Posts: 6,294
Re: gtijoe - low 'n polished mk2
« Reply #24 on: 05 May 2005, 20:16 »
just a quick update..... Mix gave me a hard time for posting on here instead of building my engine up ..... so i stopped posting and i built it!!! well, most of it. the bottom end is as built up as it needs to be and the head is all done. i just need the odd bit and a free weekend before it can go in the car. still a bit miffed its not gonna make inters but at the same time its quite exciting that its all coming together!
team grumpy....... its a way of life, not a forum post

mail@trimdeluxe.co.uk
www.facebook.com/Trimdeluxe

Offline ...joe

  • Forum Supporter
  • Forum addict
  • *****
  • Posts: 6,294
Re: gtijoe - low 'n polished mk2
« Reply #25 on: 16 May 2005, 18:35 »
engine is as built as i want it to be before putting it in, would have done it at the weekend but got held up by frickin rain and my inlet manifiold is still at my mates house. might have to hurry him up with it!!! bought a few bits at inters for it and got given a bit more bling. i then found a local chromer who's got a few more bits. wish i'd founbd him sooner as they are quite important parts in order to get the car moving!!!
team grumpy....... its a way of life, not a forum post

mail@trimdeluxe.co.uk
www.facebook.com/Trimdeluxe

Offline ...joe

  • Forum Supporter
  • Forum addict
  • *****
  • Posts: 6,294
Re: gtijoe - low 'n polished mk2
« Reply #26 on: 24 May 2005, 22:32 »
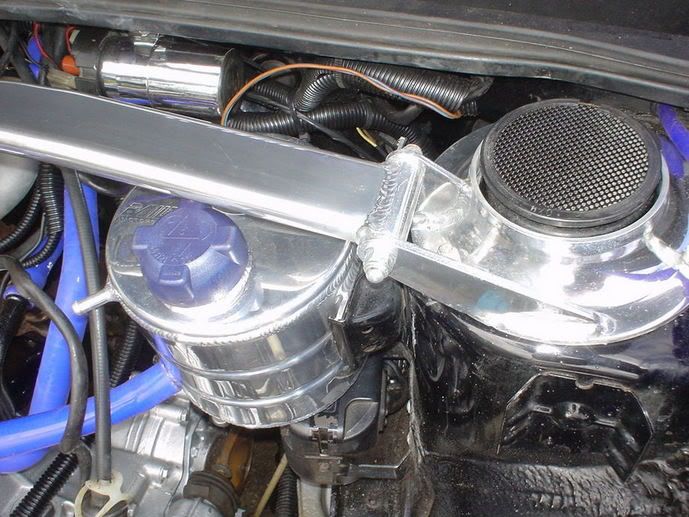
a few pics showing the nice bits that i picked up at inters:


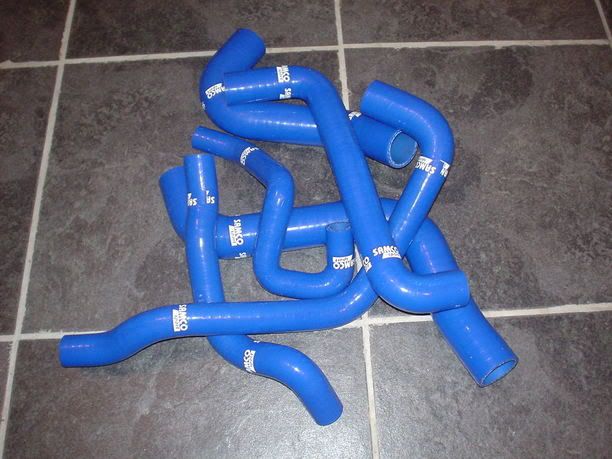
put them all together to get a bit of an idea of how it'll look, to be honest i was a bit excited about it almost coming to an end!


got held up by waiting for my manifold to get ported. it wasn't johns fault, i did tell him i wasn't in a rush but then everything came together quite quickly so i had to hurry him up. i never realised how long they take to port out but each one takes the best part of three hours and when you see the difference you can see where the time goes!


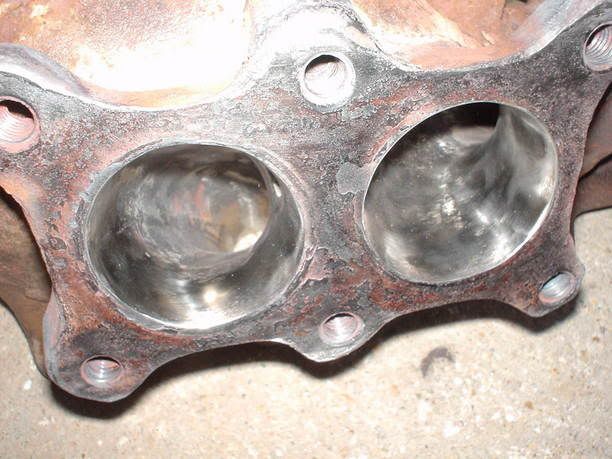
it still looks kind mingin but thats the nature of manifolds i suppose! you can see how much larger it is and is now as big as the gasket and milltek downpipe so in theory there should be no restrictions for the exhaust gasses to escape!

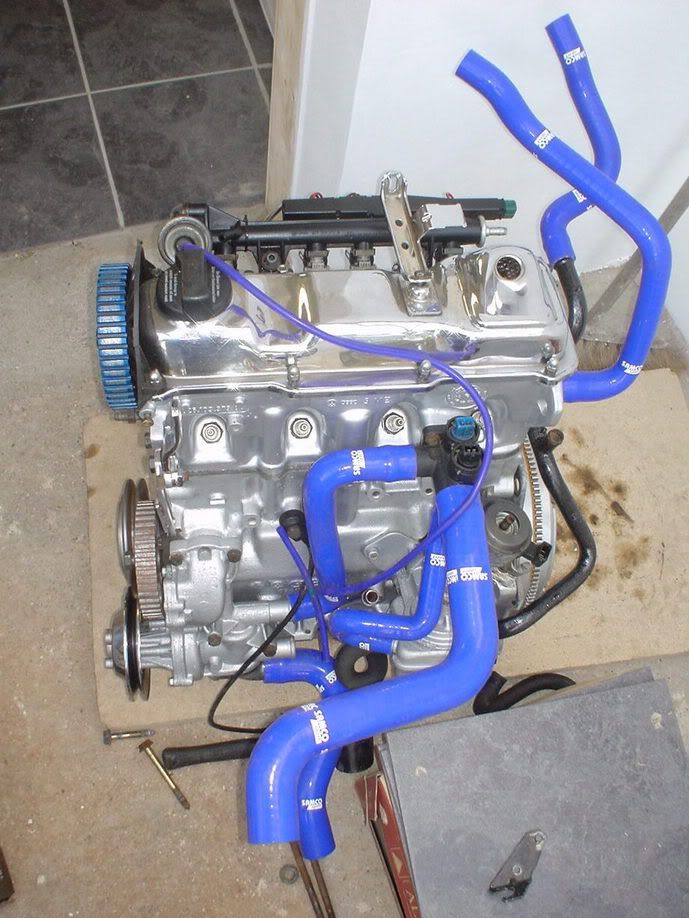
so with the manifold back i built the engine up with as much as i could apart from the gearbox. i used a metal g60 head gasket as reccommended by john. its a serious bit of gasket alright!
then as i had a saturday free form my girlfriend i decided i'd get it done. i got up early and after a cup of tea went to vw to get the new studs to put in the exhaust manifold. disaster! they didn't have them!! went to german and swedish, they didn't have any!!!!!! so just as i was beggining to panic thinkiong that i'd have to wait even longer to install my engine i passed a tyre place and thought i'd give them a try........ two minutes, six new studs and the bargain price of a quid (!) i was home fitting the studs and dragging the engine outside on a sacktruck. the bloke who was meant to be lending me the engine hoist that i took it out with was no-where to be seen so i built up more and more putting all the hoses and gearbox on and waited for him to come home.
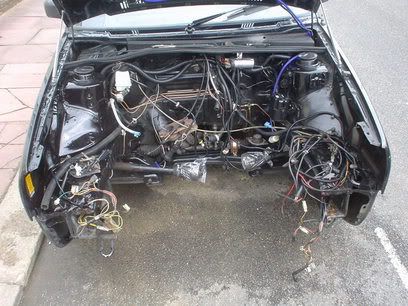
heres the car as it looked early saturday morning:


the hoist guy came home....without the bloody hoist!!! i could've killed him as he said he'd drop it off in the week, so now i was twiddleing my thumbs with no-more i could do, so i told him i was off to a scrapyard and he promised me he'd have it by the time i got back.
one of the parts thats still at the chromers is the intermediate shaft pulley, which is quite important!! so i went to a scrappy to try and find one so i could at least start it up. spent ages but got no-where. found three but could i get the f**k*rs off??!? i was begginning to lose my rag so i decided to go home and,with luck, get the hoist off alan and put my engine in.

got home, no alan, no hoist!!!!

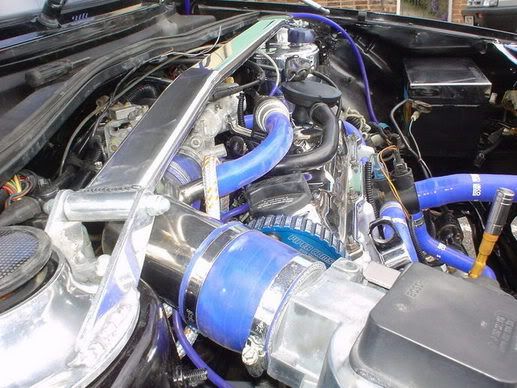
he turned up at almost 4pm when it had started to rain!!! arseholes. but i thought i'd get as far as i could, i wasn't happy with the hoist and the cables i had to lift the thing with but had to go with what i had which meant a bit of juggling to get it lined up on the engine mounts.


but it got there:


i love the fact that you can take the whole front off golfs with a few bolts! makes life so much easier so once i'd got the gearbox mount lined up i bolted up the front crossmember with the front mount in place then dropped the engine onto the rear mount.
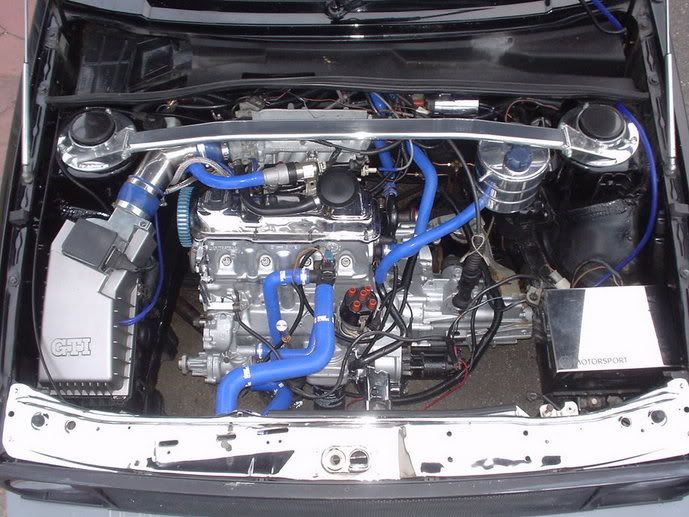
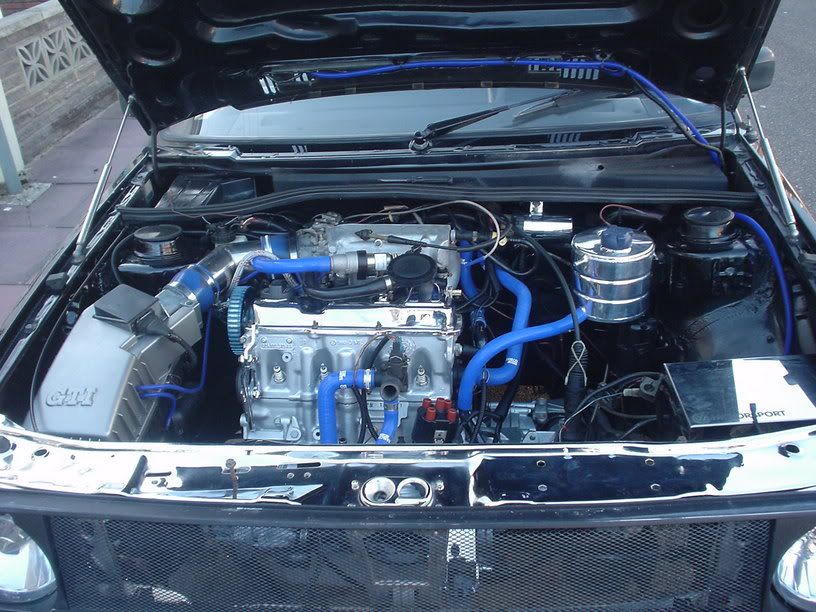
from then on it was a case of plugging wires in and plumbing hoses in. while i was at it i decided to put my new chrome slam panel on and built as much as i could. all that was left to do was put the radiator in (when it arrives) and bolt up the drive shafts, put the pulley on, time it up and then fit the alternator. the only reason i haven't fitted it yet is because i'm intending on polishing it up.

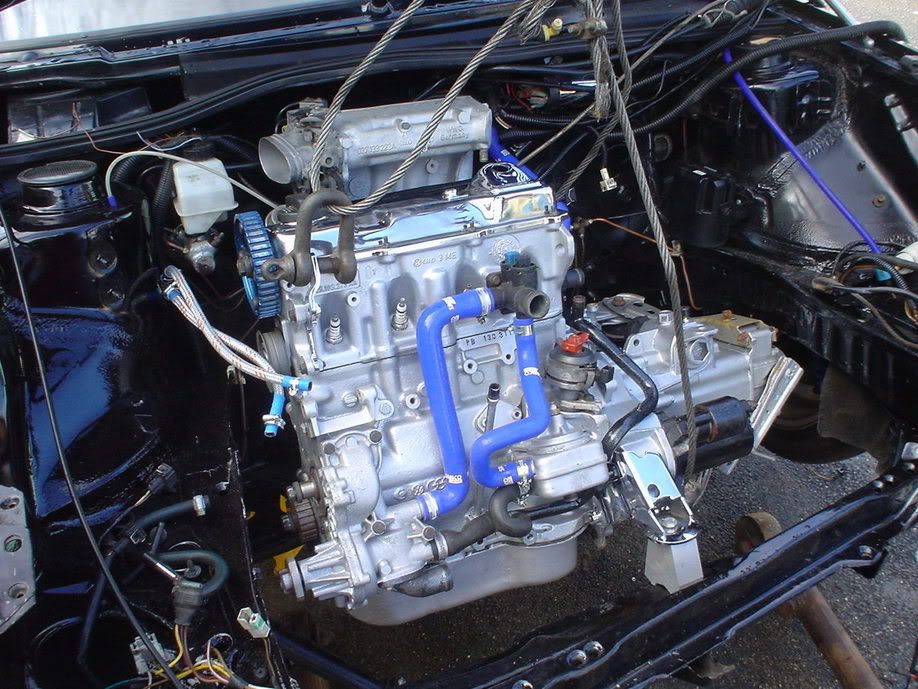
some pics of my engine in place:


« Last Edit: 24 May 2005, 22:40 by gtijoe »
team grumpy....... its a way of life, not a forum post

mail@trimdeluxe.co.uk
www.facebook.com/Trimdeluxe

Offline ...joe

  • Forum Supporter
  • Forum addict
  • *****
  • Posts: 6,294
Re: gtijoe - low 'n polished mk2
« Reply #27 on: 24 May 2005, 22:37 »
i'm now at the stage where i want to get it running so i have time to sort any problems for the coming local meet and definately for stonor park!!!

so i went round to johns and got a spare pulley that he had laying around and while i was there i picked up one of only three exhaust pipes he had made by milltek specificaly for the mk2 which allow the fitment of that awesome downpipe and the remaining system from a g60 corrado. which i may do at some point but to be honest i like my rear box and am gonna try to mate up my old system first and see how i get on.
pipe looks like this:
team grumpy....... its a way of life, not a forum post

mail@trimdeluxe.co.uk
www.facebook.com/Trimdeluxe

Offline ...joe

  • Forum Supporter
  • Forum addict
  • *****
  • Posts: 6,294
almost finished????
« Reply #28 on: 06 June 2005, 22:12 »
well a bit more of an update.

it seems its only when yuo start putting things back you realise how much there still is to do! after faffing around with the exhaust sections i eventually had to make up a combination of old exhaust and new pipes. it meant i couldn't use the new silencer but milltek said they will modify the pipe so it can be added on. which is very good of them.


i then went round the car finding all the little things i had to do before i started it. i think on some level i was putting off firing her up 'just in case' it all went wrong. having never done anything like this i found it very scary! i cleaned up a bit more wiring loom, and waited for my new radiator to turn up. i used to use a big ass radiator off a turbo diesel jetta as it fills the front of the car, but with my new samco hoses it wouldn't fit so i bought a brnad new one off ebay. i waited for the guy to get in touch and in the end i drove to his on a friday night so i could crack on with it on the saturday. he was a good lad, had just bought a 20vt rallye that needed a large amount of tlc, so i left him to it with his potential 4k spend to get it back to a reasonable state! kinda put mine into perspective a bit but his should be putting out almost 300bhp!!

so anyway, got up saturday, fitted radiator, filled cooling system with vw coolant (the cool pink stuff) and genuine vw oil filter and vw quantum sytna silver oil. realised i hadn't bled the brakes so did that with vw brake fluid as well.

so that was it no more stalling.... i had to start her up! connected the battery and everything seemed fine, turned the key ISV buzzing, fuel pump primed, turned key fully............. nothing. much. starter motor wasn't kicking in, so i took it off, had a fiddle then assumed i had forgotten a wire somewhere. called my mate john who said he'd test the motor if i went over. it all came down to the fact that as i was happily painting evrything, i didn't realise the starter motor gets its earth off the gearbox...which i'd painted! so i filed it off made sure i had a decent earth on the gear box and tried again.

as the engine has had pretty much everything rebuilt it was sooooo tight i stuck an extra battery on it to give it some ooomph and wahey, it fired up and ran sweet!!! if you could've seen the smile on my face!!! i let it run, for a bit turned it off and checked for leaks. all seemed clear so i started up again and let it get up to temperature. i was one happy chappy!
« Last Edit: 07 June 2005, 22:05 by gtijoe »
team grumpy....... its a way of life, not a forum post

mail@trimdeluxe.co.uk
www.facebook.com/Trimdeluxe

Offline ...joe

  • Forum Supporter
  • Forum addict
  • *****
  • Posts: 6,294
Re: gtijoe - low 'n polished mk2
« Reply #29 on: 07 June 2005, 22:00 »
so thats my engine pretty much sorted, i still hadn't driven it as i'd sent the gear shift linkage off to the chromers with my intermediate shaft pulley, but i had borrowed one from john to get it running.
i went to a scrappy and got the relevant parts to set the gears up so i could drive it. faffed around went out got majorly pissed at a mates birthday so never got round to doing the gears. i had called into the chromers to see how the bits were coming along after they had failed to do them by their original date and low and behold they were done!! so i ran off to get some cash before picking them up.
 
i f**kin love chrome!!!

anyway with my new shiny bits i went out and fitted them. the gearshift set up needed a bit of tweaking to get sorted but added to the new bushes made for a sweet set up. i also fitted the blinged up pulley and took some arty photo's!!


the only problem i have with  having a nice amount of chrome under my bonnit is that it highlights all the crappy bits but on the whole i'm pretty chuffed with my efforts.

but as with all things good some thing will always come along and piss on you!! i came home from work and saw a little puddle of oil and feared the worst! i got under it and all i could see was a drip coming from one of the exhaust manifold studs. i checked them for tightness and found that one had chewed up the in the head. when the car was running the oil appeared to be coming from this dodgy stud so i began thinkign the worst! now i didn't think that any of the studs passed through an oil way but i let it play on my mind. i fired a few questions at a few people. you know how little things grow out of proportion when theres nothing you can do at that moment in time? so once i'd got my rational head back on i cleaned everything up and sourced the leak down to a damaged rocker cover gasket, simple swap was all that was needed but that took place on one of the busiest days of the project so far!!! that'll come next!
team grumpy....... its a way of life, not a forum post

mail@trimdeluxe.co.uk
www.facebook.com/Trimdeluxe