Author Topic: DUB be good to me! - mk1 resto project  (Read 16042 times)

Offline jv

  • Administrator
  • Serious forum addict
  • *****
  • Posts: 7,212
DUB be good to me! - mk1 resto project
« on: 25 April 2006, 20:39 »
:)
Buy site stuff!
GolfGTI.co.uk - merchandise

Support the forum charity!
Forum Charity

Offline DUB be good to me!

  • Not said much yet
  • **
  • Posts: 16
  • Dubbers do it in the fast lane!
Re: DUB be good to me! - mk1 resto project
« Reply #1 on: 17 June 2006, 19:38 »
Right then boys and girls, its  resto time!!!
Thanks to jv for sortin this out, (sorry for my delay, had a REAL busy few weeks :evil:!)
Where to begin my tale..........
I guess it all started bout 10 years ago, i was fitting some windows for a customer and he had a grey X reg 1.6 mk1 golf gti for sale, it was all sound on the underside etc, but had been stood for a few months, so abit of hagglin and waving of pound notes he handed the keys over for a mear £500!!!!
All was good for about 8 months, then a quick trip to a local independent vw garage saw me lookin at a nicely modded mk1. i had to have it! so a qucik fone call, and a good chat later i took away this mk1.
All was good for bout 3 years, just routine serving etc.
1 day i got a call from a mate of mine who was a valeter, he said a guy had just part ex'd a mint red Lreg mk3 VR6......a quick trip to see it, and test drive later...i was smitten.....a week later i got the funds together and perchased the mk3 golf VR6!

At this point i took the mk1 off the road and stored it in my garden, where it stayed for 3 years!
I later part ex'd the VR6 for a T plate 328i BMW convertible, i got board 1 weekend so went shopping!
Anyway, bad things happened and i had to get rid of the beamer :cry: and get the mk1 back on the road.
I ran the mk1 till last november when i got board again so turned to the darkside and purchased a H plate escort RS Turbo..thats been emotional!
I eventually got hold of a big garage for the right price and put the mk1 into storage again, till april this year when i thought i miss the mk1, so instead of "patchin" it up, why not restore it...so hear i go....!
PS sorry for the waffle.... :laugh:

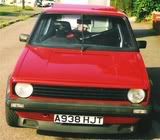
This is kinda how it looked when it was on the road and pretty clean! (im sure some1 out there prob reconises the car)


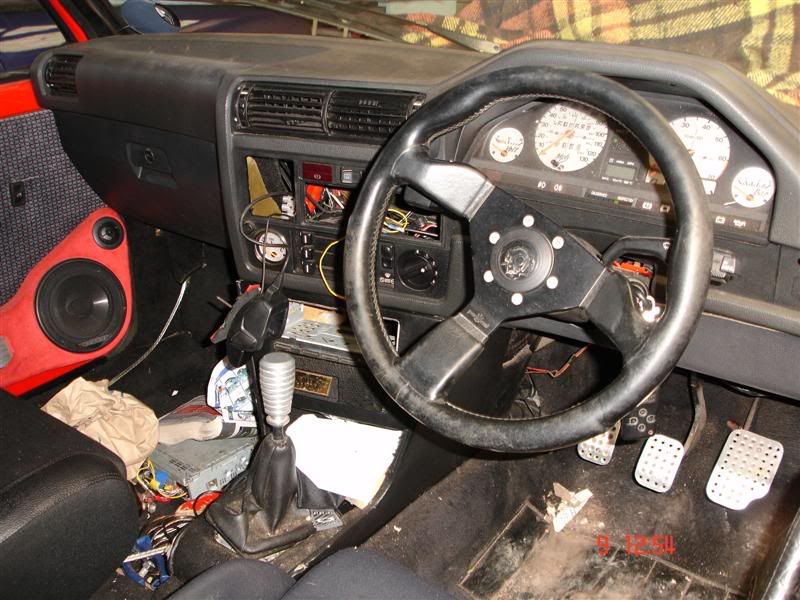
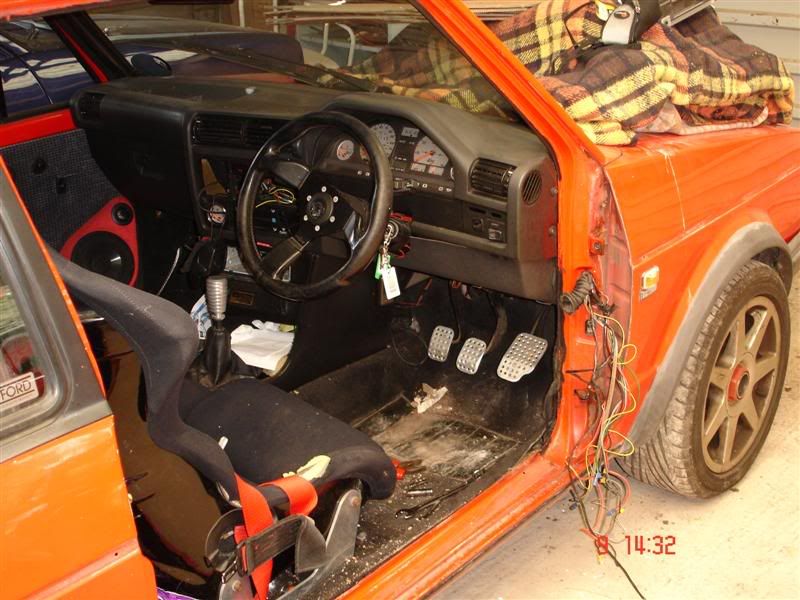
A view of the inside...classic 90's mod with an old 3 series bmw dash conversion
[/img]
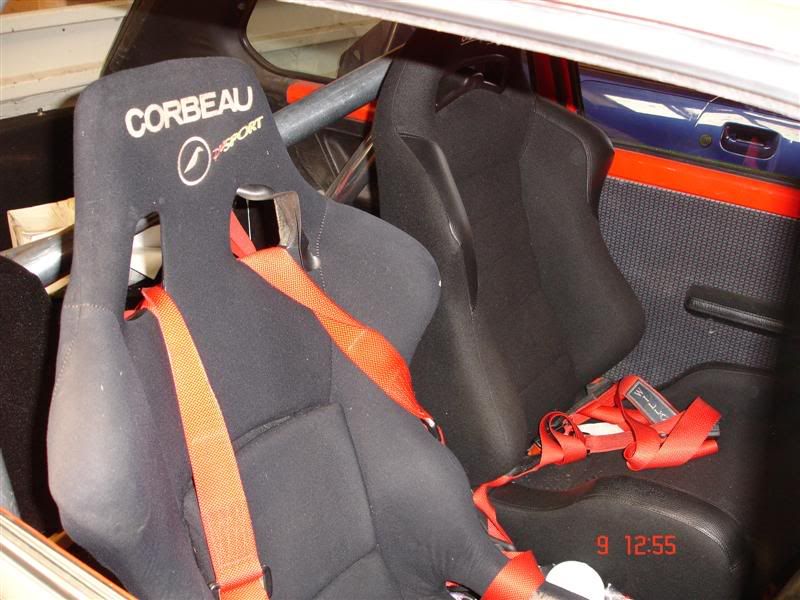
the bucket seats and harnesses (passenger 1 different as i was tryin somin new!)
[/img]
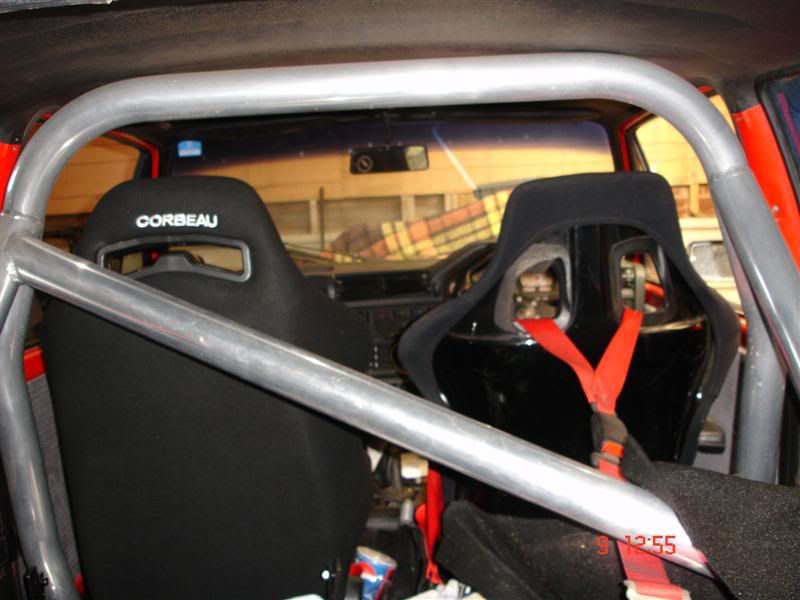
A view of the "chunky" cage
[/img]
So it begins...
[/img]
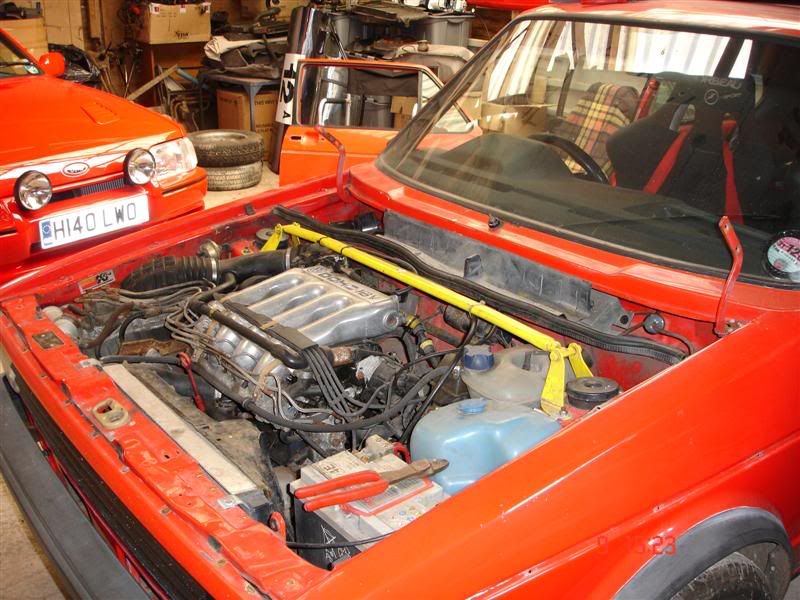
Bonnet off and good shot of engine
[/img]
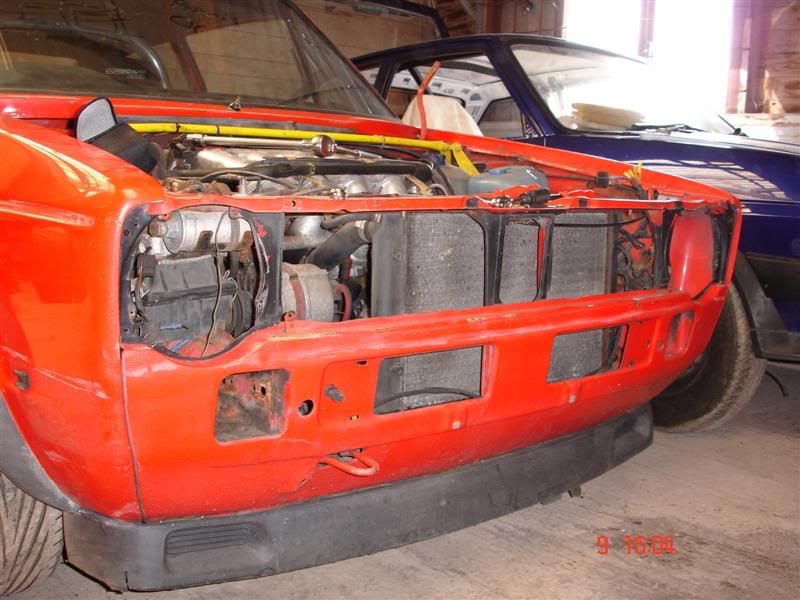
front grill, lights etc off
[/img]
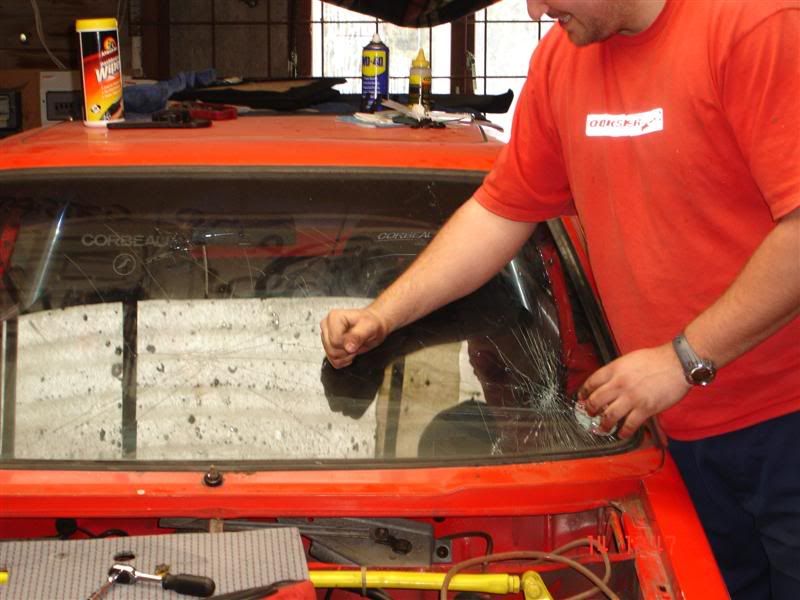
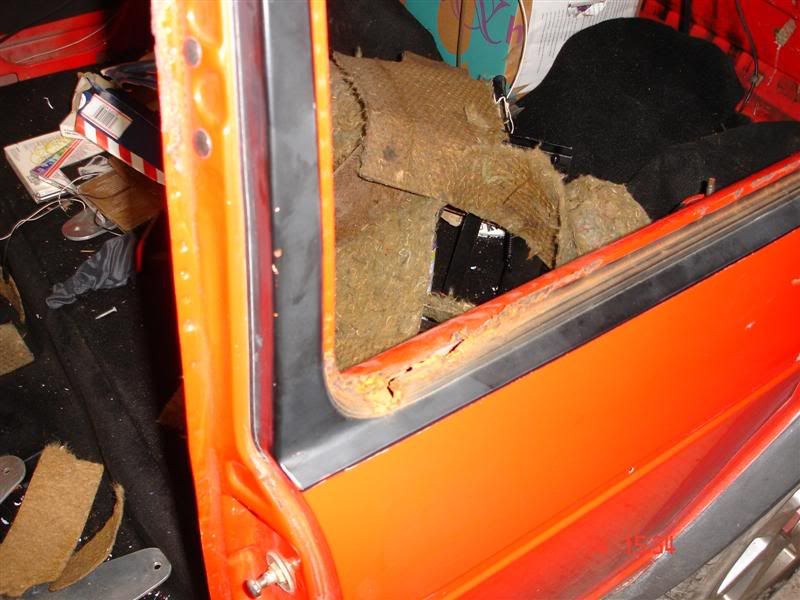
got all the glass out without breaking it except for the windscreen, it cracked so my mate decided to put his fist on it!!
[/img]
All glass out, doors, bonnet, boot and rear carpet etc out
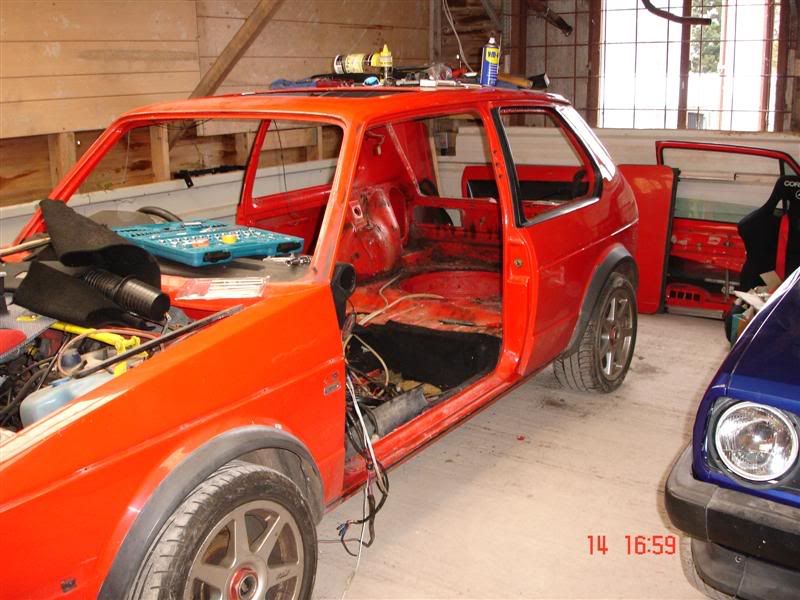
[/img]
This is about the worst bit of rust on it! not bad for a 23 year old shell!
[/img]
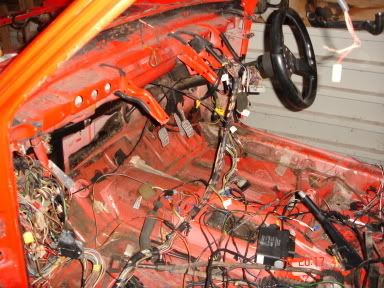
The dash, front carpet etc removed, ready to pull loom thru!
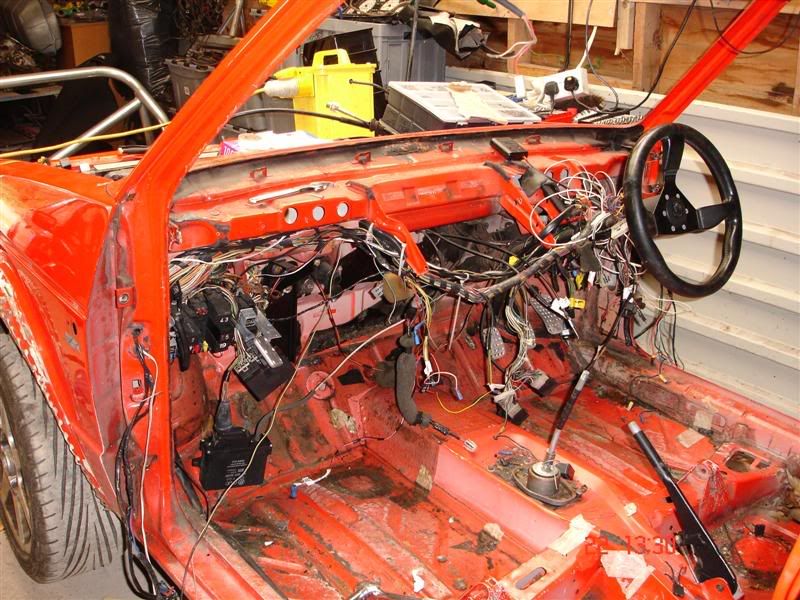
[/img]
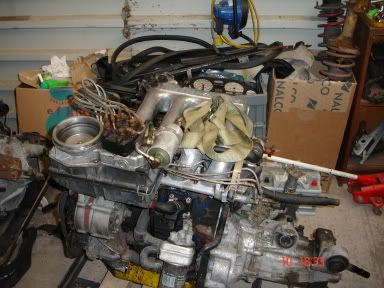
Inlet manifold removed to get the exhaust off, and all engine wiring unplugged!
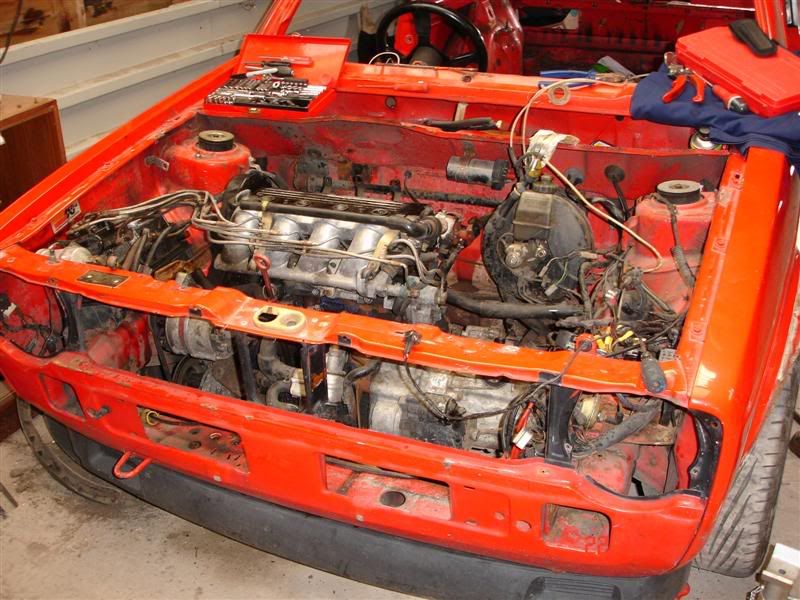
[/img]
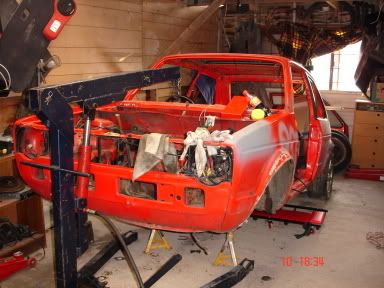
This is it! its up on the stands.......!! At this point everything was going well, untill i got to the hubs.....!
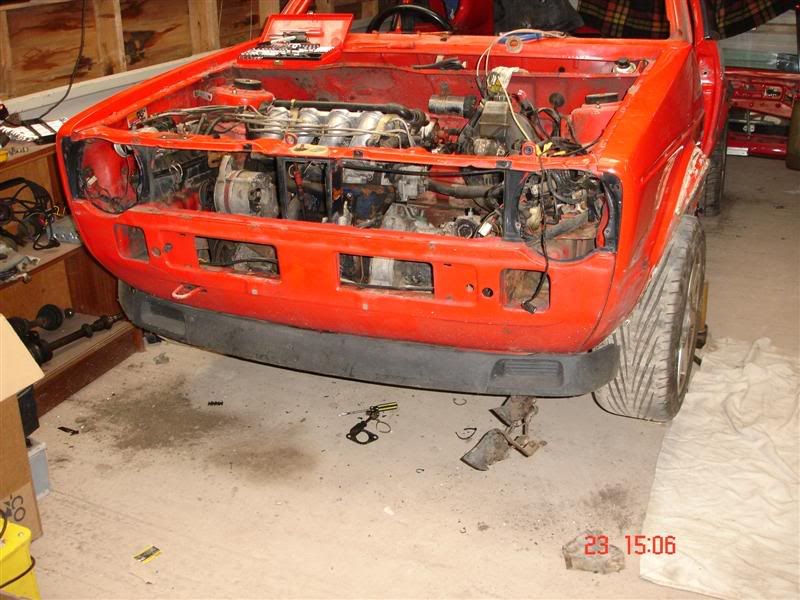
[/img]
Got the strut off, but the hub was a git ti do, so ended up taking all off in 1! Makes it abit more difficult to spilt when its off the car, but needs must etc!
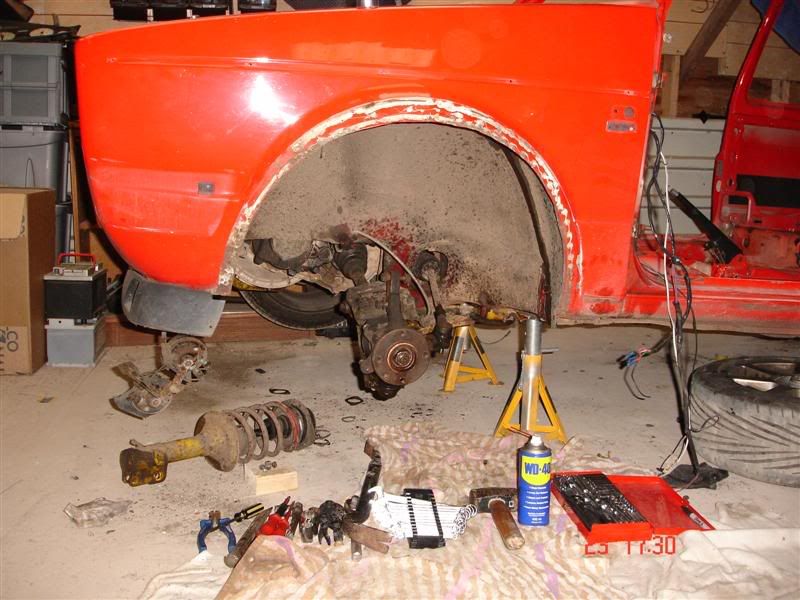
[/img]
All the wiring unclipped and pulled thru the bulkhead, nice and easy that job, just not looking forward to puttin it all back!!!
[/img]
WOOOHOOO, the engines out!! another milestone reached! and it was surprisingly easy to do, and gave minimal hassle gettin it out!
[/img]
What have i done!!!!
[/img]
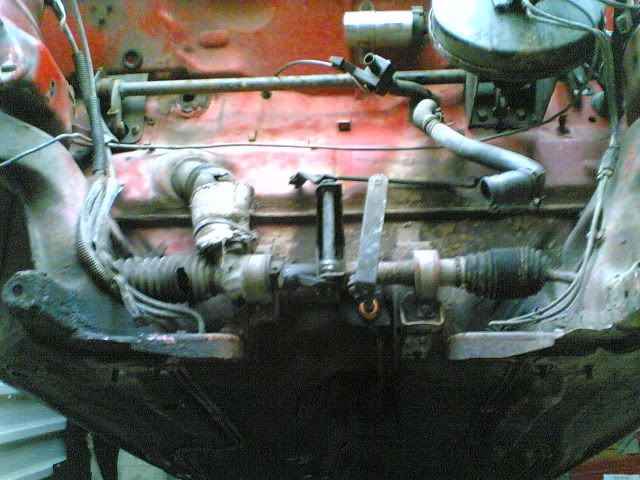
With the engine out i decided to hook the car back up to the engine hoist and lift the whole thing up, thus making it easier to take all the brake lines, steering rack etc off, why struggle eh!!
[/img]

got ot get more pics off my camera tomorrow! In the meantime, im trying to hunt down a  20v turbo engine with clocks full loom running gear etc, for the right price!(not worried if engine runs or not as i will be modifying it as the project goes on!)
« Last Edit: 14 July 2006, 20:38 by DUB be good to me! »

Offline DUB be good to me!

  • Not said much yet
  • **
  • Posts: 16
  • Dubbers do it in the fast lane!
Re: DUB be good to me! - mk1 resto project
« Reply #2 on: 09 July 2006, 18:50 »
well finally its update time, been a little pre occupied, was in car crash few weeks ago, so that kinda slowed things up abit!! anyway, on with the update.....

All bare, just the fuel tank+pump etc to come out, then its off to shotblast!
[/img]

got the 1st wing off and was well happy :smiley:....zero rust, but a bloody lot of wax-oil...better that way than none at all!!
[/img]


Marvellous :shocked:, new bits!!! handy when you know the right people....got them for an absolute bargain!! just the lower front valance, fuel filler neck to come!
[/img]


few bits clenaed up and painted, didnt really plan to do this stuff until the car was in body shop, but.....!


was feeling a little worse for wear today :sick:, so just "trial fitted" the new wing...fits really well, just a bit of adjustment needed when in for paint, but otherwise, looking good!


Thats bout the extent of it for a min, not done too much really due to car crash etc, had to take it easy etc.....going out this weekend tho with my shopping list!!! need to find engine etc, dash, and also a trip to GS&F & Euro car parts for the new parts etc.....wont be going out this weekend i feel!
well thats it for now, take it easy guys, will update soon! ps, if anyones got a polo mk5 dash, or a 20v turbo engine (broken or workin) in the devon area, please PM me, cheers all! :cool:
« Last Edit: 14 September 2007, 19:15 by DUB be good to me! »

Offline DUB be good to me!

  • Not said much yet
  • **
  • Posts: 16
  • Dubbers do it in the fast lane!
Re: DUB be good to me! - mk1 resto project
« Reply #3 on: 14 September 2007, 19:16 »
Blimy..has it been over a year!!! where does the time go...guess its time for small update....

After carefull thinking i thought, hmm...lets go for the 16v G60..tracked down the right manifold etc...but it didnt stay for long..


Got hold of a nice lupo dash! Fits really well, and the airbags hadn't gone off...bargain!


also got hold of some corrado rear seats, the bucket type, and fitted them...knew keeping that old PVW mag would come in handy to show how to fit them!


Also wanted to fit some RS turbo seats, but was too cheap to buy the subframes, so got busy with the grinder and welder and set about making 2 frames...not a bad result...


and hey presto...it worked!!..


2 RS Turbo seats fitted, secure and fully working!!!(just in need of re trim at later date!)


Started to cut the shapes to fill in the gaps beside the back seats...will get trimmed up along with seats etc


Got abit board on ebay 1 night and stumbled across a bargain....can you guess what it is yet...?!!!


Oh yes! lovely vr6! had a mk3 version couple years back and loved the sound and performance,so decided to go for it!(also got custom suspension set up getting made for it, to compensate for the extra weight on the front so finger's crossed it'll be ok!)


had to temp fit all the old shocks, hubs etc to give me position of engine etc


Got the engine in the bay, and correct location, also tied some string lines across the top to give me correct height etc, you can just make them out..


went shopping 1 weekend,got a few bits...


and a few more...


hope they fit....ebay if they dont!!


Bonnet on?? its never finished??


TA DA!! its all in and fitted on the custom mounts i made up!, all straight etc, and perfect height!!


plenty of clearence there..


started to get the brakes etc trial fitted to make sure everything fits in, and if it doesnt...then make it fit!! Had to change the blanking plugs on the master cylinder, as the engine loom wouldn't have fitted!


Also had to relocate the Header tank, it looks tight, but there's a gap between them!


Got all they shifter box and cables run in, and connected. Decided to weld a cover over the original opening and go for internal fit...works perfect with the height of seats etc!


Now the engine bay is all but done, i dropped the engine out and set about getting the shell on a Roll-over jig..(borrowed from a friend of mine in the RS owners club!) wicked things, and well worth getting!!!


can just make it out...Original panels...good old underseal's!!!


Was going to get it shotblast, but decided to strip it myself, for more personal satisfaction etc...(would shotblast next time tho!!)


Started to plate over the holes that were made from the old bucket seat sub frames before!!...All rust treated plated and red oxided before LOTS of new underseal!!


have got more pics to post, but not got them on me pc yet so bear with me!!!
Take it easy guys and gals!

Offline DUB be good to me!

  • Not said much yet
  • **
  • Posts: 16
  • Dubbers do it in the fast lane!
Re: DUB be good to me! - mk1 resto project
« Reply #4 on: 19 February 2008, 22:29 »
has it been this long since last post! blimy! Right, where to start....

found a few nasty bits as i stripped off the old underseal...


but nothing i couldnt sort out!!


and with that side of the floor pan/cill sorted, i temp preped it(just for somin to do as i had a hangover!! :sick: :embarassed: )


and red oxide'd up to help keep the gremlins at bay till the spray booth!


i then set about stripping the old underseal off the wheel arch aswell, and rust treated it all, and new seam sealer all round


had the other side of the cill to do aswell...


and with that, the whole floor pan is done...check out all the seam sealer runs!!! smelt great!, must remember to open doors when applying this stuff...woooo!(gotta love my welding mask in the background aswell!)


So with all the seam sealer dry, i set about spraying on about 4 coats of stone chip.....yes 4, it still looked abit thin in places so done another coat, just to make sure! :laugh:


So with all the floor pan rust treated, seam sealed and LOTS of stone chip..it was time to paint!


couldnt resist just placing on the new front wing...


a pic of the underside of drivers side engine mount


all the underside finished! Phew! would defo get it shot blast next time round! But as it was my 1st project i wanted to do as much as possible!


i wasn't that happy with the original front engine mount i made, so i made up a new removable 1 which also bolts up the the bumper mountings aswell as using the old mounting points on the core member(which has also has stregnthening bars added to stop twist etc.


I started to grind out the old sopt weld on the lower front valance and all of a sudde this appeared!


with the front valance off it was in need of good clean up,(no welding, except for the new strengthening bars for new engine mount) rust treated, red oxide'd and undersealed now.


front valance off


so with all that i can do on the underside, and as much as i can do on body work done i started to make up the new brake lines


and into the rear compensator...


also started to get things back from powder coat so just placed them back on so i dont loose them!


the old fuel pump brakets looking shabby....


and now not so shabby!


got the rear beam back from powdercoat, and new rubbers and genuine ARB clips etc fitted


rear disc conversion going back on..stub axle, backplate etc fitted


1 side finished, new girling 38's fitted along with green stuff fast road pads on a brembo solid rear disc,(had X drilled on before, but didnt see much benifit so went solid this time!)


wasnt happy with the colour on the new rear calipers, so got them coated up black, to match the fronts..


Rolled the car back to the top and set about added/finishing off the engine mounts...(the welds have now been ground down flat and temp coat of red oxide sprayed on.


and the other side..


Thats about it for now, ive been let down abit by a guy who was going to do my bodywork/spraying, so im in the middle of sorting that out! in the mean time i gotta get hold of AVO and get custom suspension ordered, also need to get new front brake setup ordered aswell as taking the engine to a vw friend of mine to have all new seals, chains, guides valve stem seals etc done, and also trying to track down a sump and oil pump from a mk5 vr6(as these are smaller and will give abit more clearance to the road!
have fun and keep on dubbing!

Offline DUB be good to me!

  • Not said much yet
  • **
  • Posts: 16
  • Dubbers do it in the fast lane!
Re: DUB be good to me! - mk1 resto project
« Reply #5 on: 03 April 2008, 20:26 »
so much to report!!! the body work is finally on the move!!!!!!!! :laugh:

went hunting the other day to try make things easier for the guy doing all my wiring, and came across a perfect doner car..so robbed the loom...


and while i was there i thought hmm...cant be doing with a pants old mk1 blower unit(truth is i priced a new matrix rad thing and it came in at £170!!!!!!!!!!) so i robbed this 1 from the lupo aswell!!

(i know what your thinking..that lupo heater wont fit..lets just say its been emotional!!)

i didnt want to remove the front rain tray as everyones doing it, but with the new heater box going in, i really had little choice..


and its gone!!, but i havent thrown it away, oh no!! im keeping hold of that just incase...!!!!! :wink:


now here comes the magic!! dont judge too quickly....patients and abit of common sense and anything will fit!(shame i dont have any of those qualities!!!!!!!! :shocked: :grin: ) i had to widen the original hole, and also had to cut part of the firewall..i got a wrong line, hence theres 3 cuts! his has to be done to allow the blower box to sit further back so the dash fits..


you see, i told you it would be ok! once the correct position was sorted i then had to weld in new sides, and add some angle support in to put the strength back in that area, also had to make new weather lips, but decided to make a small cover for it instead.


in the words of jim carey...LLLLLLike a glove!!! 1 lupo blower box fitted in a mk1 golf! (ignore the cable holding the left side of the box, i havent got a more recent pic of it all fixed, but its perfeck now!


small bit of filler and temp prime just to stop the brown stuff setting in and now its onto the pollen filter!, Pollen filter i hear you ask? A mk1 doesn't have a pollen filter? with the lupo blower in, this 1 does!!!


i havent got a close shot of just the pollen filter area, but you get the idea with this 1(far right hand side).. also done in this pic is the new top bracket for the brake servo unit and the new wiper motor mounts...so much fab work on this area!!


slightly closer pic of filter area etc


bodywork is all go finally!


inner arch area being prepped etc


outter arch all cut out and ready for new


outter arch


the old...

the new...


horrible inner arch just before cut off


all out and ready for new


busy with the welder..


1 nearly done..


new inner inc lip cut back for wheels and tyres etc


1st light skim of filler and primer on just to stop the brown stuff till it goes for prep


the rear 1/4 window lip being re done


working in london at the moment so cant get to work on it as often as i'd like, but should have more pics soon! cheers all